Adobe · Platform not recorded
Create Realistic Book Mockup in Photoshop - Tutorial & Template
Original source date
Answer
Step-by-Step Guide: Access the Template: Begin by visiting the Envato Elements page. Here, you can access a wide array of creative resources, including the book cover template you need.; Sign Up for Envato Elements: By registering with Envato Elements, you not only get the specific book cover template but also gain access to a vast collection of add-ons, plugins, and other Photoshop templates.; Download the Template: The process of downloading is straightforward. Once you select the desired template, it will download to your computer, typically landing in the 'Downloads' folder.
Downloading and Extracting the Book Cover Template
Step-by-Step Guide: Access the Template: Begin by visiting the Envato Elements page. Here, you can access a wide array of creative resources, including the book cover template you need.; Sign Up for Envato Elements: By registering with Envato Elements, you not only get the specific book cover template but also gain access to a vast collection of add-ons, plugins, and other Photoshop templates.; Download the Template: The process of downloading is straightforward. Once you select the desired template, it will download to your computer, typically landing in the 'Downloads' folder.

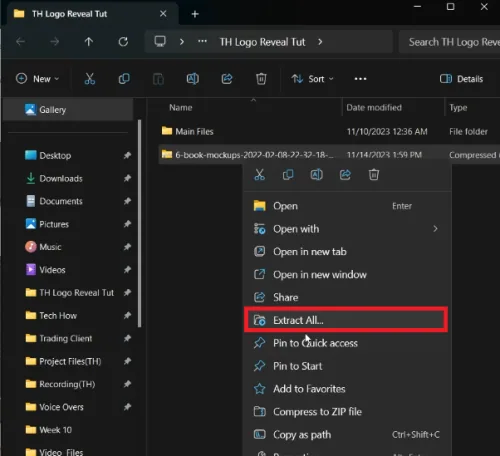
Extract the Files:For Windows Users: Locate the downloaded .zip file in your Down…
Extract the Files:For Windows Users: Locate the downloaded .zip file in your Downloads folder. Right-click on it and select 'Extract Here' or 'Extract to [folder name]'.For Mac Users: The process is similar - find the .zip file in your Downloads and double-click to automatically extract it.; For Windows Users: Locate the downloaded .zip file in your Downloads folder. Right-click on it and select 'Extract Here' or 'Extract to [folder name]'.; For Mac Users: The process is similar - find the .zip file in your Downloads and double-click to automatically extract it.; Open the Template in Photoshop: Once extracted, open the folder to find the Photoshop file. This file contains various book cover design templates for you to experiment with. For this tutorial, focus on customizing the first template provided. Note: Make sure you have Photoshop installed on your computer to open and edit these templates effectively.
Customizing Your Book Cover in Photoshop
Easy Steps for Personalization: Open the Template: Once you've opened the book cover file in Photoshop, you’ll see a nearly finished design. But there's room to add your personal touch!; Navigate the Layers: In the Photoshop interface, focus on the 'Layers' section, typically located at the bottom right. Here, locate and open the folder named "book." You'll find four 'Smart Object' layers inside, each allowing customization of different elements in your design.

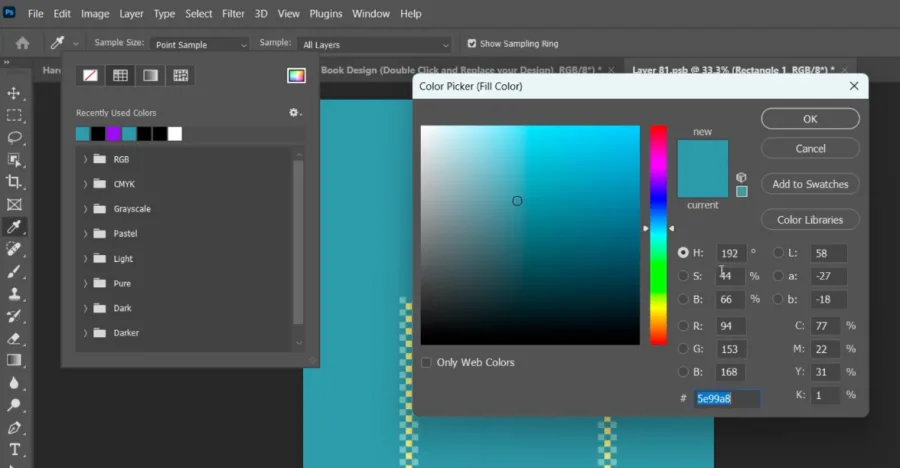
Modify the First Layer: Covering Existing Logo: Double-click the first layer to s…
Modify the First Layer: Covering Existing Logo: Double-click the first layer to start editing. To remove or hide the existing logo, use the 'Rectangle Tool' from the toolbar. Drag this rectangle over the logo to conceal it.; Color Matching: To seamlessly blend your new rectangle with the book cover, use the 'Color Fill' tool. Click on it in the toolbar and use the color picker to match the color of the book cover, effectively hiding the original logo.
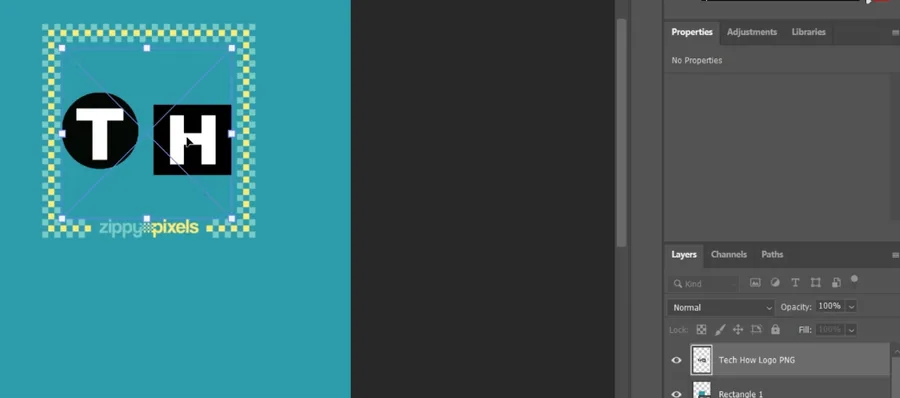
Insert Your Logo:Adding Your Design: Drag and drop your logo onto the cover from…
Insert Your Logo:Adding Your Design: Drag and drop your logo onto the cover from your files.Adjustment: Position and resize your logo to fit the design aesthetically. Remember, it’s best to use an image with a transparent background (like a .PNG file) for a cleaner look.; Adding Your Design: Drag and drop your logo onto the cover from your files.; Adjustment: Position and resize your logo to fit the design aesthetically. Remember, it’s best to use an image with a transparent background (like a .PNG file) for a cleaner look.; Further Customizations:Explore Other Layers: Feel free to edit other layers and objects in the template. Each layer in the 'book' folder offers unique customization options, letting you tailor every aspect of the book cover to your liking.; Explore Other Layers: Feel free to edit other layers and objects in the template. Each layer in the 'book' folder offers unique customization options, letting you tailor every aspect of the book cover to your liking. Remember: These steps are just a starting point. You’re free to experiment with different elements and layers to create a book cover that truly represents your style or brand.
Previewing and Exporting Your Custom Book Cover in Photoshop
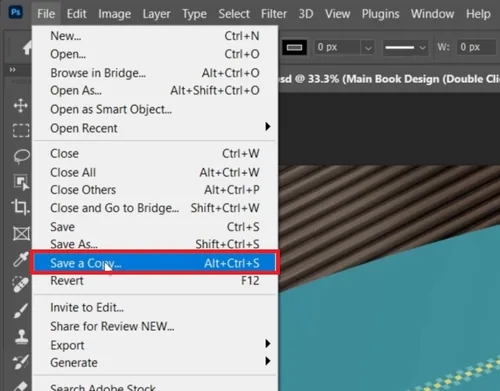
Finalizing and Saving Your Design: Preview Your Work:Check Your Edits: Once you're done customizing the template, save your changes. Then, return to the main Photoshop window where your book cover project is open.Inspect the Final Look: This is where you'll see the updated version of your book cover. Take a moment to review your design, ensuring everything looks just as you envisioned.; Check Your Edits: Once you're done customizing the template, save your changes. Then, return to the main Photoshop window where your book cover project is open.; Inspect the Final Look: This is where you'll see the updated version of your book cover. Take a moment to review your design, ensuring everything looks just as you envisioned.; Exporting the Final Product:Accessing Save Options: Go to the 'File' menu in the Photoshop toolbar.Saving Your File: Choose the 'Save a Copy' option. This step is crucial for creating a standalone version of your final design.File Format Selection:For Transparent Background: Select '.PNG' format if your book cover design has a transparent background. PNG files are ideal for maintaining the clarity of images with no background.For Standard Background: Choose '.JPEG' format if your design includes a background. JPEG is perfect for detailed, color-rich images like book covers.; Accessing Save Options: Go to the 'File' menu in the Photoshop toolbar.; Saving Your File: Choose the 'Save a Copy' option. This step is crucial for creating a standalone version of your final design.; File Format Selection:For Transparent Background: Select '.PNG' format if your book cover design has a transparent background. PNG files are ideal for maintaining the clarity of images with no background.For Standard Background: Choose '.JPEG' format if your design includes a background. JPEG is perfect for detailed, color-rich images like book covers.; For Transparent Background: Select '.PNG' format if your book cover design has a transparent background. PNG files are ideal for maintaining the clarity of images with no background.; For Standard Background: Choose '.JPEG' format if your design includes a background. JPEG is perfect for detailed, color-rich images like book covers. Congratulations! You've successfully navigated through the process of creating a realistic book cover in Photoshop. Now, you have a custom cover ready for use in presentations, portfolios, or digital displays. Remember, each step in Photoshop is an opportunity for creativity, so feel free to experiment and personalize further as needed.
Affiliate Disclosure: Some of the links on this page are affiliate links, which m…
Affiliate Disclosure: Some of the links on this page are affiliate links, which means that we may earn a commission if you click through and make a purchase from our recommended template providers. This doesn’t affect the price you pay and helps us maintain this site to continue providing you with the best template recommendations.
Video walkthrough
If it does not work
- Can I use this Photoshop book cover template for commercial purposes?. Yes, if you have a license for the template from Envato Elements, you can use it for commercial projects. Always check the specific licensing details for each template.
- Is this tutorial suitable for beginners in Photoshop?. Absolutely! This tutorial is designed to be easy to follow, even for those new to Photoshop. Each step is explained clearly, making it accessible for users of all skill levels.
- Do I need a specific version of Photoshop to use this template?. The template should be compatible with recent versions of Photoshop. However, it's always good to have the latest version to ensure full compatibility and access to all features.
- Can I customize the book cover with my own images and logos?. Yes, you can. The tutorial guides you on how to add your own images or logos, making the book cover uniquely yours. Just ensure your images are in a compatible format like PNG for transparency.
- What should I do if the colors in my exported file look different from what I see in Photoshop?. This might happen due to different color profiles. Make sure you're working in and exporting with a sRGB color profile, which is standard for web images, to maintain color consistency.