Windows 10 · Windows
Windows 10 - How To Fix Blurry Or Pixelated Icons & Fonts
Original source date
Answer
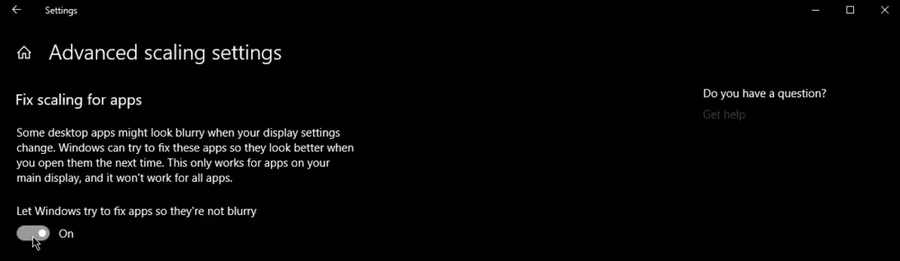
To begin, right-click on your desktop and select 'Display Settings' to access the settings that control your screen's appearance. Ensure that the scaling is set to 100% for optimal clarity, and confirm that the resolution matches your monitor's native resolution for the crispest visuals. For example, if you have a 1080p monitor, set the resolution to 1920x1080. To further enhance your display, scroll down to the 'Advanced Scaling Settings' and enable the 'Let Windows try to fix apps so they're not blurry' option. This feature allows Windows to automatically detect and correct any blurriness issues in your applications, ensuring that your icons and fonts are sharp and easy to read. By fine-tuning these settings, you'll significantly improve the overall visual quality of your Windows 10 experience.
Optimize Windows Display Settings for Clear Visuals
To begin, right-click on your desktop and select 'Display Settings' to access the settings that control your screen's appearance. Ensure that the scaling is set to 100% for optimal clarity, and confirm that the resolution matches your monitor's native resolution for the crispest visuals. For example, if you have a 1080p monitor, set the resolution to 1920x1080. To further enhance your display, scroll down to the 'Advanced Scaling Settings' and enable the 'Let Windows try to fix apps so they're not blurry' option. This feature allows Windows to automatically detect and correct any blurriness issues in your applications, ensuring that your icons and fonts are sharp and easy to read. By fine-tuning these settings, you'll significantly improve the overall visual quality of your Windows 10 experience.
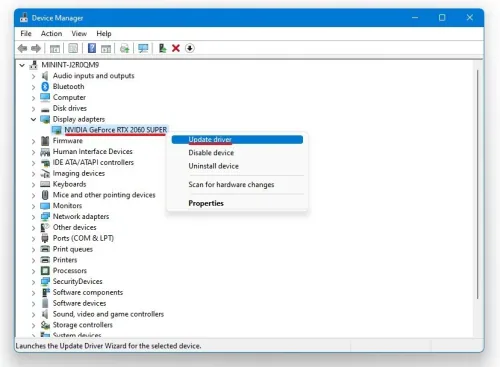
Access Device Manager for Display Adapter Updates
Begin by searching for 'Device Manager' in your taskbar search box and then open the application. Once inside, expand the 'Display Adapters' section to review the status of your graphics hardware. It's essential to ensure that all the listed display adapters are up to date for optimal system performance and clear visuals. For instance, if you have an NVIDIA GPU, you can update it using the GeForce Experience application. To do this, open the GeForce Experience app, navigate to the 'Drivers' tab, and click on 'Check for Updates.' This process will automatically search for the latest driver updates and install them if needed, keeping your graphics card functioning at peak performance. By maintaining up-to-date display adapters, you'll enjoy crisp, clear icons and fonts on your Windows 10 system.
Modify Registry Editor for Clearer Visuals
To access the Registry Editor, use the shortcut combination of the 'Windows Key' and 'R' to open the Run dialog box. Then, type 'regedit' and click 'OK' to proceed. After a brief moment, the Registry Editor will open. Carefully navigate to the following path: 'HKEY_CURRENT_USER' > 'Control Panel' > 'Desktop.' Once you reach the 'Desktop' folder, locate the 'Win8DpiScaling' entry, right-click on it, and choose 'Modify.' Change the value data to '1' and click 'OK.' Next, create a new DWORD 32-bit Value by right-clicking on a space within the 'Desktop' folder. Name this new DWORD 'LogPixels.' Once created, right-click on 'LogPixels' and select 'Modify.' Set the value data to '78,' which corresponds to 120 DPI in hexadecimal notation. Remember, it's crucial restarting your PC after making changes to the Registry Editor for the modifications to take effect. By following these steps, you'll enhance the clarity of icons and fonts on your Windows 10 system, resolving blurry or pixelated visuals.
Video walkthrough
If it does not work
- If the current interface differs, compare it with the recorded video walkthrough.