How To Fix BlueStacks 5 Not Launching or Loading on Windows

Are you tired of waiting for BlueStacks 5 to launch or load on your Windows device, only to be faced with an error message? Don't worry, you're not alone. Many users have reported encountering this issue, but the good news is that it's fixable. In this article, we'll take a deep dive into the causes of BlueStacks 5 not launching or loading and provide you with easy-to-follow solutions to get your favorite games and apps running smoothly on your Windows device.
BlueStacks Minimum System Requirements
In case your PC is running the minimum system requirements for Bluestacks, then you should make sure that all instances of the applications are closed and not running in the background. You can find the minimum system requirements listed in my extensive tutorial linked below

End BlueStacks and Other Tasks
Open up your Task Manager. Here, sort this list of processes by their memory usage and end all processes with the Bluestacks icon. You can also prevent any applications from running that could show an overlay or change your emulator files, such as CCleaner, Steam, Discord, or Adobe applications.
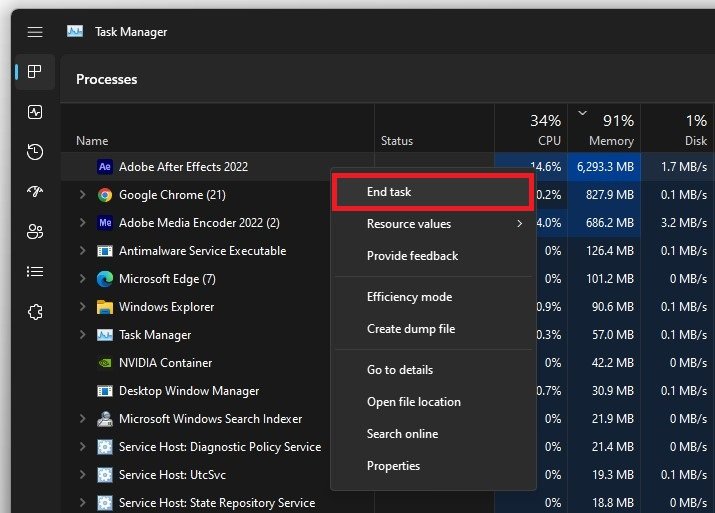
End resource intensive tasks
Allow BlueStacks Through Firewall
Sometimes, your antivirus or firewall could block parts of the software while it’s launching and cause the startup issues you are experiencing. In your start menu search, type Firewall to open up your Firewall & Network Protection system settings window. Here, select Allow an app through firewall.

Allow an app through firewall
On this window, click on Change settings, which will allow you to search and locate the BlueStacks and BlueStacksWeb services. Make sure that both of these apps are checked.

Allow BlueStacks through Windows Defender Firewall
In case you’re unable to find these apps, then you will have to click on Allow another app and proceed to locate your BlueStacks files in your File Explorer, under: Program Files > BlueStacks > HD-Player.

This PC > Program Files > BlueStacks > HD-Player
Update Graphics Driver
If the problem persists, the issue is related to outdated drivers on your PC, an unreliable network connection, or corrupted BlueStacks files. To update your graphics driver, I suggest using the GeForce Experience application for NVIDIA GPU users, and AMD users can use the AMD Radeon Software.
In this example, I will use the GeForce Experience application. In the Drivers tab, select Download the latest graphics driver, which will install automatically. You should update your GPU driver every few months to get the most out of your hardware.

GeForce Experience > Drivers
Windows Update
When this is done, open up your Windows settings. Here, in the Windows Update tab, proceed to download the latest update and then restart your Windows PC in order to install the update. After restarting your PC, you can try to launch the Bluestacks player again to see if this fixes your issue.

Windows Settings > Windows Update
Delete Temporary Files
In case the problem persists, then make sure to delete your temporary files. Search for “storage” in your start menu search to open up your Storage Settings. After a second or two, you can preview your current storage utilization.
Click on Temporary Files, and here make sure that your temporary files are selected and proceed to remove these files. Your temporary files are files saved by programs on your PC that should be deleted from time to time and can cause startup issues for some apps if not deleted.

System Settings > Storage > Temporary Files
Test Network Connection
Lastly, make sure that you’re using a reliable network connection. You can use a speed testing site or application such as Speedtest.net. Here, preview your average upload and download speed to ensure that this problem is not related to your network connection.

Test Internet upload and download speed
Reinstall BlueStacks
As a last resort, you will have to reinstall the BlueStacks emulator on your system. To do so, open up your Windows settings. Here, under Apps, click on Installed Apps. Filter your search by All Drives and look up BlueStacks. Click on the burger menu icon for BlueStacks and click on Uninstall. The uninstaller will take a few seconds to remove all of the BlueStacks files.

Uninstall BlueStacks
Lastly, on Bluestacks, you can redownload the installer for your Windows PC to re-download the BlueStacks files.

-
There could be several reasons for this issue, including outdated drivers, low system specifications, corrupted files, or conflicting software.
-
Try clearing the cache and data for BlueStacks, updating your drivers, and checking for any conflicting software. If the issue persists, try reinstalling BlueStacks.
-
Yes, low system specifications can cause performance issues, including BlueStacks 5 not launching or loading. Make sure your device meets the minimum system requirements for BlueStacks 5.