Windows 10 · Windows
Windows 10 - How To Fix WiFi Connection Problems
Original source date
Answer
It's essential to ensure you are not using faulty hardware when experiencing WiFi connection problems. To do this, carefully examine your wireless adapter and router to which you are attempting to connect. Consider rebooting your router as a troubleshooting step to determine the source of the issue. Next, connect your Windows 10 device to another network, such as a friend's or a public WiFi connection. This will help you understand if the problem is with your device or the specific network you were using. To further investigate, open up your Task Manager, navigate to the Performance tab, and click on Resource Monitor. From there, move to the Network tab and open the Processes with network activity section. Here, you will be able to see if any program or process is successfully connecting to a network.
Verify Your Hardware
It's essential to ensure you are not using faulty hardware when experiencing WiFi connection problems. To do this, carefully examine your wireless adapter and router to which you are attempting to connect. Consider rebooting your router as a troubleshooting step to determine the source of the issue. Next, connect your Windows 10 device to another network, such as a friend's or a public WiFi connection. This will help you understand if the problem is with your device or the specific network you were using. To further investigate, open up your Task Manager, navigate to the Performance tab, and click on Resource Monitor. From there, move to the Network tab and open the Processes with network activity section. Here, you will be able to see if any program or process is successfully connecting to a network.
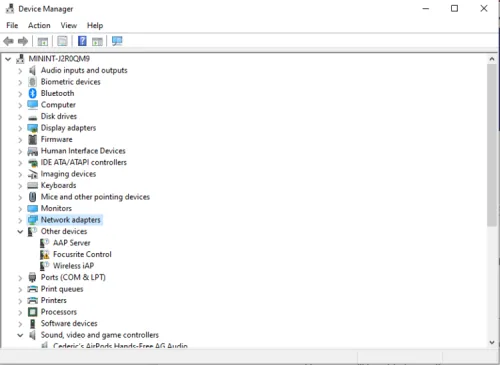
Updating Your Network Adapter
Sometimes, an outdated network adapter driver may be the root cause of your WiFi connection issues. To update it, search for Device Manager and hit enter. Right-click the network adapter you are using and select Update Driver. If you have access to another internet connection, such as your personal hotspot or a different network, switch your connection temporarily to update your network adapter driver. This can potentially resolve any lingering WiFi connectivity problems on your Windows 10 device.
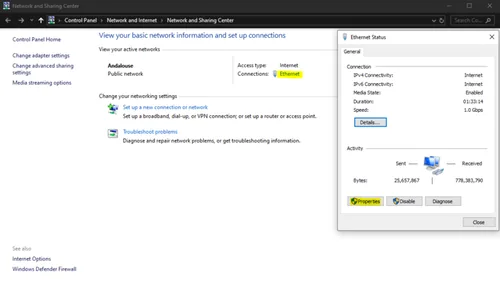
Change your IP configuration
If you're experiencing internet connectivity issues or want to optimize your network settings, changing your IP configuration can be a helpful solution. Open the Network Status system settings on your device. This can usually be done by clicking the network icon on your taskbar or accessing your device's settings menu. Once you're in the Network Status settings, navigate to the Network and Sharing Center. Here, you can see a summary of your network status, including your current network connection and IP configuration. Select your WiFi or Ethernet connection, and a new window will appear, showing your current IPv4 and IPv6 configurations. IPv4 and IPv6 are unique identifiers assigned to your device on a network, and they determine how your device communicates with other devices and servers on the internet. Checking your connection's speed and signal quality can help you determine if you're getting the best possible internet connection.
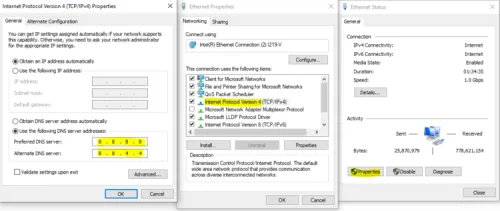
If you're experiencing slow internet speeds or connection drops, changing your DN…
If you're experiencing slow internet speeds or connection drops, changing your DNS server address can be a simple yet effective way to improve your internet performance. Here's how you can change your DNS server address to the Google DNS server address and potentially fix your WiFi issues. First, go to your connection properties and double-click on Internet-Protocol Version 4. This will open the Internet Protocol Version 4 properties window. Here, you can select "Use the following DNS server addresses" and enter the preferred and alternative DNS server addresses. For the preferred DNS server address, enter "8.8.8.8," and for the alternative DNS server address, enter "8.8.4.4." These are the public DNS server addresses provided by Google, which are safe to use and can help improve your internet connection speed and reliability. Google DNS is a fast, reliable, and secure DNS service that can help you access websites faster and protect your online privacy. By using Google DNS, you can bypass your Internet Service Provider's (ISP) DNS server, which can sometimes be slow or unreliable, and ensure that your internet traffic is secure. For example, changing your DNS server address to the Google DNS server address if you're experiencing slow internet speeds when streaming videos or downloading files can help improve your internet performance and reduce buffering times. Changing your DNS server address to the Google DNS server address can be a simple yet effective way to optimize your internet performance and potentially fix WiFi issues. However, it's vital to ensure that your hardware is working correctly and your router is in range or connected via Ethernet before making any changes to your network settings.
Video walkthrough
If it does not work
- If the current interface differs, compare it with the recorded video walkthrough.