Windows 11 · Windows
Fix Blurry Pixelated Stream on OBS Studio
Original source date
Answer
Open up OBS Studio and navigate to your Settings. Under Output, set the Output Mode to Advanced. Making changes to these settings will, in turn, prevent your stream from being blurry or pixelated. Set your Encoder according to your hardware. For mid to high-end NVIDIA graphics card users, set the option to NVIDIA NVENC. You can also use the AMD encoder or x264 to utilize your processor to render your image instead of your graphics card. Below, don’t rescale your output here; you should do this in the Video tab of your settings. Set your Rate Control option to CBR. This option will use a constant bit rate set below. Your streaming Bitrate should be set to a value according to your available upload bandwidth, the resolution and framerate you wish to stream in, and the best practices of your selected streaming service. To quickly fix pixelated streams, increasing your bitrate will in any way help, but your network connection might not be able to support it.
Adjust the OBS Studio Output Settings
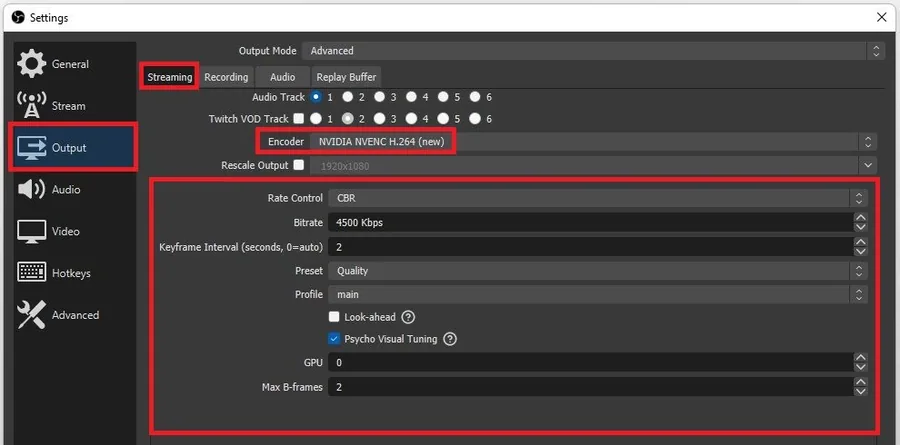
Open up OBS Studio and navigate to your Settings.

Under Output, set the Output Mode to Advanced
Under Output, set the Output Mode to Advanced. Making changes to these settings will, in turn, prevent your stream from being blurry or pixelated. Set your Encoder according to your hardware. For mid to high-end NVIDIA graphics card users, set the option to NVIDIA NVENC. You can also use the AMD encoder or x264 to utilize your processor to render your image instead of your graphics card. Below, don’t rescale your output here; you should do this in the Video tab of your settings. Set your Rate Control option to CBR. This option will use a constant bit rate set below. Your streaming Bitrate should be set to a value according to your available upload bandwidth, the resolution and framerate you wish to stream in, and the best practices of your selected streaming service. To quickly fix pixelated streams, increasing your bitrate will in any way help, but your network connection might not be able to support it.
Test & Improve your Network Connection
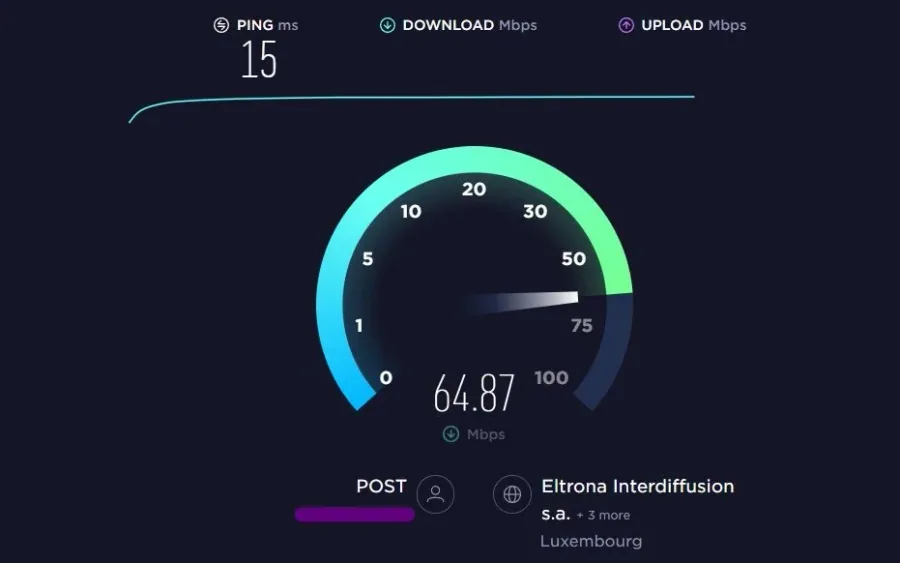
To find out how high you can set the bitrate value, head over to Speedtest.net. This site will allow you to test your upload and download speed for free. Keep an eye on your average upload speed. If it exceeds 10 MB/s, you should consider increasing your bitrate to around 6000. If you want to stream in 1080p and 60FPS, you might want to increase your bitrate even more. This will also depend on what you intend to stream.
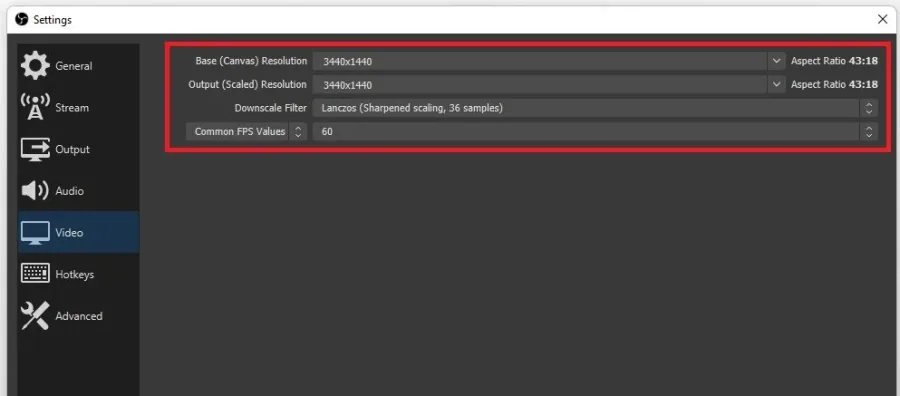
Adjusted OBS Video Settings
Fast-paced gameplay will require a higher bitrate, as much movement will otherwise look blurry or pixelated on the viewer’s end. If you cannot use a decent network connection, you should consider lowering your streaming resolution. Navigate to the Video tab in your OBS settings, set the Base Resolution to your native monitor resolution, and set the Output Resolution to 1080p, 720p, or any other with the same aspect ratio. You can also manually rewrite the resolution if it’s not recommended. Your streaming frame rate can also induce lag and pixelation. If you don’t need 60 FPS, for example, if you’re not streaming gameplay, then we suggest setting this option to 30 FPS, which should be more than enough.
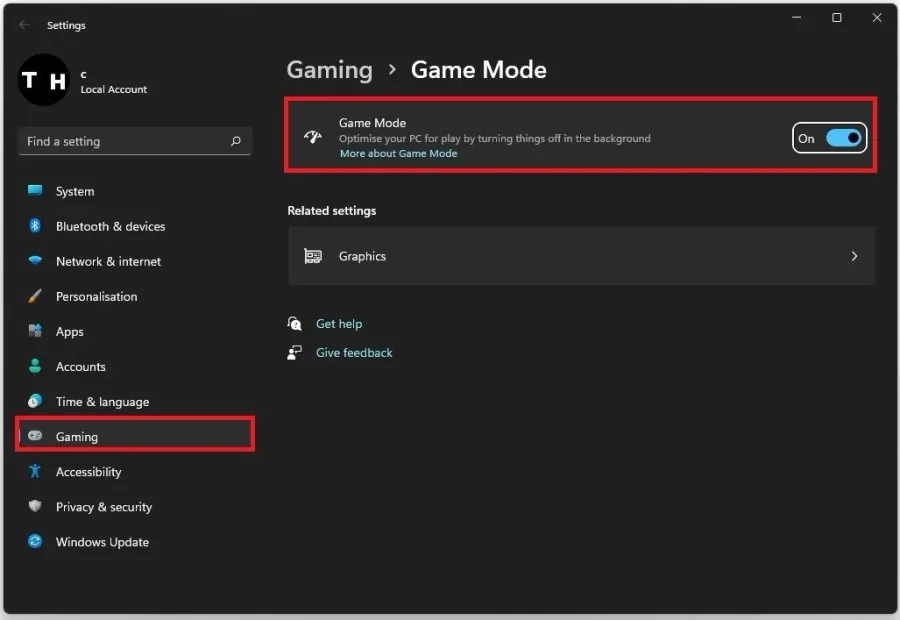
Enable Windows Game Mode
After tweaking your OBS Studio settings, your stream should look much better with reduced pixels or blur. If you wish to increase your streaming quality further, follow these steps. A wired or ethernet connection to your router is suggested for the best possible network connection. Enable your Game Mode option on Windows if you intend on streaming gameplay from your PC. Search for Game Mode in your start menu search and open your native Settings application. Ensure that Game Mode is enabled. Lastly, run OBS as an administrator before opening it up.
Video walkthrough
If it does not work
- If the current interface differs, compare it with the recorded video walkthrough.