Productivity · Platform not recorded
How To Add Discord Audio to OBS Studio - Tutorial
Original source date
Answer
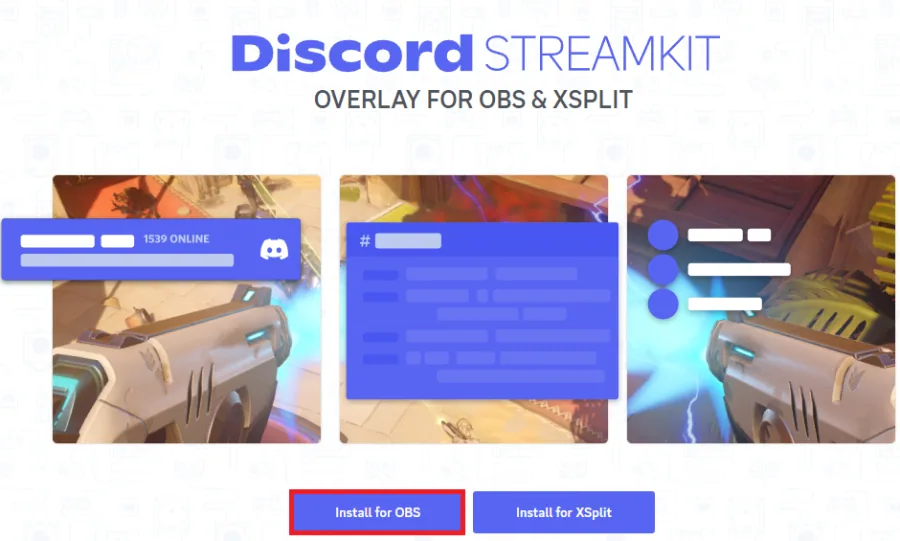
Before diving in, ensure that both Discord and OBS Studio are installed on your computer. Here's your quick guide on adding Discord audio to OBS Studio: Navigate to StreamKit: Open your browser and go to Discord StreamKit Overlay.; Install for OBS: Click on "Install for OBS" on the landing page. If this is your inaugural use of StreamKit with OBS Studio, you’ll be prompted to give StreamKit Overlay permission to access your Discord account. Click on "Authorize" to proceed.
Integrate Discord Audio with OBS Using StreamKit
Before diving in, ensure that both Discord and OBS Studio are installed on your computer. Here's your quick guide on adding Discord audio to OBS Studio: Navigate to StreamKit: Open your browser and go to Discord StreamKit Overlay.; Install for OBS: Click on "Install for OBS" on the landing page. If this is your inaugural use of StreamKit with OBS Studio, you’ll be prompted to give StreamKit Overlay permission to access your Discord account. Click on "Authorize" to proceed.
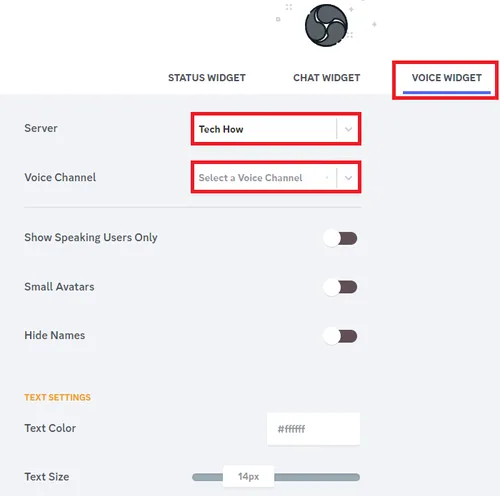
Configure Voice Widget: Once authorized, you'll be redirected to your browser
Configure Voice Widget: Once authorized, you'll be redirected to your browser. Head over to the "Voice Widget" tab, where you'll find various settings. For example, you can choose to display user icons or focus on voice-only. Configure these according to your needs. This workflow lets you customize your Discord audio settings in OBS Studio, making your live streaming or podcasting experience more interactive and engaging.
Adding Discord Audio to Your OBS Scene
Once you've customized your Discord audio settings via StreamKit, the next step is to bring that audio into OBS Studio. Here's how: Copy StreamKit URL: After configuring your settings, locate the URL beneath the preview picture on the StreamKit page. Copy this URL for use in OBS Studio.; Navigate to OBS Studio: Open OBS Studio and select the scene where you want to add the Discord audio.; Add a New Source: Click on the "+" button under the 'Sources' section to add a new source.
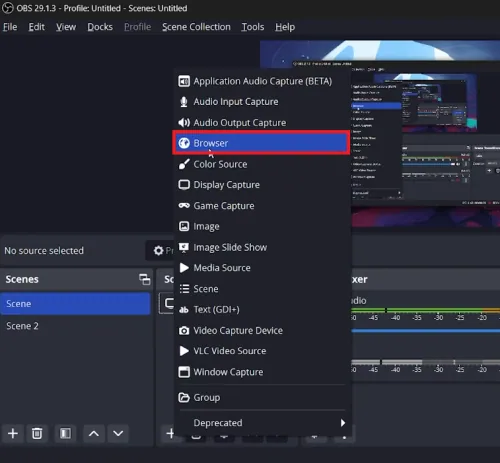
Select Browser: In the dialog that appears, choose 'Browser' and click 'OK'.; Pas…
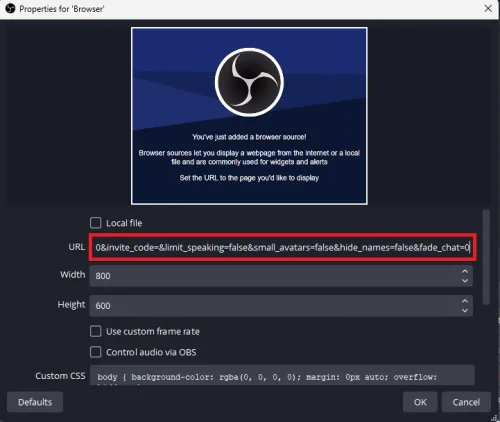
Select Browser: In the dialog that appears, choose 'Browser' and click 'OK'.; Paste URL: A new window will open with a URL field. Paste the URL you copied from StreamKit.; Confirm: Hit 'OK' to save your changes. And voilà, your Discord audio is successfully integrated into your OBS Studio setup, perfect for enhanced streaming or collaborative projects.
Video walkthrough
If it does not work
- Why is my Discord audio not working in OBS Studio?. If your Discord audio is not being captured in OBS Studio, make sure you've pasted the correct StreamKit URL in the 'Browser' source. Also, double-check your Discord and OBS Studio settings to ensure they are correctly configured.
- Can I add Discord audio to multiple OBS Studio scenes?. Yes, you can add Discord audio to multiple scenes in OBS Studio. Simply follow the same steps of copying the StreamKit URL and adding it as a 'Browser' source in each desired scene.
- Is using Discord StreamKit safe for my Discord account?. StreamKit is a tool developed by Discord, specifically for integration with OBS Studio. Granting authorization is generally safe and doesn't compromise the security of your Discord account.
- Do I need to reconfigure Discord audio settings every time I stream?. No, once you've configured your Discord audio settings via StreamKit and added it to OBS Studio, the settings are saved. However, you may wish to tweak settings based on your specific streaming needs.
- Is there any latency or delay in Discord audio when streaming via OBS Studio?. While generally minimal, latency can occur depending on various factors like your internet speed and computer's performance. Always test your setup before going live to identify and fix any latency issues.