Windows 11 · Windows
How To Fix “Projecting to This PC” Feature Disabled Issue - Windows 10/11
Original source date
Answer
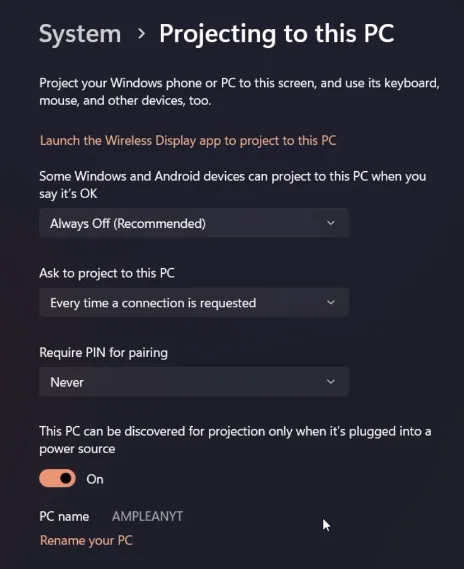
Starting off, you'll need to open the Settings application on your PC. A quick way to do this is by pressing the Windows key and 'I' together. This action will immediately bring up the Settings window for you. Next, head over to the “System” section and then click on “Projecting to this PC.” In this area, you'll find a dropdown menu under the phrase “Windows PCs and phones can project to this PC when you say it’s OK.” Click on this dropdown and you'll have two options: “Available everywhere” or “Available everywhere on secure networks.” Choose based on what you prefer or the security level of your network. For instance, if you're on a trusted network, you might opt for "Available everywhere."
Projecting to this PC Windows Settings
Starting off, you'll need to open the Settings application on your PC. A quick way to do this is by pressing the Windows key and 'I' together. This action will immediately bring up the Settings window for you. Next, head over to the “System” section and then click on “Projecting to this PC.” In this area, you'll find a dropdown menu under the phrase “Windows PCs and phones can project to this PC when you say it’s OK.” Click on this dropdown and you'll have two options: “Available everywhere” or “Available everywhere on secure networks.” Choose based on what you prefer or the security level of your network. For instance, if you're on a trusted network, you might opt for "Available everywhere."
Fine-tuning Projecting Preferences
Let's dive into the “Ask to project to this PC” setting next. In this part, you can decide between “First time only” or “Every time a connection is requested.” Pick what suits your needs. For example, if you want a one-time permission, go for "First time only." For those who like added security, the “Require PIN for pairing” option is there. Switch it on if you want a PIN request during the pairing action. This way, only those who know the PIN can project to your PC.
Testing Your Settings
Now that you've adjusted the settings, it's time to see if they work. Try projecting to your PC to check if the previous issue is sorted. Make sure your PC and the projecting device are on the same network, and all needed permissions are set. If you still face trouble, check if your devices' drivers are current, or try restarting both your PC and the projecting device. This can fix many connection problems.
Video walkthrough
If it does not work
- What is the "Projecting to this PC" feature in Windows 10/11?. The "Projecting to this PC" feature allows other devices to display their screen on your Windows 10 or 11 PC. This is useful for presentations, collaborative work, or streaming.
- How do I enable the "Projecting to this PC" feature?. To enable this feature, go to Settings > System > Projecting to this PC. From there, select either “Available everywhere” or “Available everywhere on secure networks” based on your preference.
- Why is my "Projecting to this PC" feature disabled?. The feature could be disabled due to various reasons such as outdated drivers, incorrect settings, or network issues. Following the steps in the tutorial can help rectify this.
- How do I ensure a secure connection while projecting?. For a secure connection, opt for “Available everywhere on secure networks” and turn on the “Require PIN for pairing” option to have a PIN prompt during the pairing process.
- What should I do if I still face issues after configuring the settings?. Ensure your drivers are up-to-date, both devices are on the same network, and all necessary permissions have been granted. Restarting your PC and the projecting device may also help.