Productivity · Windows
How To Share A Folder in Windows 10/11 - Network File Access Sharing Guide
Original source date
Answer
Sharing folders on a network is a smart way to exchange files or work together on documents without needing extra equipment like USB drives. Before you start, make sure your computer is connected to the same network as the other devices you want to share with. It's also good to know which folder and files you're going to share to keep things secure and private.
Prepare for Folder Sharing
Sharing folders on a network is a smart way to exchange files or work together on documents without needing extra equipment like USB drives. Before you start, make sure your computer is connected to the same network as the other devices you want to share with. It's also good to know which folder and files you're going to share to keep things secure and private.
Open the File Explorer
Click the File Explorer icon on your taskbar, or press Win + E on your keyboard.; Find the folder you want to share.
Access Sharing Settings
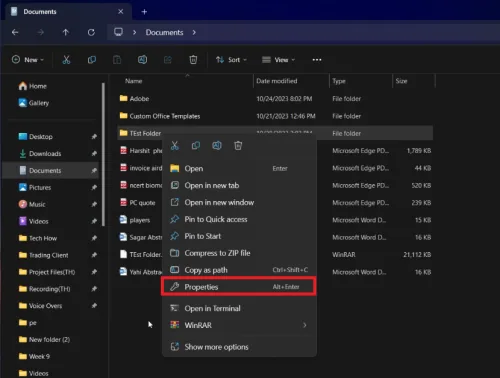
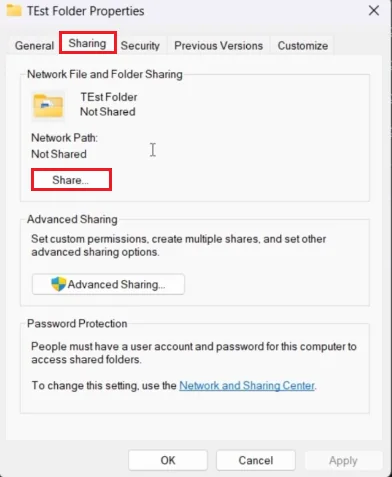
Right-click on the folder you chose.; Select the "Properties" option from the menu that appears.; Go to the "Sharing" tab at the top of the Properties window.; In the "Network File and Folder Sharing" section, click the "Share" button. Now you are in the right place to start sharing your folder with others on your network!
Choose Sharing Permissions
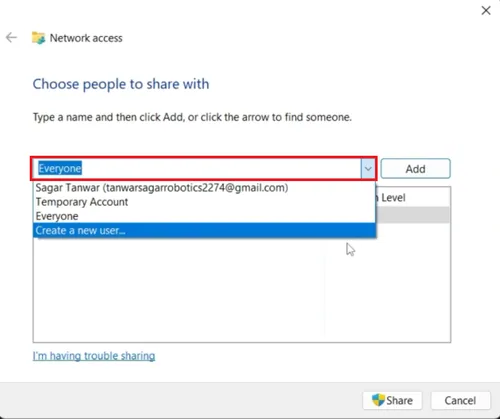
Once you click the "Share" button, a new window called "Choose people to share with" will appear. Here, you decide who can access the folder on your network.
Pick Sharing Options
From the drop-down menu, choose the "Everyone" option if you want all network users to access the folder.; If you prefer to limit who can access the folder, add specific network users.
Adjust Permissions
Click the "Add" button to put the selected users or groups on the sharing list.; Choose the permission level next:"Read" lets others only view the folder contents."Read/Write" lets others view and change the folder contents.; "Read" lets others only view the folder contents.; "Read/Write" lets others view and change the folder contents.
Finalize Sharing Settings
Click the "Share" button to save your settings.; A confirmation window will show up with the network path to your shared folder. You can write down this path or click "Copy" to save it to your clipboard. Now, others on your network can get to this folder by typing the network path in the File Explorer address bar on their PCs or by finding it on the left side pane of their file explorer. Remember, sharing folders with sensitive or personal files can be risky. Always check what's in the folder before sharing, and remove sharing permissions when you're done sharing.
Video walkthrough
If it does not work
- How can I share a folder on Windows 10 or 11 with specific people on my network?. You can share a folder with specific people by right-clicking on the folder, selecting "Properties", going to the "Sharing" tab, and clicking on the "Share" button. In the "Choose people to share with" window, add the network users you want to share with and set the desired permission levels.
- What are the different permission levels available when sharing a folder on Windows?. The two main permission levels are "Read", which allows others to view the contents of the folder, and "Read/Write", which allows others to view and modify the contents.
- How do others on my network access the shared folder?. Others can access the shared folder by typing the network path into the File Explorer address bar on their PCs or by locating it in the left side pane of their File Explorer.
- How can I stop sharing a folder on Windows 10 or 11?. To stop sharing a folder, right-click on the folder, select "Properties", go to the "Sharing" tab, and click on the "Stop Sharing" button.
- Is it safe to share folders on a network?. While sharing folders is a convenient way to collaborate, it can pose a security risk if sensitive or personal files are shared. Always double-check the contents of the folder before sharing, and revoke sharing permissions once the need for sharing is over.