Social Media · Platform not recorded
How To Schedule Instagram Posts - Tutorial
Original source date
Answer
Unlock Scheduling and More with a Professional Account Access Account Settings:Tap the three horizontal bars in the upper right corner of your Instagram profile.Select 'Settings'.; Tap the three horizontal bars in the upper right corner of your Instagram profile.; Select 'Settings'.; Switch to Professional Account:Navigate to the 'Account' section.Scroll down and select 'Switch to Professional Account'.Follow the guided walkthrough and choose your account category (Creator or Business).; Navigate to the 'Account' section.; Scroll down and select 'Switch to Professional Account'.; Follow the guided walkthrough and choose your account category (Creator or Business). Transitioning to a professional account unlocks post scheduling, audience insights, and performance analytics.
Upgrading to an Instagram Professional Account
Unlock Scheduling and More with a Professional Account Access Account Settings:Tap the three horizontal bars in the upper right corner of your Instagram profile.Select 'Settings'.; Tap the three horizontal bars in the upper right corner of your Instagram profile.; Select 'Settings'.; Switch to Professional Account:Navigate to the 'Account' section.Scroll down and select 'Switch to Professional Account'.Follow the guided walkthrough and choose your account category (Creator or Business).; Navigate to the 'Account' section.; Scroll down and select 'Switch to Professional Account'.; Follow the guided walkthrough and choose your account category (Creator or Business). Transitioning to a professional account unlocks post scheduling, audience insights, and performance analytics.

How to Schedule and Manage Posts on Instagram
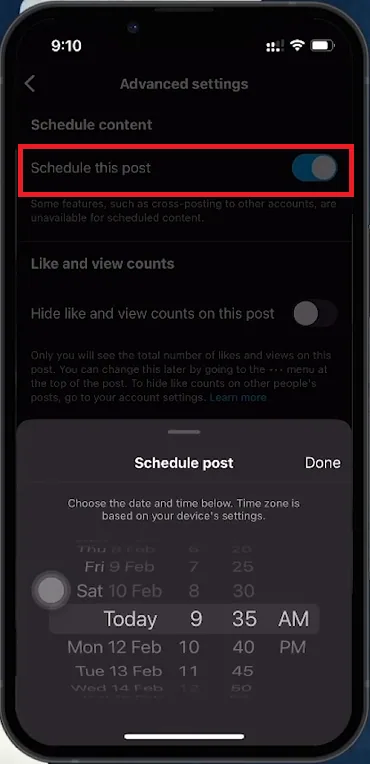
Scheduling Your Instagram Content Initiate Post Creation:Tap the create button (plus sign) at the bottom of the Instagram app.; Tap the create button (plus sign) at the bottom of the Instagram app.; Select and Customize Content:Choose your content (photo or video).Use Instagram's editing tools (filters, music, captions) to enhance your post.; Choose your content (photo or video).; Use Instagram's editing tools (filters, music, captions) to enhance your post.; Access Advanced Settings for Scheduling:Before finalizing your post, navigate to 'Advanced Settings'.Toggle 'Schedule this post' on.Select the date and time for your post to go live.Tap 'Set Time' to confirm.; Before finalizing your post, navigate to 'Advanced Settings'.; Toggle 'Schedule this post' on.; Select the date and time for your post to go live.; Tap 'Set Time' to confirm.
Managing Your Scheduled Instagram Posts
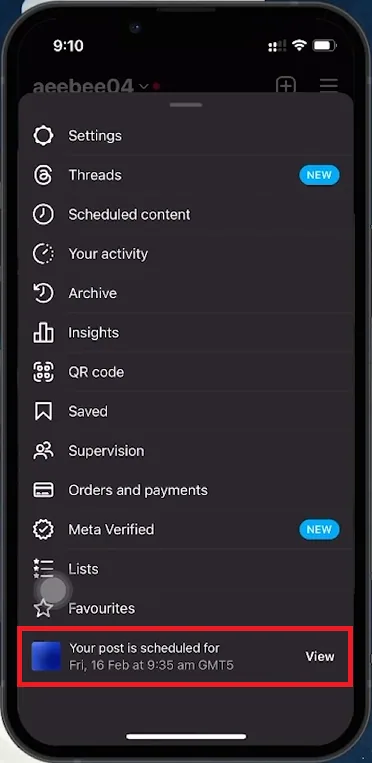
View Scheduled Content:Go to your profile and tap the menu icon (three horizontal bars).Select 'Scheduled Content'.; Go to your profile and tap the menu icon (three horizontal bars).; Select 'Scheduled Content'.; Edit Scheduled Posts:Within 'Scheduled Content', you can adjust the scheduled time or choose to publish immediately.; Within 'Scheduled Content', you can adjust the scheduled time or choose to publish immediately.
Using Instagram's scheduling feature ensures your profile stays active and engagi…
Using Instagram's scheduling feature ensures your profile stays active and engaging, even when you're offline. This tool helps manage your content strategy effectively, keeping your audience consistently engaged.
Video walkthrough
If it does not work
- Can anyone schedule Instagram posts?. Only users with a professional (Creator or Business) account can schedule posts on Instagram. Switching from a personal to a professional account is a simple process available in your account settings.
- How do I schedule a post on Instagram?. After creating your post, tap on 'Advanced Settings' before publishing, and activate the 'Schedule this post' toggle. Choose your desired date and time, and confirm with 'Set Time’.
- What type of content can I schedule on Instagram?. You can schedule both photos and videos on Instagram. After selecting your content, use the app's editing tools to customize it, then schedule it via the 'Advanced Settings' before posting.
- Where can I find the option to schedule a post?. The scheduling option is located in the 'Advanced Settings' section of the post creation process. Toggle on 'Schedule this post', choose your desired date and time, and confirm by pressing 'Set Time’.
- How can I manage my scheduled posts?. Manage your scheduled posts by navigating to your profile, tapping the menu icon, and selecting 'Scheduled Content'. Here, you can view, edit, or delete upcoming posts.