Adobe · Platform not recorded
Artistic Smoke Portrait Effect - Photoshop Tutorial & Template
Original source date
Answer
Creating an artistic smoke effect in your portraits starts with the right Photoshop template. Here’s how you can download and prepare your template from Envato Elements: Visit Envato Elements:Click here to access the Envato Elements template page.; Click here to access the Envato Elements template page.; Sign Up for Access:If you're not an Envato Elements member, sign up to gain access to a wide range of creative resources, including the smoke effect template, as well as numerous other add-ons, plugins, and templates for Photoshop.; If you're not an Envato Elements member, sign up to gain access to a wide range of creative resources, including the smoke effect template, as well as numerous other add-ons, plugins, and templates for Photoshop.; Download the Template:Search for the specific smoke effect template on Envato Elements.Click the download button to start the process.The file will be saved to your computer, usually in the 'Downloads' folder.; Search for the specific smoke effect template on Envato Elements.; Click the download button to start the process.; The file will be saved to your computer, usually in the 'Downloads' folder.
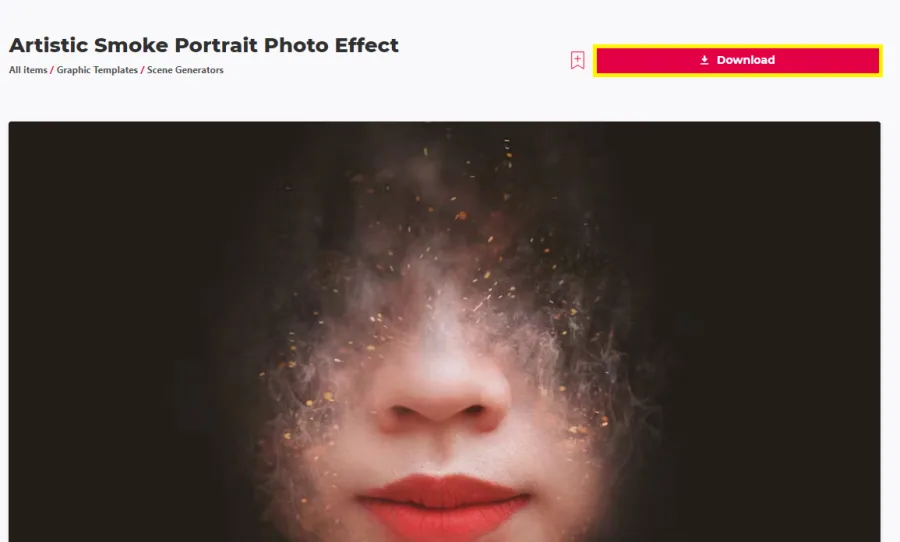
Downloading and Extracting the Portrait Smoke Effect Template
Creating an artistic smoke effect in your portraits starts with the right Photoshop template. Here’s how you can download and prepare your template from Envato Elements:
Acquiring the Template
Visit Envato Elements:Click here to access the Envato Elements template page.; Click here to access the Envato Elements template page.; Sign Up for Access:If you're not an Envato Elements member, sign up to gain access to a wide range of creative resources, including the smoke effect template, as well as numerous other add-ons, plugins, and templates for Photoshop.; If you're not an Envato Elements member, sign up to gain access to a wide range of creative resources, including the smoke effect template, as well as numerous other add-ons, plugins, and templates for Photoshop.; Download the Template:Search for the specific smoke effect template on Envato Elements.Click the download button to start the process.The file will be saved to your computer, usually in the 'Downloads' folder.; Search for the specific smoke effect template on Envato Elements.; Click the download button to start the process.; The file will be saved to your computer, usually in the 'Downloads' folder.
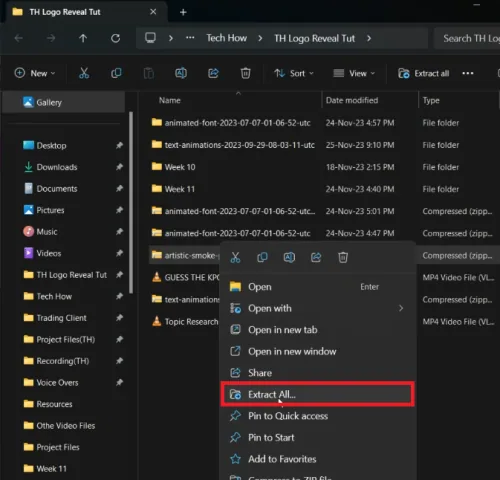
Extracting the Template File
Unzip the Downloaded File:On a Windows PC: Right-click the downloaded .zip file and choose 'Extract All' to unzip it.On a Mac: Double-click the .zip file, and it will automatically extract.; On a Windows PC: Right-click the downloaded .zip file and choose 'Extract All' to unzip it.; On a Mac: Double-click the .zip file, and it will automatically extract.; Access the Template:After extraction, a new folder containing the Photoshop template file will open.This file is now ready to be used in your Photoshop project.; After extraction, a new folder containing the Photoshop template file will open.; This file is now ready to be used in your Photoshop project. With the template in hand, you're all set to begin adding the smoke effect to your portraits, transforming them into artistic masterpieces.
Applying the Artistic Smoke Effect in Photoshop
Enhancing your image with a smoke effect in Photoshop is a creative way to add a unique touch to your artwork. Here’s a step-by-step guide on how to apply the smoke effect to your image using the downloaded template:
Opening the Template in Photoshop
Launch the Template:Open Photoshop and navigate to the folder where you extracted the smoke effect template.Open the Photoshop file (PSD). The loading time may vary based on your computer's performance.; Open Photoshop and navigate to the folder where you extracted the smoke effect template.; Open the Photoshop file (PSD). The loading time may vary based on your computer's performance.
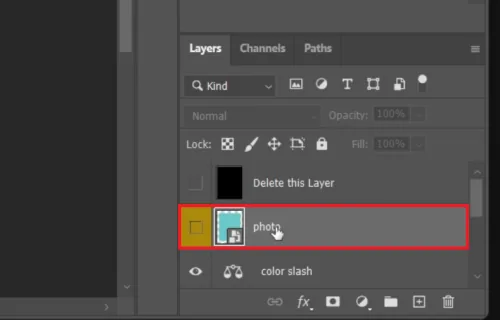
Inserting Your Image into the Template
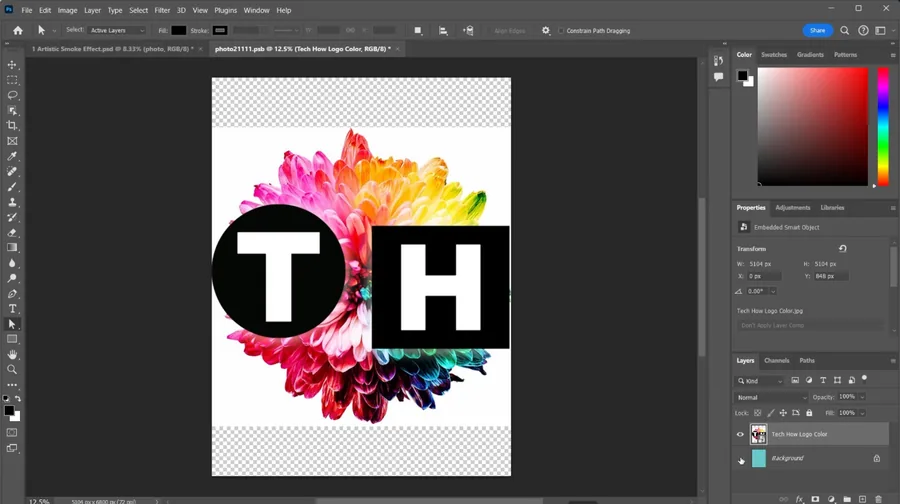
Find the Smart Object Layer:In the Photoshop interface, look for the layers section.Locate the smart object layer within the layers; this is typically labeled clearly.; In the Photoshop interface, look for the layers section.; Locate the smart object layer within the layers; this is typically labeled clearly.; Replace Placeholder with Your Image:Double-click the smart object layer to open a new canvas tab with a placeholder image.Drag and drop your own image onto this canvas.Adjust the size and position of your image to fit well within the canvas for optimal effect.; Double-click the smart object layer to open a new canvas tab with a placeholder image.; Drag and drop your own image onto this canvas.; Adjust the size and position of your image to fit well within the canvas for optimal effect.
Finalizing the Effect
Apply the Smoke Effect:Once your image is correctly placed, press 'Enter' to confirm the placement.Hide the placeholder layer by clicking the eye icon next to it.Save your changes by pressing 'Ctrl + S' (or 'Cmd + S' on Mac), which will update the smart object in the main template file.; Once your image is correctly placed, press 'Enter' to confirm the placement.; Hide the placeholder layer by clicking the eye icon next to it.; Save your changes by pressing 'Ctrl + S' (or 'Cmd + S' on Mac), which will update the smart object in the main template file.; Preview the Effect:Return to the original tab where the template is opened.You will now see your image with the artistic smoke effect applied.; Return to the original tab where the template is opened.; You will now see your image with the artistic smoke effect applied. By following these steps, you can effectively apply the artistic smoke effect to your image, resulting in a visually striking piece of artwork enhanced with the template's pre-set smoke design.
Saving Your Edited Photoshop Project
After applying the artistic smoke effect to your image in Photoshop and making all the desired adjustments, the final step is to save your project. This ensures that your creative work is preserved in the right format for future use or sharing.
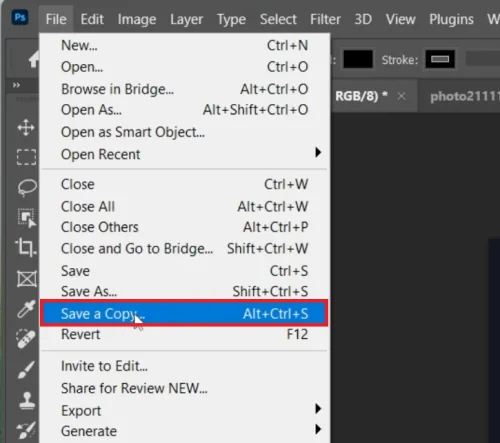
How to Save Your Edited Image
Open the Save Menu:Click on 'File' in the Photoshop toolbar at the top of the screen.; Click on 'File' in the Photoshop toolbar at the top of the screen.; Choose Save Option:Select 'Save a Copy' from the drop-down menu. This allows you to save a new version of the file without altering the original template.; Select 'Save a Copy' from the drop-down menu. This allows you to save a new version of the file without altering the original template.; Name and Format Your File:In the save dialog box, enter a new name for your file to distinguish it from the original template.Choose the appropriate file format based on your needs:.PNG: Select this format if your image has a transparent background and you want to maintain that transparency..JPEG: Choose this format if your image has a background that you wish to keep in the final saved file.; In the save dialog box, enter a new name for your file to distinguish it from the original template.; Choose the appropriate file format based on your needs:.PNG: Select this format if your image has a transparent background and you want to maintain that transparency..JPEG: Choose this format if your image has a background that you wish to keep in the final saved file.; .PNG: Select this format if your image has a transparent background and you want to maintain that transparency.; .JPEG: Choose this format if your image has a background that you wish to keep in the final saved file. By carefully following these steps, you can save your Photoshop project with the smoke effect applied, ensuring that the final image retains the quality and characteristics you've worked on. This saved file can then be used for various purposes, including digital portfolios, prints, or online sharing.
Affiliate Disclosure: Some of the links on this page are affiliate links, which m…
Affiliate Disclosure: Some of the links on this page are affiliate links, which means that we may earn a commission if you click through and make a purchase from our recommended template providers. This doesn’t affect the price you pay and helps us maintain this site to continue providing you with the best template recommendations.
Video walkthrough
If it does not work
- Can I apply the artistic smoke effect to any image?. Yes, the smoke effect template is versatile and can be applied to any image. Just replace the placeholder with your desired image in the smart object layer.
- Do I need advanced Photoshop skills to use this smoke effect template?. No, this template is user-friendly. Basic knowledge of navigating through layers in Photoshop is sufficient to apply and adjust the smoke effect.
- How do I ensure the smoke effect blends well with my image?. Place your image correctly within the smart object layer and adjust its size and position for the best fit. The template's pre-set effects will handle the blending.
- What file formats can I use to save my final smoke effect image?. You can save your final image in .PNG format for a transparent background or in .JPEG format if you wish to retain the background.
- Is this smoke effect suitable for professional artwork?. Absolutely, this smoke effect can add a sophisticated and artistic touch to professional artworks, enhancing their visual appeal.