Gaming · Platform not recorded
Cyberpunk 2077 - How To Fix Blurry & Glitched Textures
Original source date
Answer
Navigate to your Cyberpunk 2077 in-game settings. In the Video tab, ensure you are running the game in your native monitor resolution, and use Fullscreen as the window mode. In order to strike a balance between visual quality and performance, it's crucial to fine-tune the in-game graphics settings of Cyberpunk 2077. Begin by adjusting the Texture Quality option, setting it to either medium or high, based on your system's capabilities. Next, consider disabling a selection of effects that contribute to lag without significantly affecting the game's texture rendering quality. These effects encompass: Film Grain: This cinematic effect adds a layer of grainy noise to the visuals, but disabling it can provide a cleaner and crisper image.; Chromatic Aberration: This effect simulates a lens distortion that separates colors at the edges of the screen. Turning it off can lead to a more uniform image quality.; Depth of Field: This simulates the blurring of objects outside the camera's focus. Disabling it can help maintain a consistent level of sharpness across the screen.; Lens Flare: This effect adds bright streaks and halos around light sources. While it can be visually appealing, disabling it can reduce distractions and improve overall clarity.; Motion Blur: This effect blurs the image during fast movements, aiming to create a sense of speed. Turning it off can result in sharper visuals during gameplay. By carefully adjusting these settings, you can ensure a smoother gaming experience while preserving the immersive and detailed world of Cyberpunk 2077.
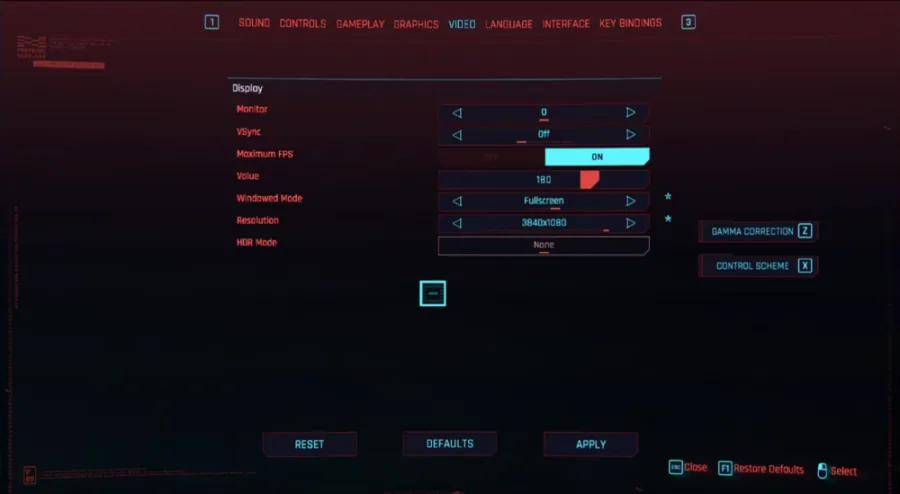
Adjust the Cyberpunk 2077 Video Settings
Navigate to your Cyberpunk 2077 in-game settings. In the Video tab, ensure you are running the game in your native monitor resolution, and use Fullscreen as the window mode.
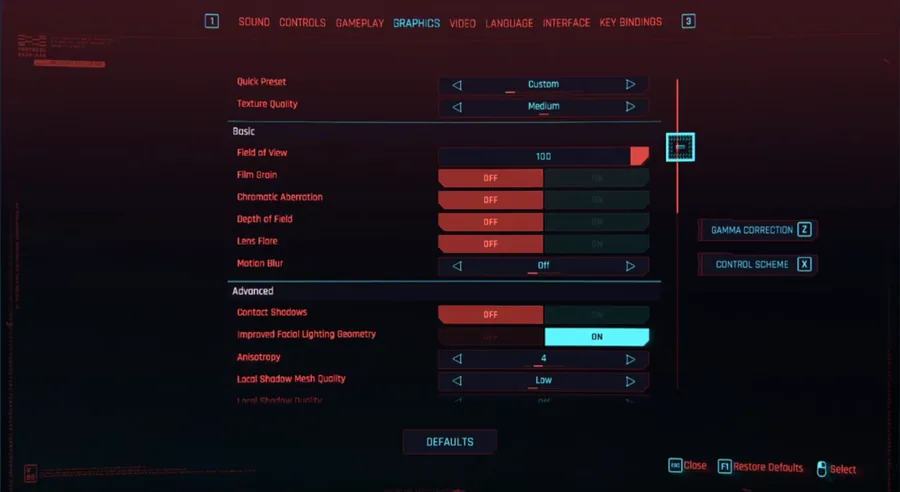
Cyberpunk 2077 Optimized Graphics Settings
In order to strike a balance between visual quality and performance, it's crucial to fine-tune the in-game graphics settings of Cyberpunk 2077. Begin by adjusting the Texture Quality option, setting it to either medium or high, based on your system's capabilities. Next, consider disabling a selection of effects that contribute to lag without significantly affecting the game's texture rendering quality. These effects encompass: Film Grain: This cinematic effect adds a layer of grainy noise to the visuals, but disabling it can provide a cleaner and crisper image.; Chromatic Aberration: This effect simulates a lens distortion that separates colors at the edges of the screen. Turning it off can lead to a more uniform image quality.; Depth of Field: This simulates the blurring of objects outside the camera's focus. Disabling it can help maintain a consistent level of sharpness across the screen.; Lens Flare: This effect adds bright streaks and halos around light sources. While it can be visually appealing, disabling it can reduce distractions and improve overall clarity.; Motion Blur: This effect blurs the image during fast movements, aiming to create a sense of speed. Turning it off can result in sharper visuals during gameplay. By carefully adjusting these settings, you can ensure a smoother gaming experience while preserving the immersive and detailed world of Cyberpunk 2077.
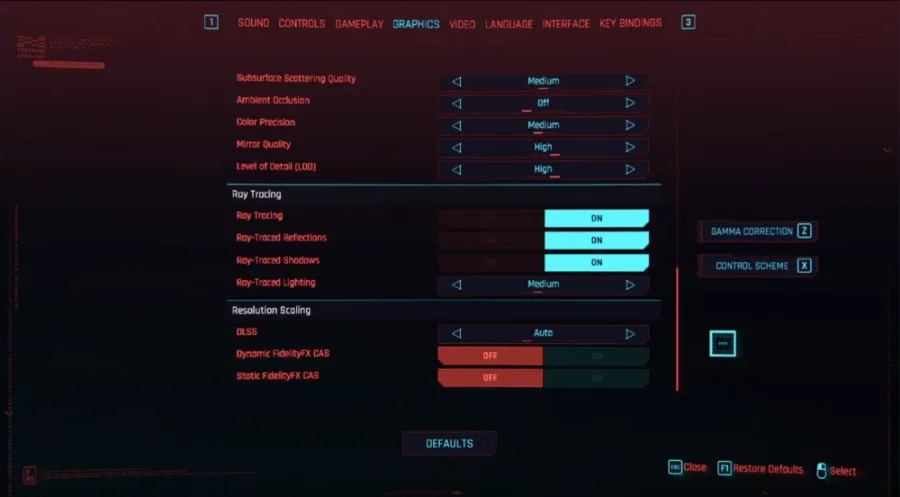
Scroll further down, in order to set the Level of detail option to high
Scroll further down, in order to set the Level of detail option to high. In case you’re running an NVIDIA RTX graphics card, then you should take advantage of ray tracing as it has a big visual impact.
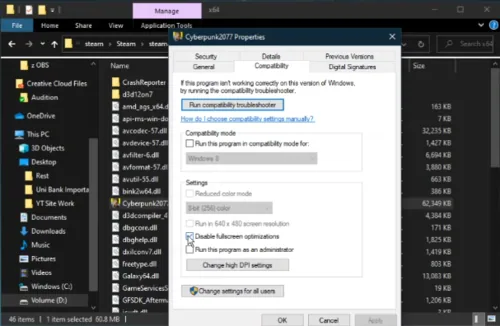
Optimize the Cyberpunk 2077 Compatibility Settings
The final step would be to prevent your system or the game from changing the visual quality. This will be done by changing the game’s compatibility property: Close Cyberpunk and open up your file explorer, then navigate to the drive on which you installed the game. Right-click Cyberpunk2077 click on Properties and disable the Fullscreen Optimizations option.
Video walkthrough
If it does not work
- If the current interface differs, compare it with the recorded video walkthrough.