Gaming · Platform not recorded
Cyberpunk 2077 - Best Settings For Low-End PCs
Original source date
Answer
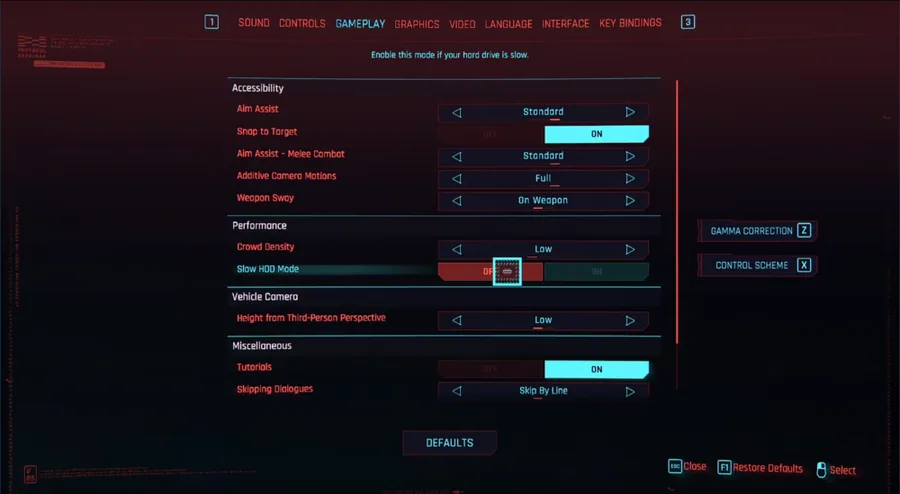
In the gameplay tab under Performance, you will find Crowd Density and Slow HDD Mode; set the settings to Low and Off respectively Navigating the video settings of Cyberpunk 2077 is crucial for improving your gaming experience, particularly on low-end systems. First, disable VSync to reduce input lag and enable the FPS limiter. Cap your FPS at a value slightly higher than your monitor's refresh rate but below the maximum FPS achievable by your system. This will help prevent screen tearing while maintaining a smooth frame rate. Make sure to set the Windowed Mode to Fullscreen for optimal performance. For systems struggling to run the game smoothly, consider lowering the resolution to 1600x900 or even 1280x720. Although the overall visual quality will be compromised, it will significantly improve the game's performance on low-end hardware. Finally, disable the HDR mode to reduce the graphical load on your PC further. Don't forget to hit 'apply' to save these changes, and enjoy a smoother, more responsive Cyberpunk 2077 experience tailored for low-end PCs.
Lower the Crowd Density
In the gameplay tab under Performance, you will find Crowd Density and Slow HDD Mode; set the settings to Low and Off respectively
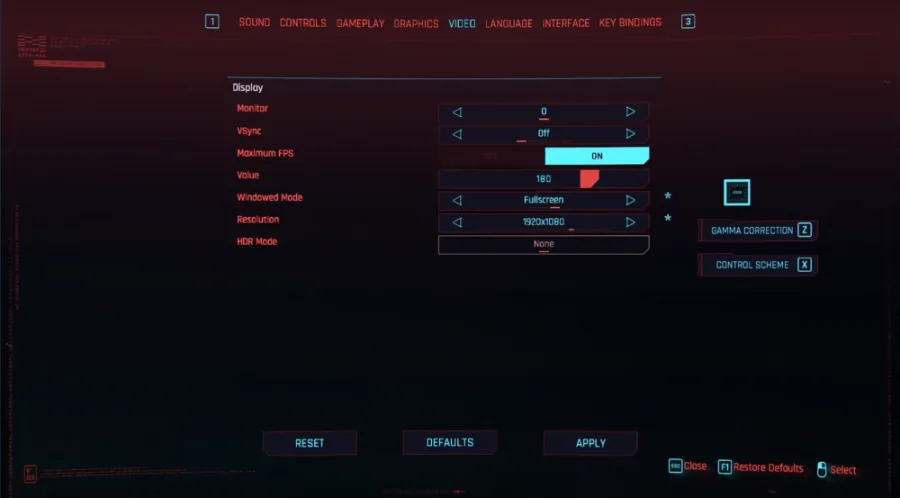
Cyberpunk 2077 Video Settings Optimization
Navigating the video settings of Cyberpunk 2077 is crucial for improving your gaming experience, particularly on low-end systems. First, disable VSync to reduce input lag and enable the FPS limiter. Cap your FPS at a value slightly higher than your monitor's refresh rate but below the maximum FPS achievable by your system. This will help prevent screen tearing while maintaining a smooth frame rate. Make sure to set the Windowed Mode to Fullscreen for optimal performance. For systems struggling to run the game smoothly, consider lowering the resolution to 1600x900 or even 1280x720. Although the overall visual quality will be compromised, it will significantly improve the game's performance on low-end hardware. Finally, disable the HDR mode to reduce the graphical load on your PC further. Don't forget to hit 'apply' to save these changes, and enjoy a smoother, more responsive Cyberpunk 2077 experience tailored for low-end PCs.
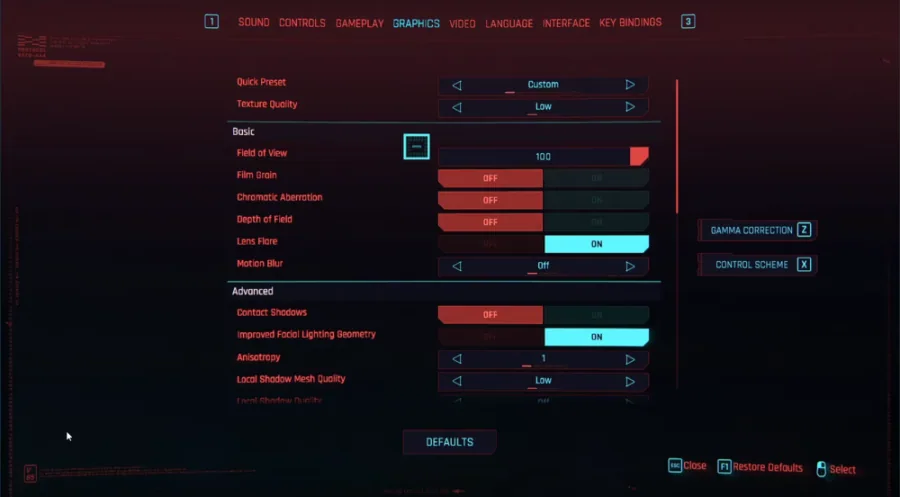
Optimizing Graphics Settings for Cyberpunk 2077
When fine-tuning the graphics settings for Cyberpunk 2077 on low-end PCs, it's essential to adjust specific options in the graphics tab under Basic. To maximize performance, make sure to disable the following settings: Film grain: This setting adds a gritty texture to the visuals, but disabling it can improve performance and provide a cleaner image.; Chromatic aberration: Turning off this setting reduces the color distortion around objects, helping to enhance the overall clarity of the game.; Depth of field: Disabling depth of field removes the blurring effect on objects in the foreground or background, potentially increasing frame rates and delivering a sharper image.; Motion blur: This setting causes moving objects to appear blurred. While it can add a sense of realism to fast-paced action, disabling it can boost performance and provide a clearer picture during gameplay.; Lens flare: Keeping lens flare enabled is a matter of personal preference, as it adds a cinematic effect to the game. However, turning it off can result in minor performance gains. By adjusting these settings, you can strike the perfect balance between visual quality and performance, ensuring an enjoyable gaming experience on low-end PCs.
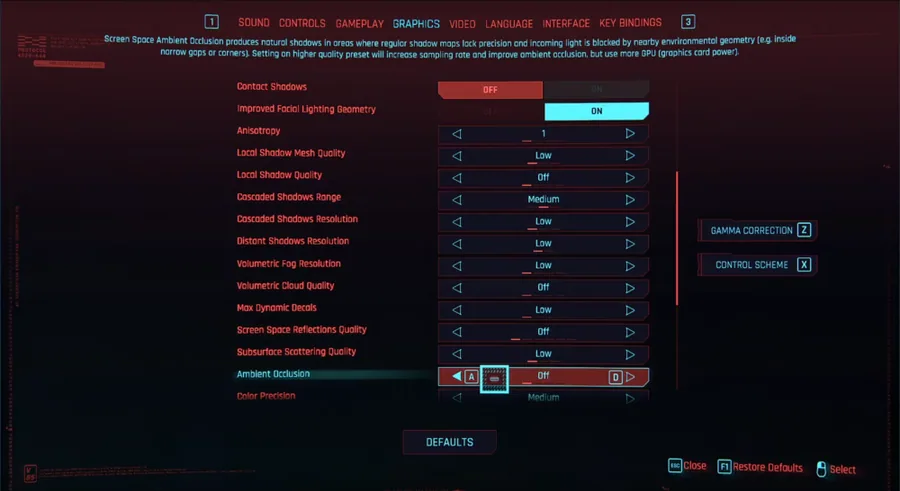
Cyberpunk 2077 Advanced Graphics Settings
In the Advanced section of Cyberpunk 2077's graphics settings, you'll find options that significantly impact the game's performance and overall visual quality. To achieve the best balance between performance and visuals on low-end PCs, consider adjusting the following settings: Contact Shadows: Off – Disabling this option will remove some shadows, potentially boosting performance.; Improved Facial Lighting Geometry: On – Keep this enabled to maintain a higher level of detail on character faces.; Anisotropy: 1 - Set the anisotropic filtering to its lowest value for improved performance.; Local Shadow Mesh Quality: Low – Reducing shadow mesh quality can help increase frame rates.; Local Shadow Quality: Off – Turning this off will remove some shadows, potentially improving performance.; Cascaded Shadows Range: Medium – Opt for a medium setting to strike a balance between shadow quality and performance.; Cascaded Shadows Resolution: Low – Lowering the resolution of cascaded shadows can help boost frame rates.; Distant Shadows Resolution: Low – Setting this to low can increase performance without significantly impacting visuals.; Volumetric Fog Resolution: Low – Reducing the resolution of volumetric fog can help improve performance.; Volumetric Cloud Quality: Off – Disabling volumetric cloud quality can result in performance gains.; Max Dynamic Decals: Low – Lowering this setting can help increase frame rates.; Screen Space Reflections Quality: Off – Turning off screen space reflections can improve performance.; Subsurface Scattering Quality: Low – Reducing this setting can help boost frame rates.; Ambient Occlusion: Off – Disabling ambient occlusion can result in performance improvements.; Color Precision: Medium – Opting for a medium setting strikes a balance between color accuracy and performance.; Mirror Quality: Low – Lowering mirror quality can help increase frame rates.; Level of Detail: Medium – Choosing a medium setting provides a good balance between visuals and performance. For those not using an RTX GPU, it's advisable to turn off Ray Tracing. Regarding Resolution Scaling, set DLSS to Auto and disable the rest. Finally, click Apply to save all changes and enjoy a smoother gaming experience on low-end PCs.
Video walkthrough
If it does not work
- If the current interface differs, compare it with the recorded video walkthrough.