Gaming · Platform not recorded
How To Create A Minecraft Server for Free (Updated)
Original source date
Answer
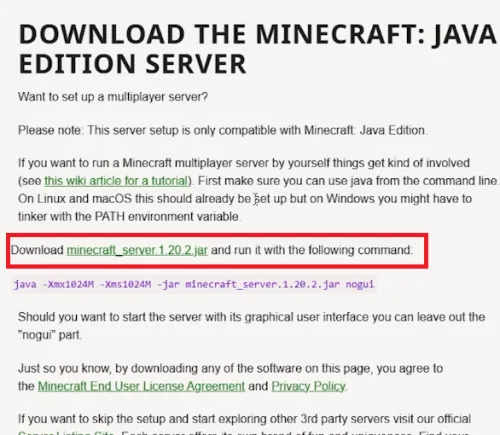
Embarking on creating a server starts with acquiring the official Minecraft multiplayer server files. Here’s how: Access Official Server Files:Visit minecraft.net/download/server or utilize the link provided in the video description.Opt for the server link designated for the Java Edition, and initiate the download for the latest version of the Minecraft Java Edition server.; Visit minecraft.net/download/server or utilize the link provided in the video description.; Opt for the server link designated for the Java Edition, and initiate the download for the latest version of the Minecraft Java Edition server.
Download Official Minecraft Server Files 📁
Embarking on creating a server starts with acquiring the official Minecraft multiplayer server files. Here’s how: Access Official Server Files:Visit minecraft.net/download/server or utilize the link provided in the video description.Opt for the server link designated for the Java Edition, and initiate the download for the latest version of the Minecraft Java Edition server.; Visit minecraft.net/download/server or utilize the link provided in the video description.; Opt for the server link designated for the Java Edition, and initiate the download for the latest version of the Minecraft Java Edition server.
Initialize Server Setup
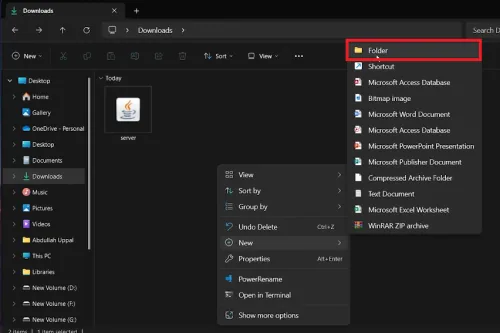
Post download, it's time to set up the server environment on your machine: Locate Downloaded Server App:Navigate to your downloads folder; your browser's download manager can assist in locating the file.; Navigate to your downloads folder; your browser's download manager can assist in locating the file.; Create Server Folder:Right-click on an empty space, navigate to New, and create a new folder.Label this folder “Minecraft Server” and move the downloaded server app into this folder.; Right-click on an empty space, navigate to New, and create a new folder.; Label this folder “Minecraft Server” and move the downloaded server app into this folder.; Run Server Application:Open the newly created Minecraft Server folder and execute the server application.Upon running, additional files will generate within the folder, totaling 6 files inclusive of the server app, post setup.; Open the newly created Minecraft Server folder and execute the server application.; Upon running, additional files will generate within the folder, totaling 6 files inclusive of the server app, post setup.
Update EULA Agreement ✅
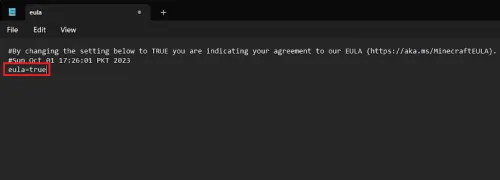
A small but crucial step to proceed with the server setup: Modify EULA Document:Access the “eula” document within the server folder using a text editor like Notepad.Change the eula value to “true”, save the document, and exit the text editor.; Access the “eula” document within the server folder using a text editor like Notepad.; Change the eula value to “true”, save the document, and exit the text editor. With the EULA agreement updated, you’re on the verge of having your Minecraft server sprouting into existence, paving the way for endless adventures in the blocky realms.
Customize Server Settings ⚙️
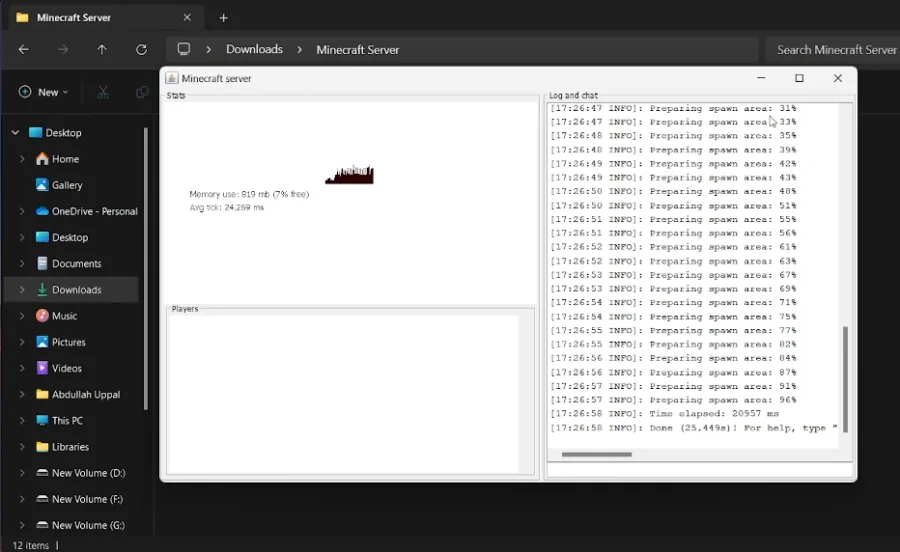
Once the server application has been initiated, a fresh Minecraft world begins to take shape for your server. Here's how to tailor your server settings: Run Server Application Again:Re-launch the “server” application from your file explorer.A window will appear, orchestrating the creation of your Minecraft server world. This process is swift, taking mere seconds based on your PC's capabilities.; Re-launch the “server” application from your file explorer.; A window will appear, orchestrating the creation of your Minecraft server world. This process is swift, taking mere seconds based on your PC's capabilities.; Tweak World Settings:Locate and open the server document file using Notepad or any text editor of your choice.Modify settings to your liking, for example, set the game mode to peaceful to ensure a serene gameplay environment.; Locate and open the server document file using Notepad or any text editor of your choice.; Modify settings to your liking, for example, set the game mode to peaceful to ensure a serene gameplay environment.; Assign Admin Rights:In the Minecraft server application, type “op [YOUR USERNAME]” and press enter to grant yourself admin privileges, unlocking the ability to manage the server settings in-game.; In the Minecraft server application, type “op [YOUR USERNAME]” and press enter to grant yourself admin privileges, unlocking the ability to manage the server settings in-game.
Embark on Your Minecraft Server Adventure 🌏
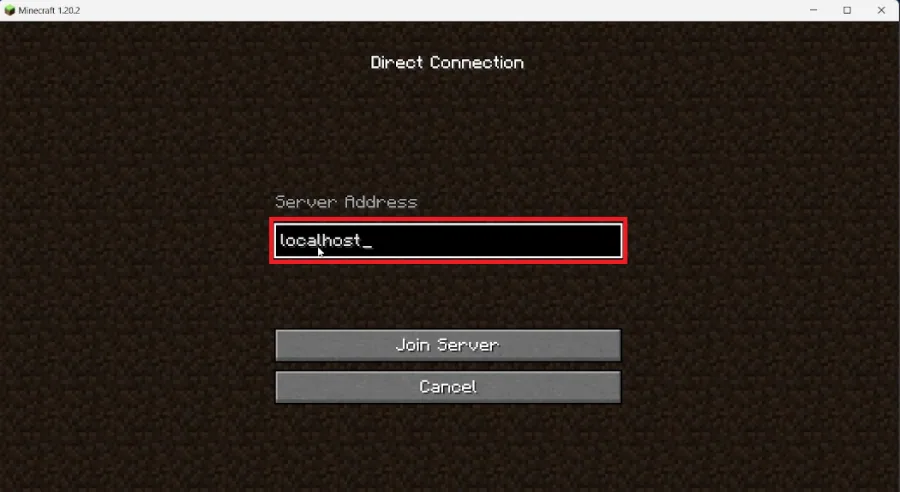
With the settings finely-tuned, it's time to delve into your server world: Launch Minecraft Java Edition:Run the Minecraft Java Edition on your PC, and navigate to the “Multiplayer” option on the main menu.; Run the Minecraft Java Edition on your PC, and navigate to the “Multiplayer” option on the main menu.; Connect to Your Server:Select “Direct Connection”, then type “localhost” in the Server Address field.Hit enter, and voila! Your Minecraft character will materialize in your newly crafted server world, ready for exploration and adventures galore.; Select “Direct Connection”, then type “localhost” in the Server Address field.; Hit enter, and voila! Your Minecraft character will materialize in your newly crafted server world, ready for exploration and adventures galore. This meticulous setup ensures a smooth sail as you venture into your Minecraft server, providing a conducive environment for boundless creativity and camaraderie among fellow players.
Video walkthrough
If it does not work
- What are the basic requirements for setting up a free Minecraft server?. To set up a free Minecraft server, you'll need a PC with decent specs, an internet connection, and the Minecraft Java Edition game. Additionally, downloading the official Minecraft server files from minecraft.net is crucial.
- How can I ensure a smooth performance on my Minecraft server?. Ensuring that your PC meets the recommended specifications for running a server, and optimizing server settings through the server document file can significantly enhance server performance.
- Can I customize my server's game mode settings?. Yes, you can customize game mode settings by editing the server document file using a text editor like Notepad. For instance, you can set the game mode to peaceful to create a tranquil gameplay environment.
- How do I grant admin rights on my server?. To set yourself as the admin of your server, type “op [YOUR USERNAME]” in the Minecraft server app and hit enter. This grants you admin privileges, allowing you to manage server settings in-game.
- How do I connect to my newly created Minecraft server?. To connect, launch Minecraft Java Edition, select “Multiplayer” from the main menu, choose “Direct Connection”, type “localhost” in the Server Address field, and hit enter. Your character will be loaded into your Minecraft server world.