Windows 11 · Windows
How To Create A Batch (.bat) File on Windows
Original source date
Answer
Open Notepad:Search for "Notepad" in the Start menu and open it.; Search for "Notepad" in the Start menu and open it.; Initiate Your Script:Start with @ECHO OFF to run commands silently without displaying each line in the command prompt.; Start with @ECHO OFF to run commands silently without displaying each line in the command prompt.; Insert Your Commands:Add the tasks you want to automate. For example:To open a web browser: start chrome.exeTo perform disk cleanup: cleanmgr; Add the tasks you want to automate. For example:To open a web browser: start chrome.exeTo perform disk cleanup: cleanmgr; To open a web browser: start chrome.exe; To perform disk cleanup: cleanmgr; Conclude with a Pause:End with PAUSE to keep the command window open after execution, allowing you to review output or errors.; End with PAUSE to keep the command window open after execution, allowing you to review output or errors.
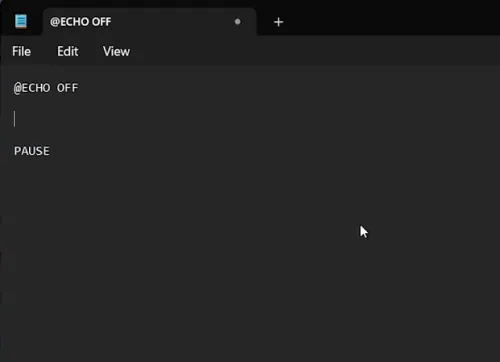
Crafting Your Script
Open Notepad:Search for "Notepad" in the Start menu and open it.; Search for "Notepad" in the Start menu and open it.; Initiate Your Script:Start with @ECHO OFF to run commands silently without displaying each line in the command prompt.; Start with @ECHO OFF to run commands silently without displaying each line in the command prompt.; Insert Your Commands:Add the tasks you want to automate. For example:To open a web browser: start chrome.exeTo perform disk cleanup: cleanmgr; Add the tasks you want to automate. For example:To open a web browser: start chrome.exeTo perform disk cleanup: cleanmgr; To open a web browser: start chrome.exe; To perform disk cleanup: cleanmgr; Conclude with a Pause:End with PAUSE to keep the command window open after execution, allowing you to review output or errors.; End with PAUSE to keep the command window open after execution, allowing you to review output or errors.
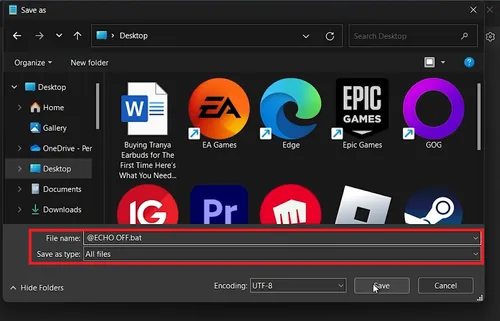
Steps to Save Your Batch File:
Open Save Dialog:In Notepad, click 'File' > 'Save As'.; In Notepad, click 'File' > 'Save As'.; Set File Type:In the 'Save As Type' dropdown, select 'All Files'.; In the 'Save As Type' dropdown, select 'All Files'.; Name Your File:Enter a filename followed by .bat (e.g., mybatchfile.bat).; Enter a filename followed by .bat (e.g., mybatchfile.bat).; Choose Location and Save:Select the save location and click 'Save'.; Select the save location and click 'Save'.
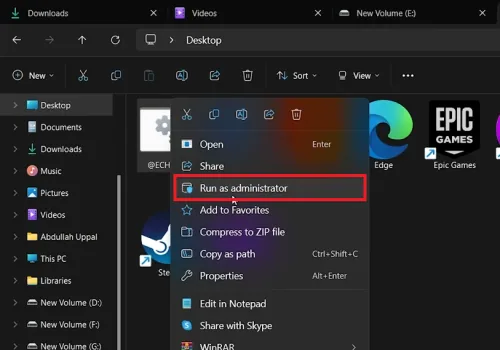
How to Run Your Batch File:
Locate the File:Navigate to the folder where you saved your batch file.; Navigate to the folder where you saved your batch file.; Run Normally or as Administrator:Double-click the file to run it.If administrative rights are needed, right-click the file and select 'Run as administrator'. Click 'Yes' if prompted by User Account Control (UAC).; Double-click the file to run it.; If administrative rights are needed, right-click the file and select 'Run as administrator'. Click 'Yes' if prompted by User Account Control (UAC).
Video walkthrough
If it does not work
- What is a batch file?. A batch file is a text file containing a series of commands executed by the Windows command line. It's used to automate repetitive tasks on Windows PCs.
- How do I create a batch file?. To create a batch file, write your commands in Notepad and save the file with a .bat extension, ensuring you select 'All Files' in the 'Save As Type' dropdown.
- Can batch files run automatically at startup?. Yes, batch files can be added to the startup folder (shell:startup in the Run dialog) or scheduled via Task Scheduler to run automatically upon login or at specified times.
- Do I need special software to create a batch file?. No special software is needed. Batch files can be created using Notepad, which is included with all versions of Windows.
- How can I edit an existing batch file?. To edit an existing batch file, right-click on the file, select 'Edit', which will open it in Notepad, where you can modify the commands as needed.