Social Media · Platform not recorded
How To Cancel Friend Request on Facebook - Tutorial
Original source date
Answer
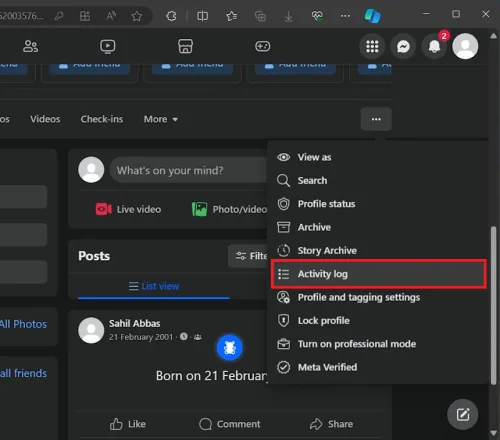
Open Facebook:Go to Facebook.com and log into your account.; Go to Facebook.com and log into your account.; Go to Your Profile:Click your profile picture in the top right corner to open a drop-down menu.Select your profile to go to your personal page.; Click your profile picture in the top right corner to open a drop-down menu.; Select your profile to go to your personal page.; Open Activity Log:Look for the three dots near your cover photo.Click the three dots to open a menu.Select "Activity Log."; Look for the three dots near your cover photo.; Click the three dots to open a menu.; Select "Activity Log."
Accessing Your Facebook Activity Log
Open Facebook:Go to Facebook.com and log into your account.; Go to Facebook.com and log into your account.; Go to Your Profile:Click your profile picture in the top right corner to open a drop-down menu.Select your profile to go to your personal page.; Click your profile picture in the top right corner to open a drop-down menu.; Select your profile to go to your personal page.; Open Activity Log:Look for the three dots near your cover photo.Click the three dots to open a menu.Select "Activity Log."; Look for the three dots near your cover photo.; Click the three dots to open a menu.; Select "Activity Log."
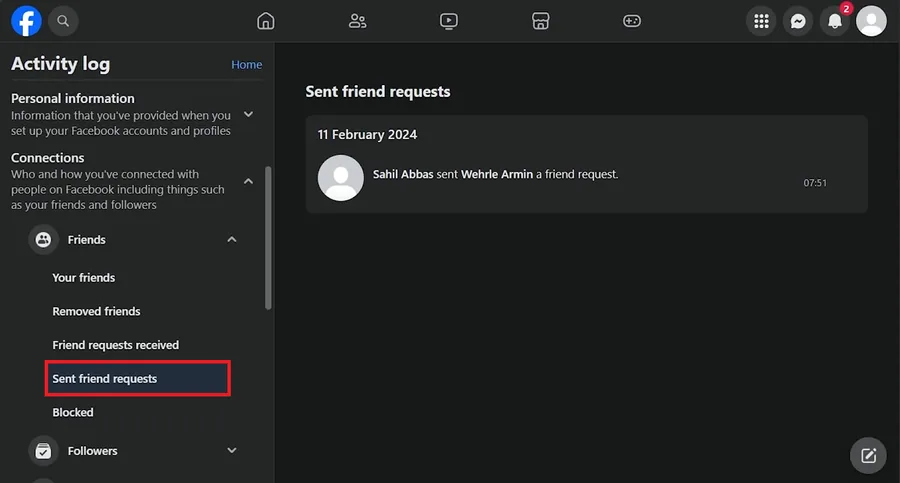
Finding Sent Friend Requests
Navigate to Connections:In the Activity Log, scroll to find "Connections."Click on "Connections" to expand the options.; In the Activity Log, scroll to find "Connections."; Click on "Connections" to expand the options.; Select Sent Friend Requests:Choose "Friends."Click on "Sent friend requests" to view all requests you've sent.; Choose "Friends."; Click on "Sent friend requests" to view all requests you've sent.
Canceling Sent Friend Requests
Identify the Request:Browse the list of sent friend requests.Find the request you want to cancel.; Browse the list of sent friend requests.; Find the request you want to cancel.; Cancel the Request:Click the recipient's name to go to their profile page.Select "Cancel Request."; Click the recipient's name to go to their profile page.; Select "Cancel Request."

Important Considerations
No Notification: The person will not be notified when you cancel a friend request. It simply disappears from their notifications.; Manage Connections: This feature helps you control your social connections without any awkwardness. By following these steps, you can efficiently manage and retract any friend requests on Facebook, keeping your social network just the way you want it.
Video walkthrough
If it does not work
- How do I cancel a friend request I accidentally sent on Facebook?. To cancel a sent friend request, go to your profile, access the Activity Log, select "Connections," then "Friends," and choose "Sent friend requests." Find the person's name and click "Cancel Request.”
- Will the person know if I cancel a friend request on Facebook?. No, Facebook does not notify users when a friend request is canceled. The request simply disappears from their pending notifications.
- Can I cancel a friend request from the Facebook mobile app?. Yes, the process to cancel a friend request on the Facebook mobile app is similar. Go to your profile, tap on the three horizontal lines for the menu, select "Friends," then "Sent Friend Requests," and cancel as needed.
- What happens if I accidentally cancel a friend request?. If you accidentally cancel a friend request, the recipient will not be notified. You can always send another friend request if you change your mind later.
- Is there a limit to how many friend requests I can cancel on Facebook?. No, Facebook does not limit the number of friend requests you can cancel. You have the freedom to manage your sent requests as you see fit.