Social Media · Windows
How To Deactivate Facebook Account on PC - Easy Guide
Original source date
Answer
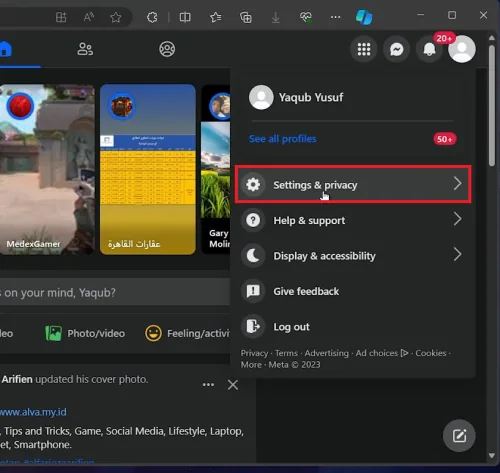
Deactivating your Facebook account involves several straightforward steps: Log in to Facebook:Open your preferred web browser.Go to Facebook.com and log in using the account credentials of the account you wish to deactivate.; Open your preferred web browser.; Go to Facebook.com and log in using the account credentials of the account you wish to deactivate.; Profile and Settings:Once logged in, locate your profile icon in the upper right corner of the Facebook homepage.Click on the profile icon to reveal a drop-down menu.Select “Settings and Privacy,” then proceed by clicking on “Settings.”; Once logged in, locate your profile icon in the upper right corner of the Facebook homepage.; Click on the profile icon to reveal a drop-down menu.; Select “Settings and Privacy,” then proceed by clicking on “Settings.” This process ensures that you access the main settings page where you can control all aspects of your Facebook account.
Accessing Facebook Account Settings
Deactivating your Facebook account involves several straightforward steps: Log in to Facebook:Open your preferred web browser.Go to Facebook.com and log in using the account credentials of the account you wish to deactivate.; Open your preferred web browser.; Go to Facebook.com and log in using the account credentials of the account you wish to deactivate.; Profile and Settings:Once logged in, locate your profile icon in the upper right corner of the Facebook homepage.Click on the profile icon to reveal a drop-down menu.Select “Settings and Privacy,” then proceed by clicking on “Settings.”; Once logged in, locate your profile icon in the upper right corner of the Facebook homepage.; Click on the profile icon to reveal a drop-down menu.; Select “Settings and Privacy,” then proceed by clicking on “Settings.” This process ensures that you access the main settings page where you can control all aspects of your Facebook account.
Navigating to Deactivation Options
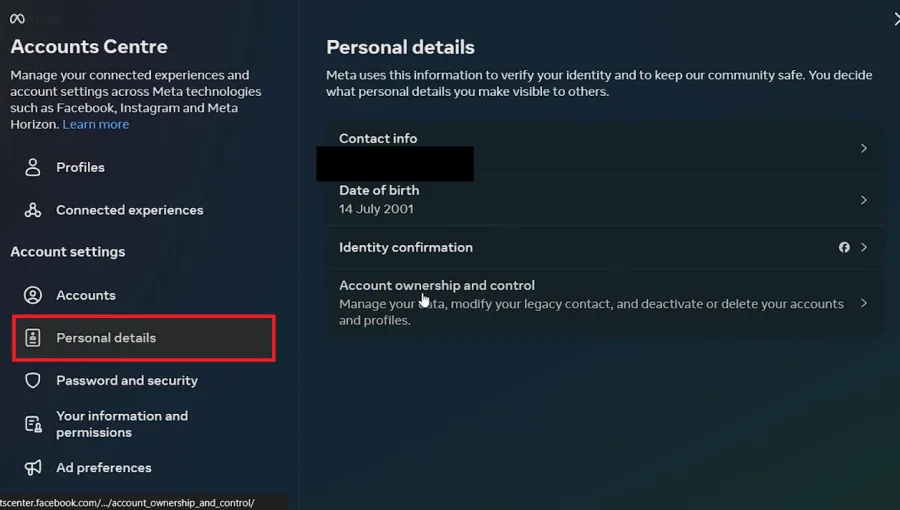
Once you're in the settings: Account Center:On the Settings page, look for the 'Account Center' on the left-hand side of the screen.; On the Settings page, look for the 'Account Center' on the left-hand side of the screen.; Personal Details:Under “Account Settings,” locate and click on “Personal Details.”; Under “Account Settings,” locate and click on “Personal Details.”; Account Ownership and Control:Within the Personal Details section, find the “Account Ownership and Control” option.Clicking on this will open a new window specifically dedicated to account management tasks.; Within the Personal Details section, find the “Account Ownership and Control” option.; Clicking on this will open a new window specifically dedicated to account management tasks. Navigating through these sections helps you find the specific controls needed to deactivate your account.
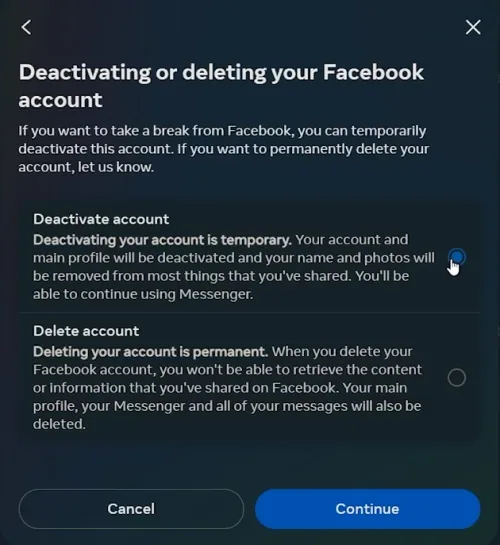
Completing the Facebook Account Deactivation Process
Facebook will ask you to specify a reason for deactivating your account: Select a Reason:A list of possible reasons will be displayed. Choose the one that best fits your situation.The specific reason you select helps Facebook understand user needs but is not critical to the deactivation process itself.; A list of possible reasons will be displayed. Choose the one that best fits your situation.; The specific reason you select helps Facebook understand user needs but is not critical to the deactivation process itself.; Click 'Continue':After selecting your reason, proceed by clicking on ‘Continue’.; After selecting your reason, proceed by clicking on ‘Continue’.
Setting the Deactivation Duration
Default Duration:By default, the deactivation is set to 7 days.; By default, the deactivation is set to 7 days.; Long-Term Deactivation:If you prefer to deactivate your account for an extended period, select the “Don't reactivate automatically” option.This ensures your account remains deactivated until you decide to manually reactivate it.; If you prefer to deactivate your account for an extended period, select the “Don't reactivate automatically” option.; This ensures your account remains deactivated until you decide to manually reactivate it.
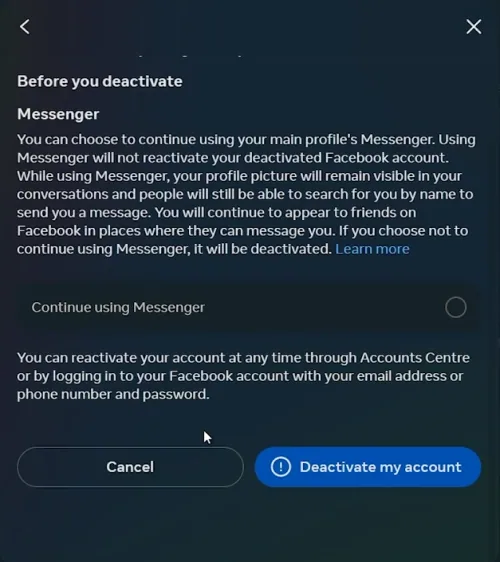
Final Confirmation and Messenger Option
Before finalizing the deactivation: Confirm Your Decision:Facebook will ask for final confirmation to deactivate the account.Review your choices and confirm.; Facebook will ask for final confirmation to deactivate the account.; Review your choices and confirm.; Messenger Continuation Option:Facebook will prompt you to decide if you wish to keep using Messenger. Tick this option if you want to stay connected via Messenger even with your Facebook account deactivated.; Facebook will prompt you to decide if you wish to keep using Messenger. Tick this option if you want to stay connected via Messenger even with your Facebook account deactivated.; Deactivate the Account:Finally, click on “Deactivate my Account.”Your account will be deactivated, and it will remain in this state until you decide to reactivate it.; Finally, click on “Deactivate my Account.”; Your account will be deactivated, and it will remain in this state until you decide to reactivate it. For example, if you're planning a vacation and want to disconnect from Facebook while still being able to chat with friends via Messenger, you can choose to keep Messenger active during your account’s deactivation period. By following these detailed steps, you can easily manage your Facebook presence, taking a break as needed while ensuring your account can be reactivated when you’re ready.
Video walkthrough
If it does not work
- Can I reactivate my Facebook account after deactivating it?. Yes, you can easily reactivate your Facebook account by simply logging in with your credentials anytime after deactivation.
- Will my friends be able to view my profile while it's deactivated?. No, your profile becomes invisible to others when you deactivate your account. Your name and messages will still be visible in friends' inboxes.
- Does deactivating Facebook automatically deactivate Messenger?. No, deactivating Facebook does not deactivate Messenger by default. You can choose to keep using Messenger even while your Facebook account is deactivated.
- Can I still use other apps logged in through Facebook if my account is deactivated?. Your ability to log into other apps with your Facebook account may be affected when your account is deactivated. It's best to check with the individual apps for their policies.
- Will deactivating my Facebook account delete my photos and posts?. No, deactivating your account does not delete any content like photos or posts. Everything is preserved and will be available if you reactivate your account.