Windows 11 · Windows
How To Fix Windows Update Error “Update Failed” - Windows 7/10/11
Original source date
Answer
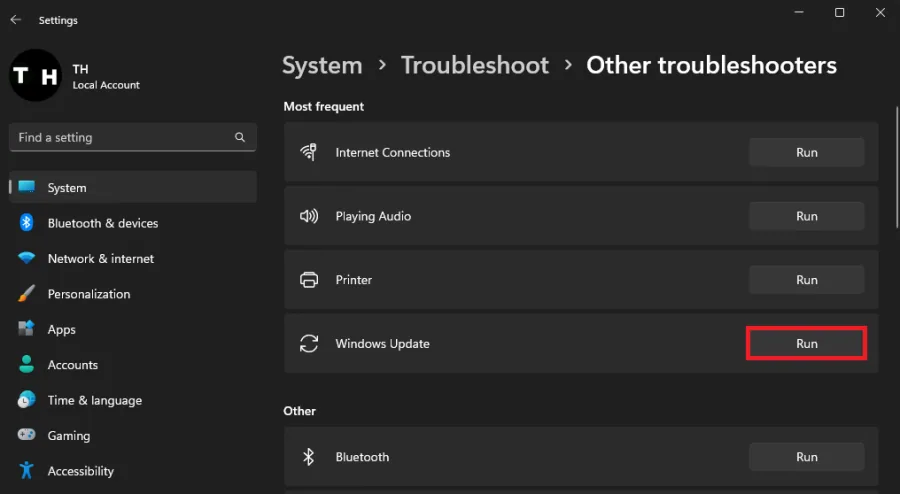
An "Update Failed" error on your Windows PC can stem from various glitches and irregularities. A smart first step to tackle this issue is deploying the Windows Update Troubleshooter, a built-in tool designed to diagnose and mend minor hiccups with Windows Update. Here's how to initiate it: Navigate to your Windows Settings.; Click on the 'System' category.; Proceed to 'Troubleshoot'.; In the section labeled 'Other Troubleshooters', select and run the 'Windows Update' troubleshooter. This process, usually taking a matter of seconds, will seek out potential problems and apply corrective measures to resolve the Windows Update error you're encountering. By doing so, it can eliminate the need for more complex troubleshooting measures in many instances.
Run the Windows Update Troubleshooter
An "Update Failed" error on your Windows PC can stem from various glitches and irregularities. A smart first step to tackle this issue is deploying the Windows Update Troubleshooter, a built-in tool designed to diagnose and mend minor hiccups with Windows Update. Here's how to initiate it: Navigate to your Windows Settings.; Click on the 'System' category.; Proceed to 'Troubleshoot'.; In the section labeled 'Other Troubleshooters', select and run the 'Windows Update' troubleshooter. This process, usually taking a matter of seconds, will seek out potential problems and apply corrective measures to resolve the Windows Update error you're encountering. By doing so, it can eliminate the need for more complex troubleshooting measures in many instances.
Reset the Windows Update Service
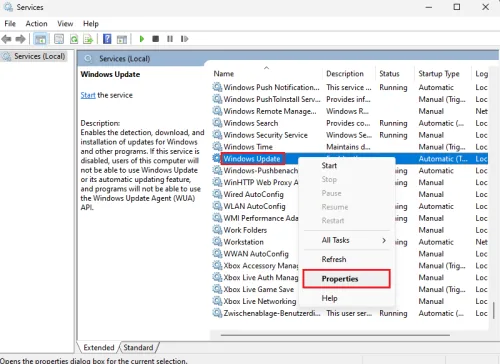
In addition to running the troubleshooter, rebooting the Windows Update service on your computer can be an effective measure in resolving the "Update Failed" error. Here are the steps to guide you through this process: Initiate a search for "Services" in your Start menu to launch the Windows Services Manager application.; Within the application window, click on any service from the list and begin typing "Windows Update" to swiftly locate the specific service.; Right-click on the Windows Update service to pull up its properties.
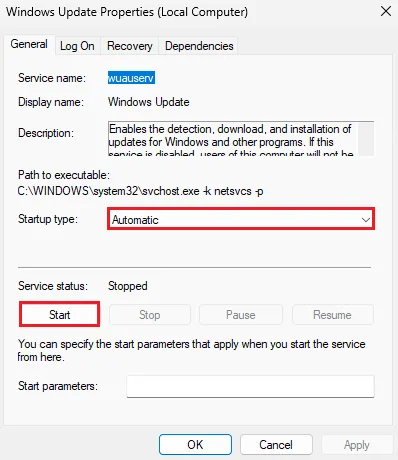
In the properties window, ensure that the startup type is set to "Automatic"
In the properties window, ensure that the startup type is set to "Automatic". This setting ensures that the service automatically starts when you boot your PC.; Check the service status, located below the startup type. It should read "Running". If it doesn't, click on the 'Start' button to activate the service. By restarting the Windows Update service, you are effectively refreshing its operations, which can often rectify any issues causing the "Update Failed" error.
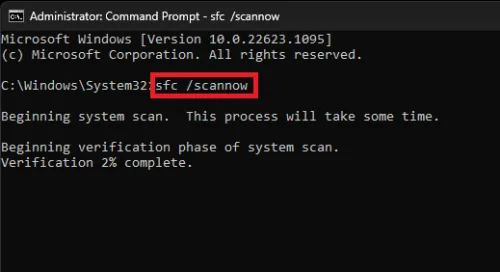
Execute the System File Checker Tool
An additional step in resolving the "Update Failed" error involves using the System File Checker tool. This tool aids in identifying and replacing any corrupted system files. Follow the steps below for a smooth procedure: Prior to starting, ensure to disconnect any peripheral devices connected to your computer. This includes items like webcams, external speakers, or headsets.; Launch the Command Prompt by typing "CMD" in your Start menu search. Remember to click "Run as Administrator" to execute it with administrative privileges.; In the Command Prompt window, enter the command "sfc /scannow". This command triggers the System File Checker tool to begin scanning all the protected system files on your PC.; Once initiated, the tool will identify any corrupted files and replace them with a cached copy stored in your system. This step has proven beneficial for numerous users experiencing the Windows Update error.; The scanning process may take a few minutes. Upon completion, a system restart is mandatory to effect the changes made. This procedure is instrumental in maintaining the health of your system files, thus minimizing the chances of the "Update Failed" error reoccurring.
Video walkthrough
If it does not work
- What is the "Update Failed" error on Windows 7/10/11?. The "Update Failed" error is a common issue that users encounter when trying to install updates on their Windows 7/10/11 operating system. It could occur due to various reasons including corrupted system files, faulty Windows Update service, or even issues with peripherals.
- How can I fix the "Update Failed" error on my Windows PC?. You can resolve the "Update Failed" error by running the Windows Update troubleshooter, restarting the Windows Update service, and using the System File Checker tool. If these steps don't work, you might need to check your peripherals or consult professional help.
- How do I run the Windows Update troubleshooter on Windows 7/10/11?. You can access the Windows Update troubleshooter by opening your Windows Settings, clicking on System, and then selecting the Troubleshoot option. From there, choose "Windows Update" in the "Other Troubleshooters" section.
- How does the System File Checker tool help in resolving the "Update Failed" error?. The System File Checker tool scans all protected system files on your PC and replaces any corrupted files with a cached copy. This process helps fix potential issues causing the Windows Update error.
- What should I do if the "Update Failed" error still persists after following these steps?. If the error continues, it might be due to more complex issues that need professional attention. Consider reaching out to Microsoft support or a trusted IT professional. Always remember to backup your data before trying more advanced troubleshooting methods.