Windows 11 · Windows
How To Repair Windows 11 & Fix Corrupted Files
Original source date
Answer
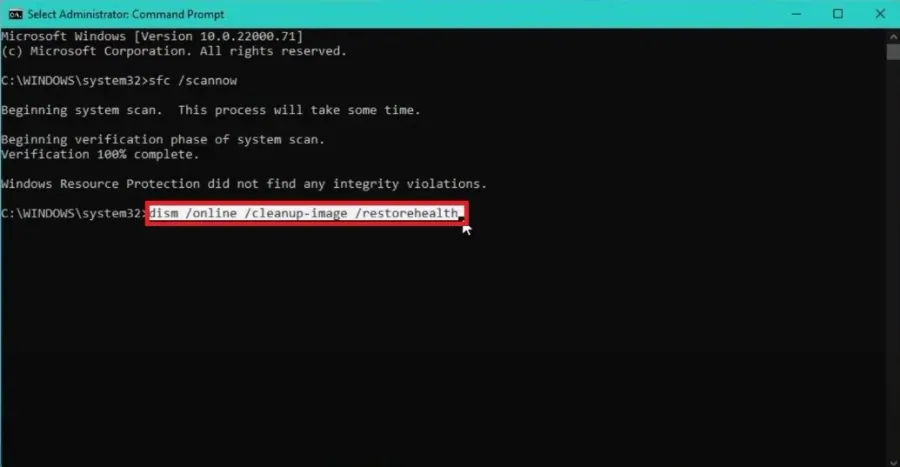
The first troubleshooting method to repair Windows 11 and fix corrupted files is to use the Windows Command Prompt. Go to your start menu type: Command Prompt. Right-click the icon and select Run as administrator. In your command prompt, use the command sfc /scannow and hit enter. This process will take some time, usually around 2 to 5 minutes. If this method doesn’t work for you, then you will need to use other commands. In your command prompt, type the command dism /online /cleanup-image /restorehealth and hit enter. This process will also take some time, depending on your system configuration and the number of files that you have on your PC. Once the process is complete, restart your PC to check whether your issue is solved.
Scan & Restore your Windows 11 Files
The first troubleshooting method to repair Windows 11 and fix corrupted files is to use the Windows Command Prompt. Go to your start menu type: Command Prompt. Right-click the icon and select Run as administrator. In your command prompt, use the command sfc /scannow and hit enter. This process will take some time, usually around 2 to 5 minutes. If this method doesn’t work for you, then you will need to use other commands. In your command prompt, type the command dism /online /cleanup-image /restorehealth and hit enter. This process will also take some time, depending on your system configuration and the number of files that you have on your PC. Once the process is complete, restart your PC to check whether your issue is solved.
Restart Windows in Safe Mode
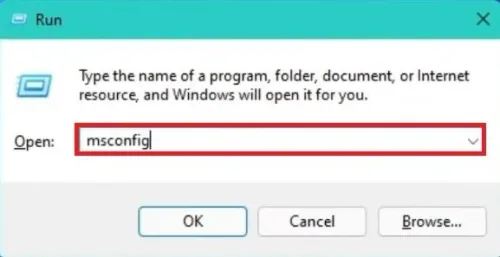
Restart your PC in safe mode. To do this, use the Windows key + R shortcut to open up the Run dialogue. In the Run dialogue box, type msconfig and click on OK.
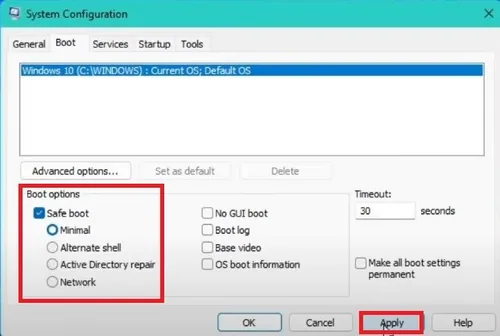
The System Configuration window will appear
The System Configuration window will appear. Navigate to the Boot tab and enable the Safe boot option by ticking the checkbox. Apply the changes and click on OK. Select the Restart option to apply these changes. Your PC will then restart in safe mode.
After the restart, navigate to your start menu search, and search for Command Prompt
After the restart, navigate to your start menu search, and search for Command Prompt. In your command prompt, type the command sfc /scannow and hit enter. This process will take some time, like the previous one depending on your system configuration.

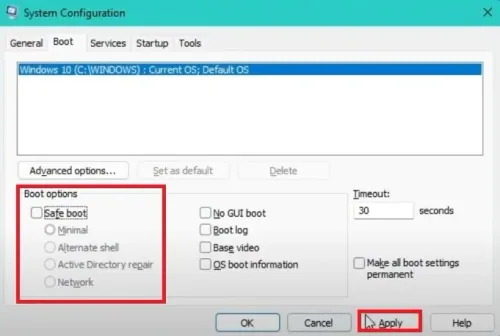
Once the process is complete, restart your PC into normal mode
Once the process is complete, restart your PC into normal mode. To do so, open Run using the shortcut Windows key + R. In the Run dialogue box, type msconfig and click Ok. In the System Configuration window, navigate to the Boot tab and disable the Safe boot option. Apply the changes and click on Ok. Select the Restart option to apply these changes.
Restore the Windows System Files and Settings
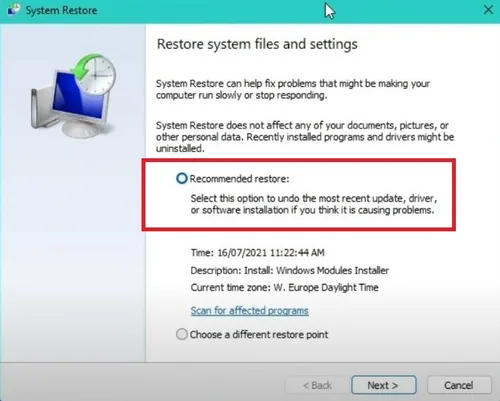
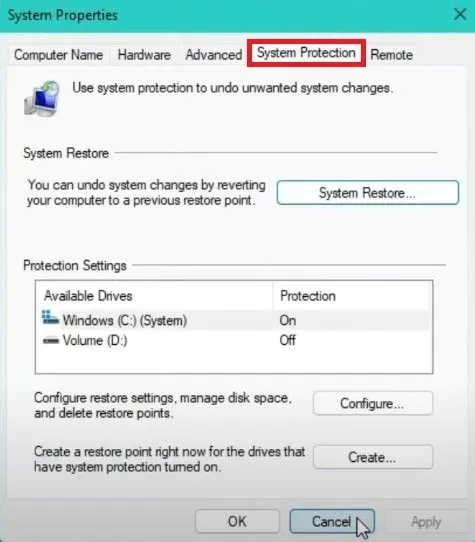
Lastly, go to your start menu search and type System Restore. Click on the Create a restore point option. The System Properties window will appear. Navigate to System Protection and click on System Restore. A System Restore window will appear. You’ll have two options; Recommended restore or Choose a different restore point. If you have previously created a system restore point, select the second option and click Next.
Select the system restore point you want to use and click next
Select the system restore point you want to use and click next. Confirm your system restore point and click on “Finish.” This might take some time to restore your computer. Once the process is complete, check whether the issue is resolved or not. Also, make sure to create a backup before running the system restore point to avoid losing your important files.
Video walkthrough
If it does not work
- If the current interface differs, compare it with the recorded video walkthrough.