Gaming · Platform not recorded
How To Make A Texture Pack In Minecraft - Guide
Original source date
Answer
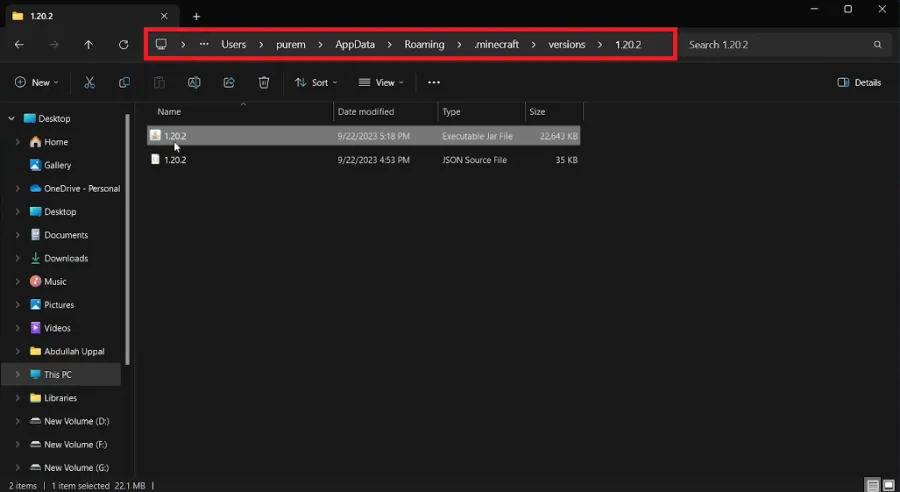
To kickstart your texture pack creation, first, access your Minecraft application files. Use the Start Menu search bar to look for %AppData% and press Enter. This action will open your file explorer, where you'll then go to.minecraft and finally to the versions folder. Inside the versions folder, you'll find a list of Minecraft versions you've installed since your gaming journey began. Choose the version you want to modify and copy its.jar file, then paste it onto your desktop.
Locate and Copy the Minecraft Version File
To kickstart your texture pack creation, first, access your Minecraft application files. Use the Start Menu search bar to look for %AppData% and press Enter. This action will open your file explorer, where you'll then go to .minecraft and finally to the versions folder. Inside the versions folder, you'll find a list of Minecraft versions you've installed since your gaming journey began. Choose the version you want to modify and copy its .jar file, then paste it onto your desktop.
Unzip and Extract the Version File
Now, it's time to prepare your file. Change the file extension from .jar to .zip. If a warning pop-up appears, simply click "Yes." Once done, proceed to extract the .zip file to your desktop. The extraction could take up to 90 seconds but it's a crucial step in creating your custom texture pack.
Modify Minecraft Texture Files 🎨
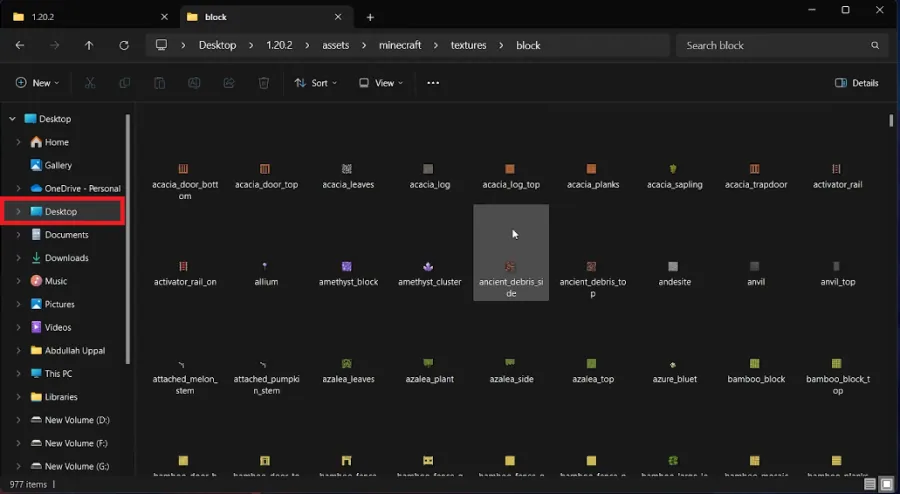
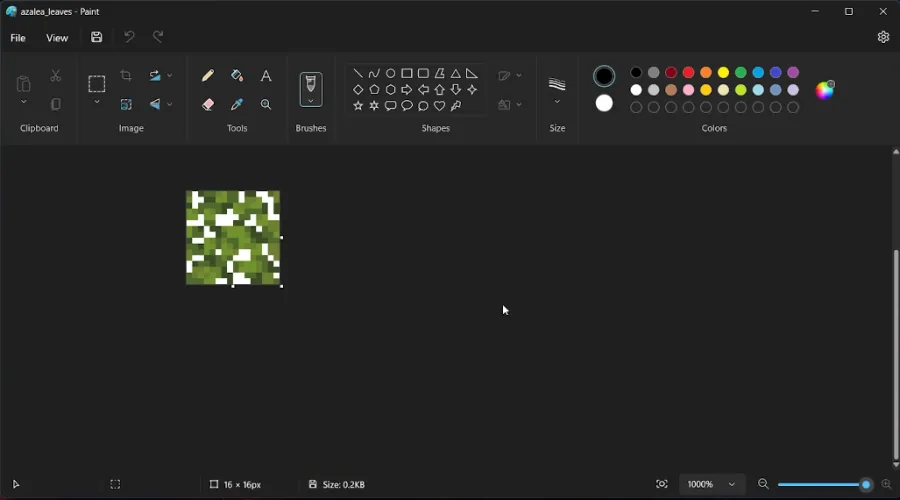
After extracting the folder, delete all content except for the essential game "assets." Head to the directory following this path: assets > minecraft > textures. Here you'll discover a myriad of texture files that make up the Minecraft universe, from blocks to mobs. Choose a texture you'd like to customize—let's say, for instance, the grass block texture. Right-click on it and select "Open With," then choose a photo editor. While professionals might opt for Photoshop, MS Paint works just as well for simple edits and comes pre-installed on Windows systems. Pro Tip: Avoid distorting the image by stretching or expanding it. Instead, use the zoom slider located in the lower-right corner to get a closer look at the texture details. Unleash your creativity by employing MS Paint's arsenal of free editing tools. Add new designs, patterns, or colors to make the texture uniquely yours. Once satisfied with your edits, save the file to lock in your customizations.
Generate Your Texture Pack Metadata 📝
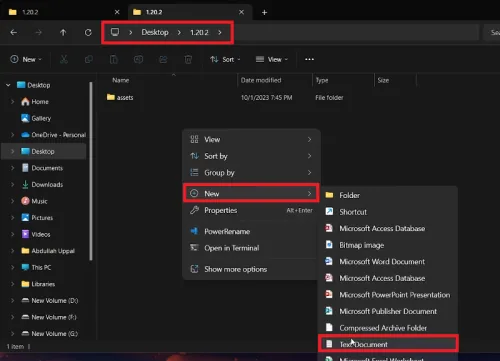
The finishing touch to your custom Minecraft texture pack involves creating a metadata file, known as pack.mcmeta. Navigate to your version-specific folder using File Explorer. Right-click in the window to unveil a drop-down menu, then select "New" and create a "Text Document."
Upon opening this newly created Text Document, click on the "File" tab located in…
Upon opening this newly created Text Document, click on the "File" tab located in the upper-left corner, and opt for the "Save As" option. In the ensuing dialog box, rename the file to pack.mcmeta and set the "Save As Type" to "All Files." Copy the JSON code snippet below, which will serve as your pack's foundational metadata:
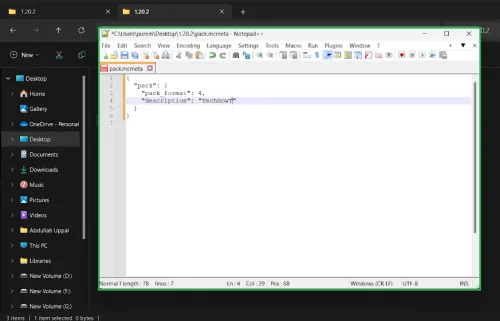
Open your pack.mcmeta file using Notepad++—an essential text editor for coding tasks
Open your pack.mcmeta file using Notepad++—an essential text editor for coding tasks. If you haven't yet installed Notepad++, you'll find a download link in the related tutorial. Paste the copied JSON code into the Notepad++ editor, and personalize the "description" field. Save the file to finalize your unique Minecraft texture pack metadata.
Finalize and Deploy Your Custom Texture Pack
To put the finishing touches on your Minecraft texture pack, start by removing any leftover Text Document files from your working folder. Highlight the crucial files—usually assets and pack.mcmeta—and right-click to see the context menu. Select "Compress to Zip File" and let your computer do the zipping magic. Once the compressed file is ready, rename it to something memorable like "MyAwesomeTexturePack.zip," ensuring it reflects the essence of your creation. Now it's time to integrate your texture pack into Minecraft. Navigate to the %AppData% folder again, and make your way to the .minecraft directory, specifically locating the resourcepacks folder. Drop your newly minted texture pack zip file here. Pro Tip: Ensure Minecraft isn't running while you do this for a seamless integration. After this, you're all set to relaunch Minecraft and equip your game worlds and servers with your custom-designed texture pack.

Video walkthrough
If it does not work
- How Do I Access Minecraft App Files to Create a Texture Pack?. To access the Minecraft app files, open your start menu and search for %AppData%. Hit enter and your file explorer will open up. From there, navigate to .minecraft and then go to the versions folder.
- What File Format Should My Texture Pack Be In?. Your texture pack needs to be in a .zip file format containing all your custom textures and a pack.mcmeta file. The zip file should be placed in the resourcepacks folder within the .minecraft directory.
- Can I Use Any Photo Editor for Texture Editing?. Yes, you can use various photo editors such as MS Paint, Photoshop, or GIMP. Just make sure to zoom into the texture for precise editing and avoid stretching or expanding the texture files.
- What Code Do I Need for the pack.mcmeta File?. In your pack.mcmeta file, include a JSON code that specifies the pack format and description. For example:{ "pack": { "pack_format": 4, "description": "My Custom Texture Pack" } }
- How Do I Make Sure My Custom Texture Pack Works?. After placing your zip file in the resourcepacks folder, restart Minecraft and navigate to Options > Resource Packs. Your custom texture pack should appear in the list; click on it to activate.