Windows 11 · Windows
How To Merge C: and D: Drive in Windows 10/11
Original source date
Answer
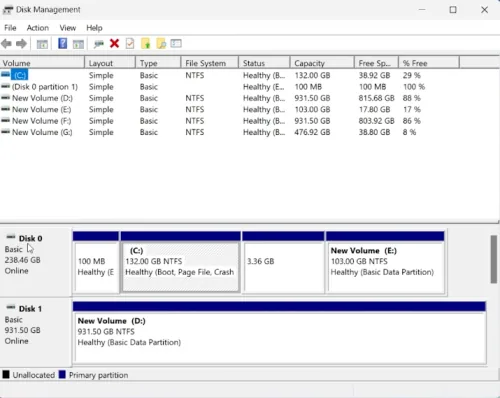
Embarking on the journey to merge your C: and D: drives? Here’s a crisp walkthrough to get it done: Launch Disk Management:Hit the Start Menu, type in “Create and Format Hard Disk Partitions,” and press enter. A Disk Management window will pop up showcasing all your disks.; Hit the Start Menu, type in “Create and Format Hard Disk Partitions,” and press enter. A Disk Management window will pop up showcasing all your disks.; Identify Drives:Navigate to the “Disk 0” section. Here you'll find your D drive (it could be named E: or something else on your PC, so keep an eye out).; Navigate to the “Disk 0” section. Here you'll find your D drive (it could be named E: or something else on your PC, so keep an eye out).
Merge Drives Step-by-Step
Embarking on the journey to merge your C: and D: drives? Here’s a crisp walkthrough to get it done: Launch Disk Management:Hit the Start Menu, type in “Create and Format Hard Disk Partitions,” and press enter. A Disk Management window will pop up showcasing all your disks.; Hit the Start Menu, type in “Create and Format Hard Disk Partitions,” and press enter. A Disk Management window will pop up showcasing all your disks.; Identify Drives:Navigate to the “Disk 0” section. Here you'll find your D drive (it could be named E: or something else on your PC, so keep an eye out).; Navigate to the “Disk 0” section. Here you'll find your D drive (it could be named E: or something else on your PC, so keep an eye out).
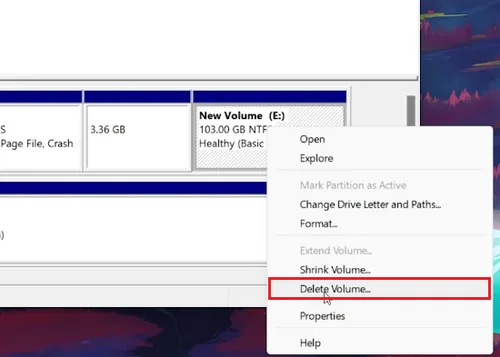
Delete D Drive Volume:Right-click on the D drive and from the drop-down menu, cho…
Delete D Drive Volume:Right-click on the D drive and from the drop-down menu, choose “Delete Volume.”A confirmation prompt will appear; hit “Yes.” This step will erase all data on the D drive. Ensure you've backed up vital files to your C: drive or a cloud service.; Right-click on the D drive and from the drop-down menu, choose “Delete Volume.”; A confirmation prompt will appear; hit “Yes.” This step will erase all data on the D drive. Ensure you've backed up vital files to your C: drive or a cloud service.
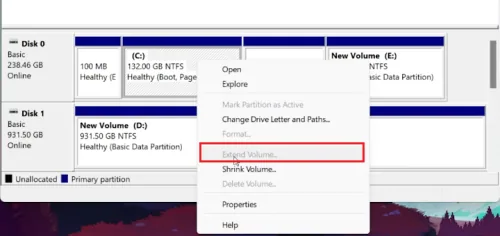
Extend C Drive Volume:Post deletion, a black bar labeled “unallocated” will appea…
Extend C Drive Volume:Post deletion, a black bar labeled “unallocated” will appear under the D drive’s storage size.Now, right-click on your C: drive, and select “Extend Volume” from the menu.The “Extend Volume Wizard” will launch. Simply follow through by selecting Next > Next > Finish.; Post deletion, a black bar labeled “unallocated” will appear under the D drive’s storage size.; Now, right-click on your C: drive, and select “Extend Volume” from the menu.; The “Extend Volume Wizard” will launch. Simply follow through by selecting Next > Next > Finish. Voila! Your C: and D: drives are now one unified drive, paving the way for streamlined storage management on your Windows PC.
Video walkthrough
If it does not work
- What happens to my data when I merge C: and D: drives?. Merging drives involves deleting the D: drive, which will erase all the data stored on it. Ensure you back up all essential files to an external storage or cloud service before proceeding.
- Is merging C: and D: drives reversible?. Yes, you can reverse the process by shrinking the C: drive to create unallocated space and then creating a new D: drive. However, the original data on D: drive won't be recovered unless you have a backup.
- Can I merge the drives without losing data?. It's advisable to backup all data before merging. However, using third-party partition manager software can help merge drives without losing data, though there's always a risk involved.
- Is it safe to merge C: and D: drives?. Merging drives is a relatively safe operation if done correctly, but there's always a risk of data loss. Ensure you follow the steps carefully and have a complete backup of your data.
- Will merging drives affect the performance of my PC?. Merging drives won’t notably affect your PC's performance but will provide you with a larger space for storage, which can be beneficial for installing programs and storing files.