Mac OS · macOS
How To Install & Setup Zoom on Mac OS
Original source date
Answer
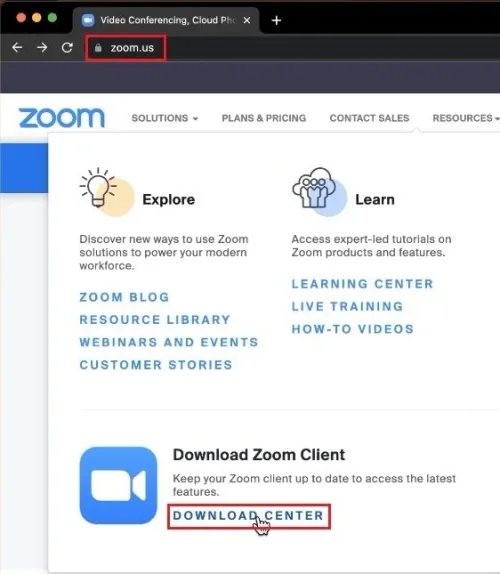
First, make sure that Zoom is properly installed on your Mac. Navigate to Zoom.us to get to the official download page, or click on the link in the description below to get to this page. Under Resources, click on download for Zoom Desktop Client. This will start downloading the 80 MB install file for Zoom. It should only take a minute to download the file, and your browser can help you find your downloaded files.
Download & Install Zoom
First, make sure that Zoom is properly installed on your Mac. Navigate to Zoom.us to get to the official download page, or click on the link in the description below to get to this page. Under Resources, click on download for Zoom Desktop Client. This will start downloading the 80 MB install file for Zoom. It should only take a minute to download the file, and your browser can help you find your downloaded files.
Double-click the downloaded file, which will start the install wizard
Double-click the downloaded file, which will start the install wizard. Install Zoom to your system by following the steps shown on your screen. You might need to use your admin password to allow the Zoom installation on your Mac. When this is done, a new window will open up, asking you if you want to join a meeting straight away or to log into your account. Click on Sign In.

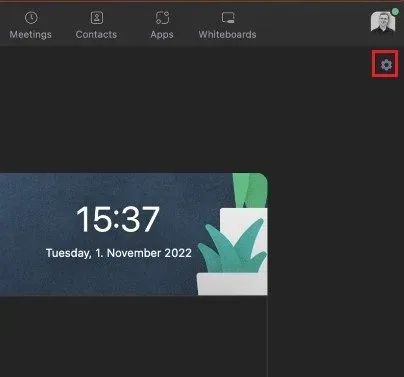
After signing in to your account, the Zoom application should open up automatically
After signing in to your account, the Zoom application should open up automatically. When this is done, you should take a look at your Zoom settings to make sure that your microphone and webcam are configured correctly. To do so, click on the gear icon on the top right of your screen to access your settings.
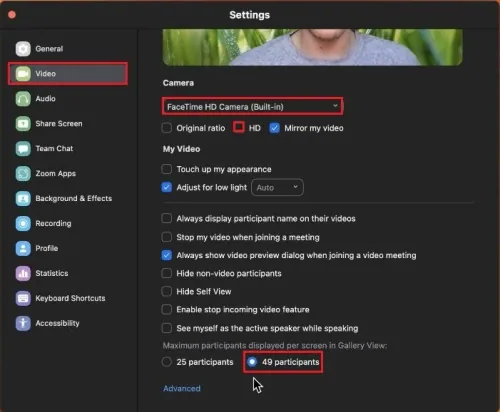
Zoom Video Settings
in the Video section, you might be asked to allow Zoom access to your internal camera. Allow access to your camera to get access to these settings. Set the Camera option to the camera you wish to use. For most of you, this should be your built-in Mac camera. You can enable or disable the HD option to get better video quality, but this will also depend on your camera. Feel free to test if this option makes any difference. If not, then disable the HD option to save some resources while using Zoom. The Touch Up My Appearance option will make your face less wrinkled, but it will, in turn, also reduce some details in your video feed. Options like adjusting for low light can be very useful, depending on your current setting, before starting a Zoom call. You should, in all cases, test out these settings to ensure that your video footage looks the best it can. On the bottom of this window, you can enable the option that allows 49 call participants to show up on one single monitor in gallery view while in a Zoom call. This option is set to 25 participants by default, as it can cause performance and network-related issues when set to 49.
Zoom Audio Settings
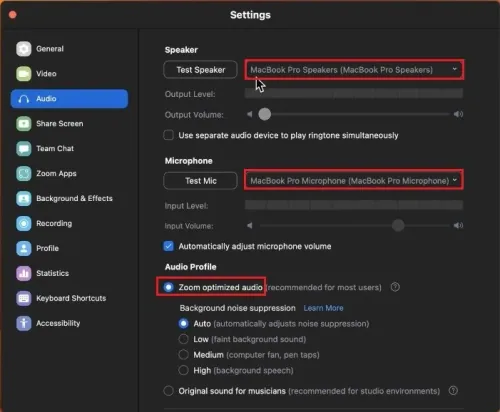
Set the Speaker and Microphone options in the Audio section of your Zoom settings to your preferred audio output and input device. You have the option to test your speakers or headphones as well as your microphone to make sure that these are set to the correct device. Below, I’d suggest enabling the Automatically adjust microphone volume option. This will allow Zoom to reduce or increase your input volume to ensure that call participants get the most out of your voice. If you feel like some of these default settings are reducing your mic or video quality, you should disable them and test your mic and video quality to see what works best for you. Under Audio Profile, the Zoom-optimized audio option should work best for most users. If you feel like you’re experiencing a lot of background noise, set this option to High. This will require you to speak loudly into your mic while in a Zoom call, but it will, in turn, heavily decrease any background noise you are experiencing.
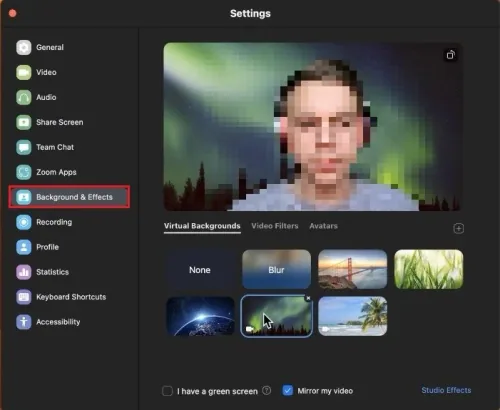
Background & Effects Settings
Under Background & Effects, you can select a preferred video background. Choose to blur your background or insert a different picture as your video background when joining a Zoom video call.
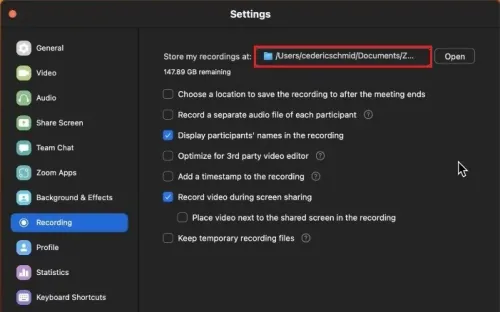
Zoom Recording Settings
If you intend on recording Zoom calls, then navigate to the Recording section of your preferences. First, you’ll be able to change your Zoom recording download location on your Mac. Below, change some settings of your recordings, such as displaying the participants’ names or adding a timestamp to the recording.
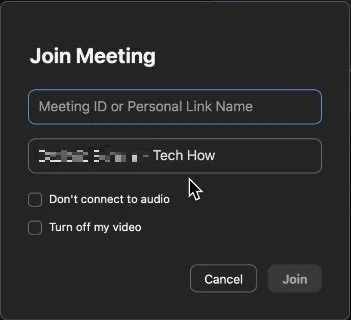
Join a Zoom Meeting
You can then close your Zoom settings and select create a new or join a meeting. When selecting Join, you must enter the meeting ID or personal link you received in your Zoom invitation.
Video walkthrough
If it does not work
- How long does it take to install Zoom on Mac OS?. The installation process should take about 5-10 minutes, depending on the speed of your internet connection.
- Can I use Zoom on Mac OS without an account?. No, you need to sign up for an account or sign in with your existing account to use Zoom on Mac OS.
- Is there a difference between the Mac OS version of Zoom and other versions?. No, the functionality of Zoom is the same across all platforms, including Mac OS.
- Can I run Zoom on an older version of Mac OS?. Zoom requires Mac OS X 10.10 (Yosemite) or higher. If you're running an older version, you'll need to upgrade your operating system.
- Can I use Zoom for video and audio calls on Mac OS?. Yes, you can use Zoom for both video and audio calls on Mac OS, as well as for virtual meetings and webinars.