Adobe · Platform not recorded
Create Minimalist 2D Intro in After Effects - Tutorial & Template
Original source date
Answer
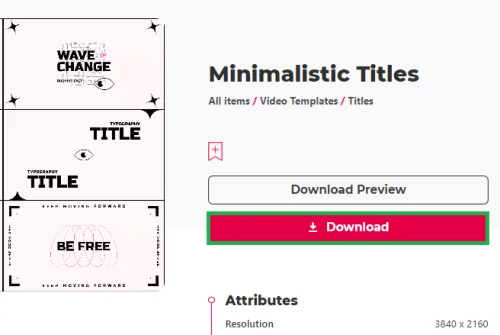
To start creating your minimalist 2D intro in After Effects, the first step is to download the necessary template: Find the Template: Visit this Envato Elements page. Envato Elements offers a vast library of resources, including the template needed for this project, along with a variety of other add-ons, plugins, and templates compatible with After Effects.; Sign Up for Access: To download, sign up for Envato Elements. This gives you access not only to the required template but also to a multitude of additional creative tools and resources.; Download the Template: Once you find the template, download it. The downloaded file will likely be in a compressed (.zip) format.
Download and Extract the After Effects Template
To start creating your minimalist 2D intro in After Effects, the first step is to download the necessary template: Find the Template: Visit this Envato Elements page. Envato Elements offers a vast library of resources, including the template needed for this project, along with a variety of other add-ons, plugins, and templates compatible with After Effects.; Sign Up for Access: To download, sign up for Envato Elements. This gives you access not only to the required template but also to a multitude of additional creative tools and resources.; Download the Template: Once you find the template, download it. The downloaded file will likely be in a compressed (.zip) format.
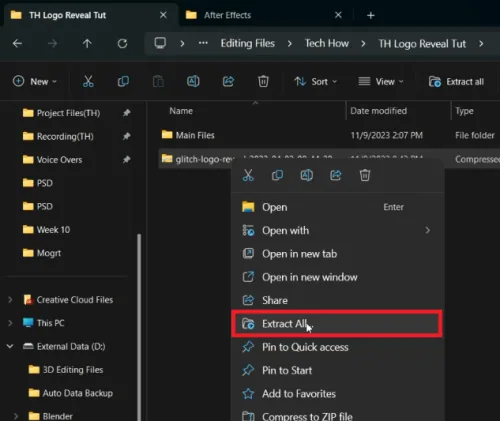
Extract the File: On a Windows PC: Right-click the .zip file and select 'Extract…
Extract the File: On a Windows PC: Right-click the .zip file and select 'Extract All' in your downloads folder.; On a Mac: Similar extraction process applies. Double-click the .zip file, and it will automatically extract in the same location. After these steps, you will have a new folder containing the After Effects template file, ready for use in your project.
Import and Customize the After Effects Template
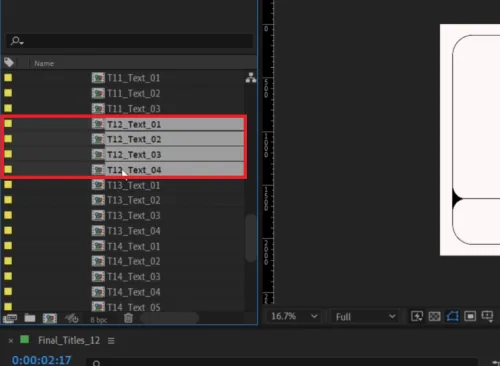
Creating a minimalist 2D text intro in After Effects is straightforward with the right template. Here's how you can do it: Import the Template into After Effects:Open your After Effects project workspace.Drag and drop the extracted project file into the workspace.; Open your After Effects project workspace.; Drag and drop the extracted project file into the workspace.; Explore the Project Contents:Click on the arrow in the project panel to expand and view the imported project's contents.This project includes various motion graphics title templates, offering multiple creative options.; Click on the arrow in the project panel to expand and view the imported project's contents.; This project includes various motion graphics title templates, offering multiple creative options.; Selecting the Template:For a minimalist 2D text intro, navigate to the "Render" folder within the Project window.Locate and double-click on the composition named "Final_Titles_12". This action opens the composition where you can start editing.; For a minimalist 2D text intro, navigate to the "Render" folder within the Project window.; Locate and double-click on the composition named "Final_Titles_12". This action opens the composition where you can start editing.; Customizing Text Elements:Once inside the "Final_Titles_12" composition, you can begin customizing the text according to your needs.For example, change “MOVE” and “FORWARD” to "TECH" and "HOW", and set "TECH HOW TAGLINE" as the tagline.To edit these texts, go to the "EDIT" folder, and then into the "TEXT" folder.Look for compositions that start with "T12" – in this case, there are four compositions related to the 12th title. Each composition represents a different part of the title, allowing you to change each piece of text individually.; Once inside the "Final_Titles_12" composition, you can begin customizing the text according to your needs.; For example, change “MOVE” and “FORWARD” to "TECH" and "HOW", and set "TECH HOW TAGLINE" as the tagline.; To edit these texts, go to the "EDIT" folder, and then into the "TEXT" folder.; Look for compositions that start with "T12" – in this case, there are four compositions related to the 12th title. Each composition represents a different part of the title, allowing you to change each piece of text individually. By following these steps, you can easily select and modify the motion graphics template in After Effects to fit your specific requirements, creating a sleek and stylish 2D intro.
Customize Text in After Effects Intro Template
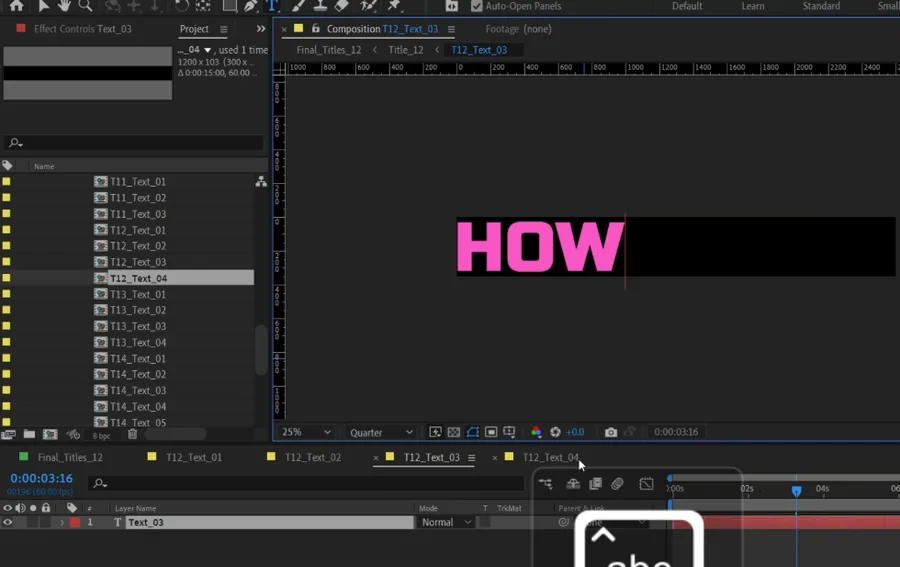
Personalizing the text in your After Effects intro template is simple and can significantly impact your final animation. Here's a step-by-step guide: Open Text Compositions:Access each of the four text compositions in your project. These are found in the "EDIT" and then "TEXT" folders.Open them one by one by double-clicking on each composition.; Access each of the four text compositions in your project. These are found in the "EDIT" and then "TEXT" folders.; Open them one by one by double-clicking on each composition.; Edit Text in Composition 'Text 1':In the "Text 1" composition, find the default text in the preview window.Double-click on it to edit. For instance, replace "MOVE" with "TECH" or any text you prefer.; In the "Text 1" composition, find the default text in the preview window.; Double-click on it to edit. For instance, replace "MOVE" with "TECH" or any text you prefer.; Preview Changes:After editing, return to the "Final_Titles_12" composition to view how the changes look in the overall animation.This step allows you to check the integration of your custom text with the animation.; After editing, return to the "Final_Titles_12" composition to view how the changes look in the overall animation.; This step allows you to check the integration of your custom text with the animation.; Remove Unnecessary Text Layers:In the "Text 2" composition, if a text layer isn’t needed, simply select it and delete it.; In the "Text 2" composition, if a text layer isn’t needed, simply select it and delete it.; Modify Additional Text Compositions:Continue to the "Text_3" composition and change the text to "HOW" or another choice of wording that aligns with your theme.In the "Text_4" composition, input your tagline, like "TUTORIALS" or any other suitable phrase.; Continue to the "Text_3" composition and change the text to "HOW" or another choice of wording that aligns with your theme.; In the "Text_4" composition, input your tagline, like "TUTORIALS" or any other suitable phrase. By carefully adjusting each text layer, you can ensure that every part of your intro aligns with your branding or the message you want to convey. This customization step is crucial in creating a cohesive and impactful introduction for your video.
Previewing and Exporting Your 2D Intro in After Effects
Finalizing your 2D intro animation in After Effects is straightforward. Here’s how you can preview and export your project:
Preview Your Animation
Return to Main Composition:Once you've finished editing the text, navigate back to the "Final_Titles_12" composition.; Once you've finished editing the text, navigate back to the "Final_Titles_12" composition.; Play to Preview:Play the animation to see how your edits look. Initially, playback might be slow or laggy.; Play the animation to see how your edits look. Initially, playback might be slow or laggy.; Wait for Full Render:For smoother playback, wait until the timeline is fully rendered, indicated by a green line above the timeline.; For smoother playback, wait until the timeline is fully rendered, indicated by a green line above the timeline.
Export Your Intro
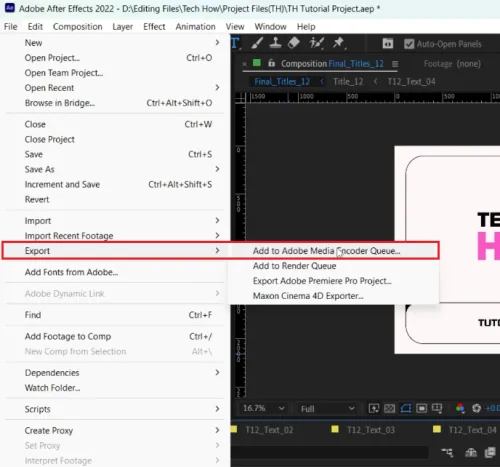
Initiate Export Process:To export your project, go to the top menu and click on “File”.Then, select “Export” followed by “Add to Media Encoder Queue”.; To export your project, go to the top menu and click on “File”.; Then, select “Export” followed by “Add to Media Encoder Queue”.; Media Encoder Queue:After adding your project to the Adobe Media Encoder Queue, it might take a few moments to appear.; After adding your project to the Adobe Media Encoder Queue, it might take a few moments to appear.; Start Rendering:Once visible in the queue, click the ‘Start’ button to commence the rendering process.; Once visible in the queue, click the ‘Start’ button to commence the rendering process. By following these steps, you can successfully preview and export your minimalist 2D intro animation, ensuring a seamless and professional finish for your project. Remember to allow sufficient time for rendering to achieve the best quality output.
Affiliate Disclosure: Some of the links on this page are affiliate links, which m…
Affiliate Disclosure: Some of the links on this page are affiliate links, which means that we may earn a commission if you click through and make a purchase from our recommended template providers. This doesn’t affect the price you pay and helps us maintain this site to continue providing you with the best template recommendations.
Video walkthrough
If it does not work
- Can I use my own logo in this After Effects template?. Absolutely! The template is designed to easily incorporate your logo. Simply drag and drop your logo file, preferably with a transparent background, into the designated composition.
- How do I customize the text in the template?. Customizing text is easy. Find the "TEXT" folder in the "EDIT" section, double-click on the text layers, and replace the default text with your desired words.
- Is it necessary to have After Effects experience to use this template?. Basic knowledge of After Effects is helpful but not essential. The template is user-friendly, and the tutorial guides you through each step.
- Can I change the color scheme of the intro?. Yes, most templates allow color customization. Look for color control layers or settings within the template to adjust colors to fit your brand.
- What should I do if the playback of the animation is laggy?. Initial lag is normal. For smooth playback, allow the timeline to fully render, indicated by a green line above the timeline, before previewing.