Gaming · Platform not recorded
Overwatch - How To Boost FPS & Improve Performance
Original source date
Answer
If you're experiencing performance issues while playing Overwatch, adjusting the in-game settings can often make a significant difference in FPS and overall gameplay. It's important to note that the specific changes you make will depend on your system's specifications and capabilities. For example, if you're using a low-end PC, you may want to decrease your graphics quality or disable certain visual effects, such as shadows or reflections. Similarly, if you have limited RAM or processing power, you may want to reduce the amount of particles or other on-screen elements that can cause lag.
Adjust the Overwatch In-Game Settings
If you're experiencing performance issues while playing Overwatch, adjusting the in-game settings can often make a significant difference in FPS and overall gameplay. It's important to note that the specific changes you make will depend on your system's specifications and capabilities. For example, if you're using a low-end PC, you may want to decrease your graphics quality or disable certain visual effects, such as shadows or reflections. Similarly, if you have limited RAM or processing power, you may want to reduce the amount of particles or other on-screen elements that can cause lag.
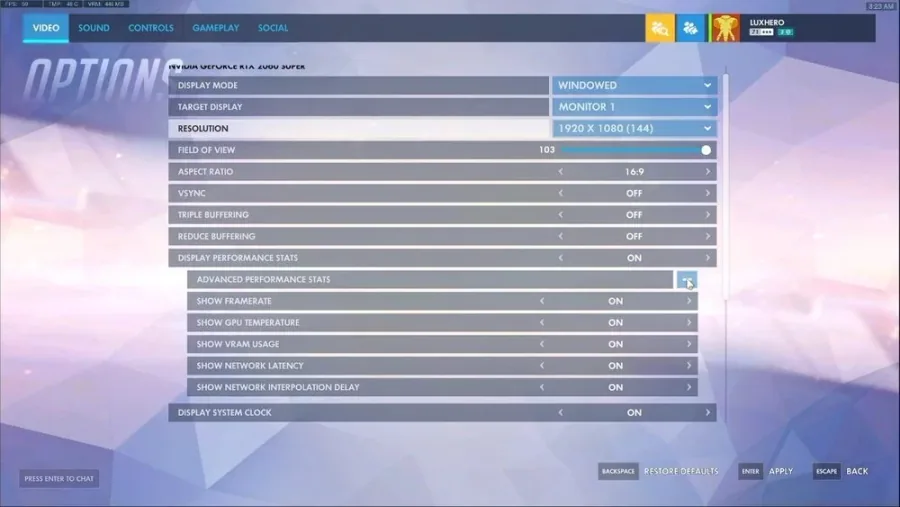
Video Settings
Optimizing your video settings is a crucial step in boosting FPS and improving performance in Overwatch. Start by navigating to the video tab in your settings and setting the screen resolution and aspect ratio to match your native monitor resolution. If you're still experiencing lag or low FPS, consider lowering your screen resolution to 1600x900 or lower, although this may impact the overall visual quality of the game. Another important setting to adjust is VSync and Triple Buffering. Disabling these features can reduce input lag and improve overall responsiveness. To help monitor your FPS and other performance metrics, be sure to enable the Display Performance Stats option in your settings. This will display a FPS counter, VRAM usage, CPU temperature, and more on the top left of your screen, allowing you to track the impact of different tweaks and optimizations. Finally, consider setting a custom FPS limit to a value above your screen refresh rate but below the maximum FPS your system can handle. This can help reduce screen tearing and other visual artifacts while also ensuring a smooth, stable framerate. By making these adjustments to your video settings and monitoring your performance stats, you can optimize your Overwatch experience and gain a competitive edge on the battlefield.
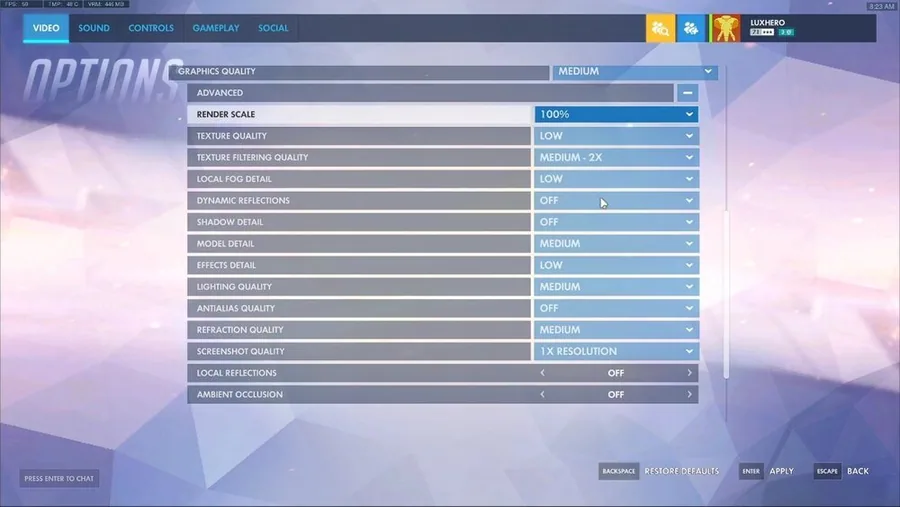
Advanced Video Settings
For those looking to optimize their Overwatch experience even further, adjusting the advanced video settings can make a significant difference in FPS and overall performance. Start by setting the graphics quality to a level that works best with your components. For low-end systems, it's recommended to set this to Low. Next, expand the Advanced options and make the following changes: Reduce your Render Scale to 100%; Set the Texture Quality to Low; Set Texture Filtering Quality to Medium 2x; Set Local Fog Detail to Low; Turn off Dynamic Reflections; Turn off Shadow Detail; Set Model Detail to Medium; Set Effects Detail to Low; Set Lighting Quality to Medium; Turn off Antialias Quality; Set Refraction Quality to Medium; Disable Local Reflections and Ambient Occlusion Be sure to apply these changes to see the impact on your gameplay performance. By customizing your advanced video settings, you can further optimize your FPS and gain a competitive edge in Overwatch.
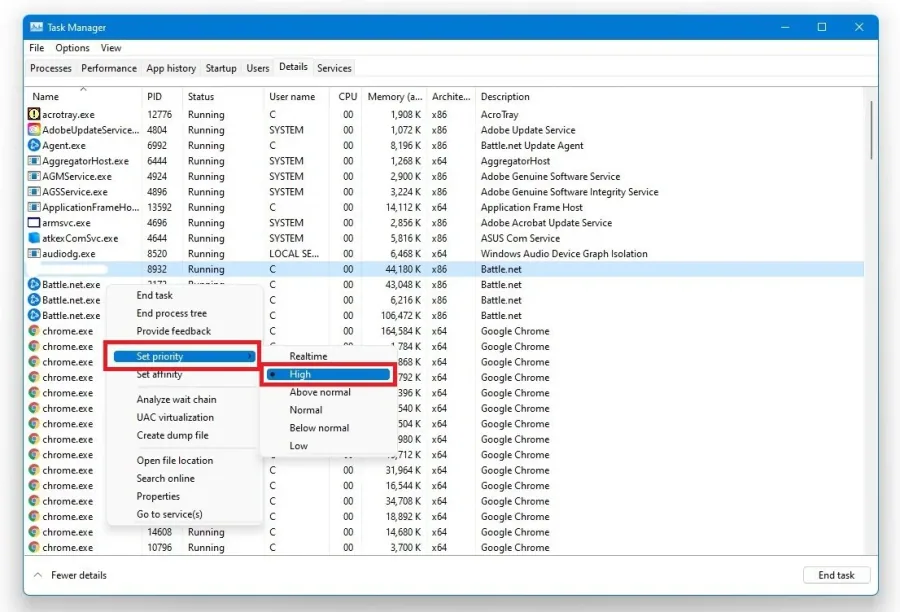
Change the Overwatch Process Priority
Changing the process priority of Overwatch can be a powerful way to boost performance and reduce lag on your PC. To get started, right-click on your taskbar to open the Task Manager. From there, navigate to the Processes tab and right-click on the Overwatch process. Select "Go to details" to access the Details tab, where you can highlight the application and set the priority to high. By allocating more resources to Overwatch, this setting can help improve performance, particularly if you have other programs running in the background that may be competing for CPU resources. In addition to adjusting process priority, you can reduce CPU utilization by ending unnecessary programs running in the background. Be sure only to end programs you know won't interfere with your operating system. Another way to further optimize your system is by preventing certain programs from starting up on system boot. You can access the Startup tab in Task Manager to disable unnecessary programs from running when your PC starts up. By making these adjustments and prioritizing Overwatch, you can minimize lag and ensure a smooth, responsive gaming experience.
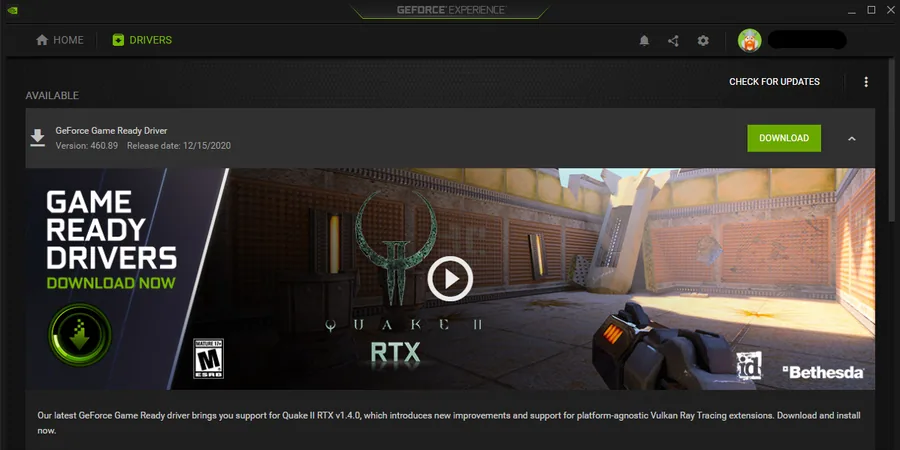
Update Graphics Card Driver
NVIDIA graphics cards can utilize the GeForce Experience application. Click here to download the application to your system. When the download is completed, open up the application, and in the Drivers tab select Download. This will download and install the latest GPU update and should only take a few minutes to complete.
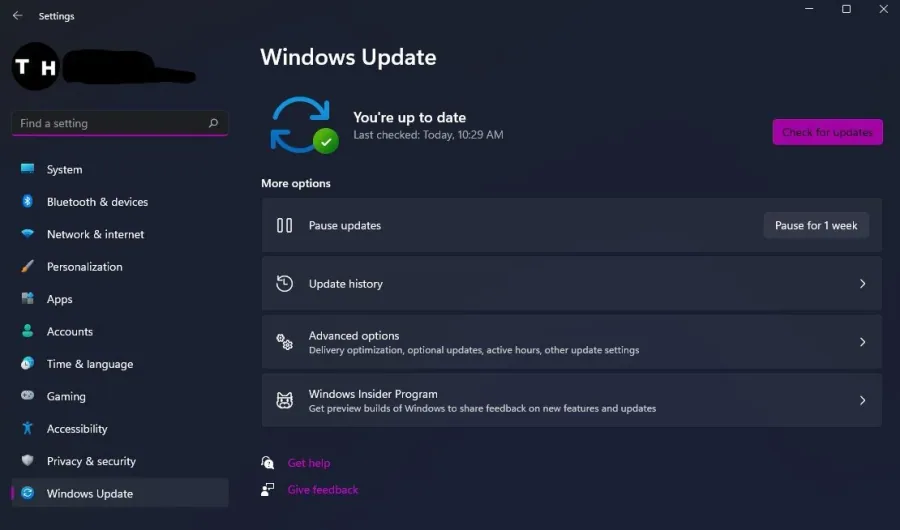
Update Operating System
To optimize your system for performance, you should make sure that your operating system is up to date. Simply search for Update in your taskbar search. In your Check for updates system settings window, make sure to download the latest update and make sure to restart your PC after that the download is completed. This will in any case help you with performance issues.
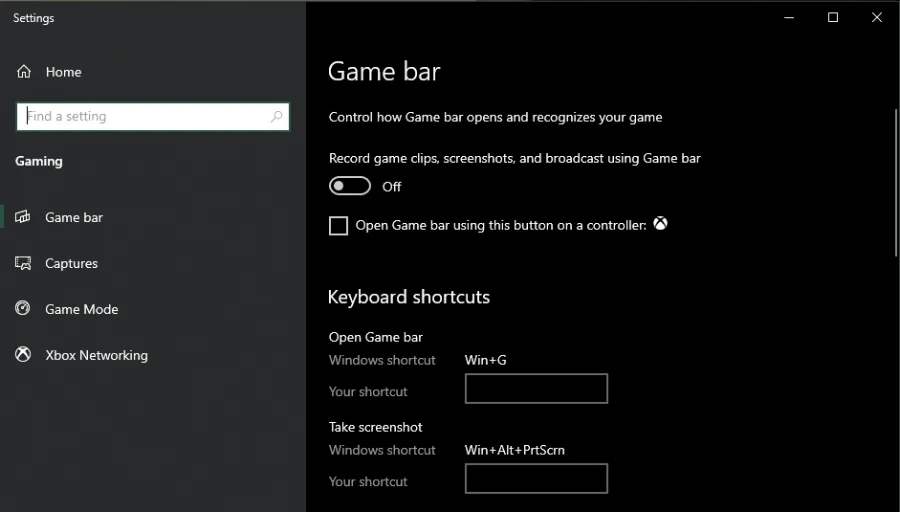
Disable Xbox Game Bar Recording
Optimizing your Windows settings is an important step in improving performance and reducing lag while playing Overwatch. One setting that can have a significant impact on your gameplay is the Game Bar recording option, which continuously records your gameplay and audio, putting additional strain on your system. To disable this feature, simply search for "Game Bar" in your taskbar search to open up the game bar system settings. From there, uncheck the recording option to turn off this feature. Additionally, in the Captures tab, be sure to disable the background recording option, which can also reduce your performance. While it can be tempting to record your gameplay for later review or sharing, using the native Windows 10 Game Bar recording option can come at a performance cost. If you do want to record your gameplay, it's recommended to use an external capture card or software like OBS Studio, which won't have as much of an impact on your system's performance. By adjusting your settings and disabling unnecessary features, you can maximize your FPS and gain a competitive edge in Overwatch.
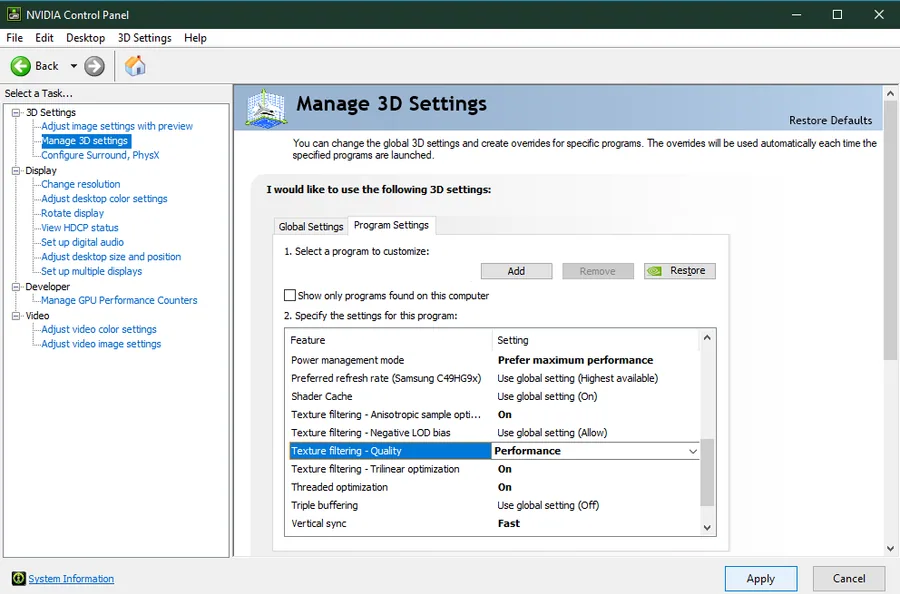
Adjust the NVIDIA Control Panel Options
Adjusting your NVIDIA control panel options can be a game-changer when it comes to improving performance and FPS in Overwatch. To get started, right-click on your desktop and select NVIDIA Control Panel. From there, navigate to Manage 3D Settings > Program Settings. Next, select "Add a program to customize" and locate Overwatch in the program list. If you're unable to find the game, you can click on "Browse" and locate the drive and path on which Overwatch is installed to add it to the program list. Once you've added Overwatch to the program list, you can begin customizing your settings. Make sure that the CUDA setting is set to your main GPU, as this will ensure that Overwatch is utilizing your graphics card effectively. You should also set the Power management mode to "Prefer maximum performance" to ensure your GPU runs at full power. Finally, adjust the texture filtering quality to "Performance" for optimal performance. By making these changes to your NVIDIA control panel options, you can boost your FPS and gain a competitive edge in Overwatch. Don't let lag or low performance hold you back - optimize your system today and dominate the battlefield.
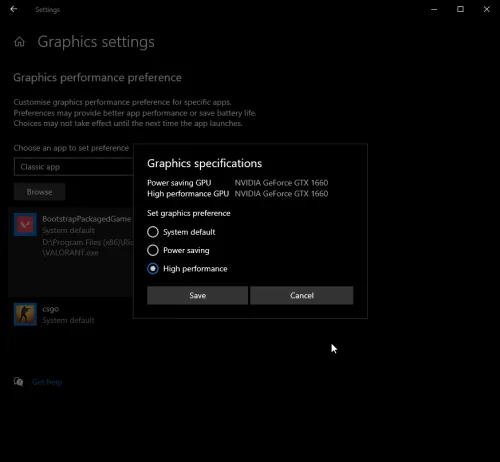
Change the Overwatch Graphics Preference
Optimizing your graphics settings is a key step in maximizing performance while playing Overwatch on Windows. To start, enter "Graphics Settings" in your taskbar search to open up your native settings. From there, select "Browse" to navigate to the drive and path where Overwatch is saved on your system. Once you've added the program to your graphics settings list, you can choose between several options, including: Let Windows choose; Power Saving (usually Intel HD Graphics); High Performance (usually your graphics card(s)); Specific GPU (which allows you to choose which GPU to use) For the best system performance while playing Overwatch, it's recommended to use the High-Performance option. This will utilize your graphics card(s) to their fullest potential and ensure a smooth, responsive gameplay experience. However, if your GPU is bottlenecking your performance, you may want to select the "Let Windows Decide" option. Be sure to apply your changes to see the impact on your Overwatch performance. You can optimize your system and gain an edge over your opponents by utilizing power user settings like graphics preferences. Don't let lag or low FPS hold you back - maximize your performance today and dominate the battlefield in Overwatch.
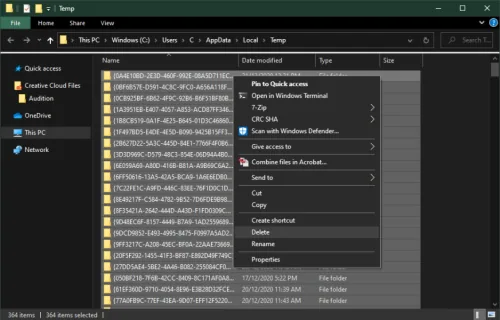
Delete Windows Temporary Files
Over time, your hard drive can become cluttered with unwanted temporary files that can slow down your system and impact your Overwatch gameplay performance. To combat this issue, it's important to regularly delete these files and free up space on your hard drive. One way to do this is by using PC cleanup programs such as CCleaner, which will automatically scan and remove temporary files for you. However, you can also delete these files manually by entering "%temp%" in your taskbar search and hitting enter. This will open up a new folder containing your temporary files, which you can then delete. Be aware that this process may take a few minutes if you haven't done it before, and some files may not be deleted if they are still in use by your programs. To ensure that all temporary files are deleted, you should also empty your recycle bin. By regularly deleting your temporary files, you can free up space on your hard drive and optimize your system's performance, ensuring that Overwatch runs smoothly and without lag. So, make sure to keep your system clean and optimized for maximum gaming performance!
Video walkthrough
If it does not work
- If the current interface differs, compare it with the recorded video walkthrough.