Windows 11 · Windows
How To Fix NVIDIA Installer Cannot Continue Error on Windows
Original source date
Answer
Embarking on the process of fixing the "NVIDIA installer cannot continue" error on your Windows PC? It's wise to begin with a safety net. Creating a system restore point ensures that you can revert your system back to a stable state if the unexpected happens during the driver update. Here's a simple step-by-step guide: Search for Safety: In your Windows start menu, search for "System Restore."; Navigate to Control: Open the "Create a restore point" control panel window.; Choose and Create: Select the drive you wish to create the restore point for, then click 'Create.' This quick precautionary step is akin to buckling your seatbelt before a drive; it ensures that your system's current settings are saved, allowing for a smooth recovery if needed. By following this method, you're not only preparing for success but also safeguarding against potential mishaps.
Create a System Restore Point
Embarking on the process of fixing the "NVIDIA installer cannot continue" error on your Windows PC? It's wise to begin with a safety net. Creating a system restore point ensures that you can revert your system back to a stable state if the unexpected happens during the driver update. Here's a simple step-by-step guide: Search for Safety: In your Windows start menu, search for "System Restore."; Navigate to Control: Open the "Create a restore point" control panel window.; Choose and Create: Select the drive you wish to create the restore point for, then click 'Create.' This quick precautionary step is akin to buckling your seatbelt before a drive; it ensures that your system's current settings are saved, allowing for a smooth recovery if needed. By following this method, you're not only preparing for success but also safeguarding against potential mishaps.

Download & Install the Latest NVIDIA GPU Driver
Keeping your NVIDIA GPU driver up-to-date ensures optimal performance and compatibility. Follow this concise guide to download and install the latest driver for your specific graphics card model: Backup First: Make sure your system is backed up; Find the Driver:Navigate to NVIDIA's Driver Download page.Select your graphics card model and your operating system.Download the appropriate driver file.; Navigate to NVIDIA's Driver Download page.; Select your graphics card model and your operating system.; Download the appropriate driver file.
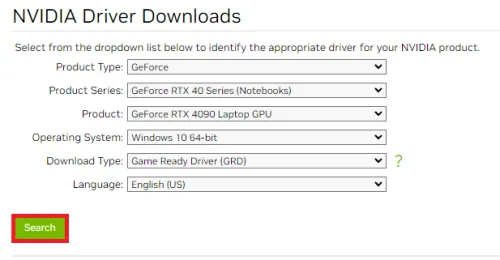
Save Smartly: Choose a location that's easy to access, like your desktop, and sav…
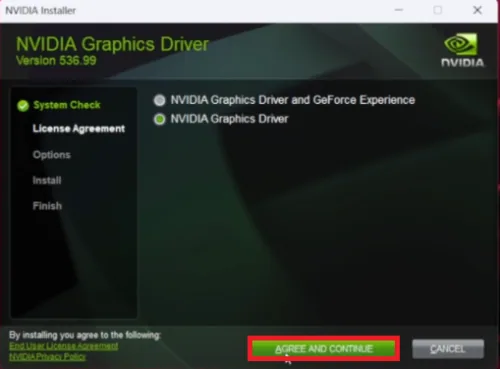
Save Smartly: Choose a location that's easy to access, like your desktop, and save the downloaded file there.; Run the Installer:Open the NVIDIA driver installer you downloaded.Select 'Custom installation.'Choose 'Perform a clean installation.'Follow the on-screen instructions to complete the process.; Open the NVIDIA driver installer you downloaded.; Select 'Custom installation.'; Choose 'Perform a clean installation.'; Follow the on-screen instructions to complete the process. By opting for 'Custom installation' and a 'clean installation', you ensure that the new driver overwrites the existing files, eliminating potential conflicts. With the latest NVIDIA GPU driver installed, your graphics card is now primed to deliver the best possible performance, whether you're gaming, editing videos, or running graphics-intensive applications.
Prepare Your System for Installation
When installing an updated NVIDIA graphics driver, some security settings or outdated system files might obstruct the process. Here's a step-by-step guide to prepare your system:
Disable Security Software Temporarily
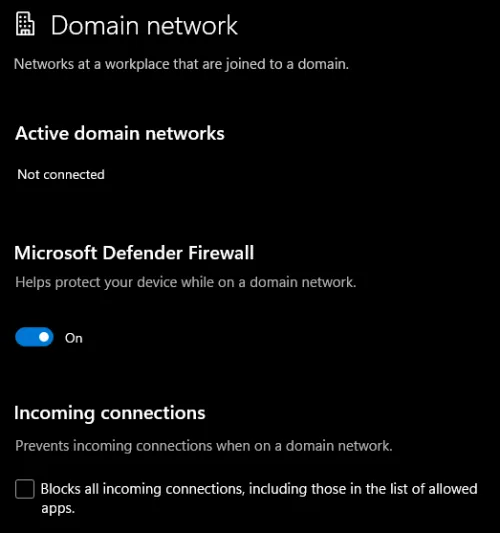
Antivirus and firewalls are crucial for protecting your system, but they might interfere with the installation: Disable Antivirus:Open your antivirus program.Locate the option to disable or pause protection temporarily.Confirm the action.; Open your antivirus program.; Locate the option to disable or pause protection temporarily.; Confirm the action.; Disable Windows Defender Firewall:Open your Windows Security app.Go to 'Firewall & network protection.'Click on your active network and turn off Windows Defender Firewall.; Open your Windows Security app.; Go to 'Firewall & network protection.'; Click on your active network and turn off Windows Defender Firewall. Remember to re-enable these security measures after completing the installation.
Update Windows for Optimal Compatibility
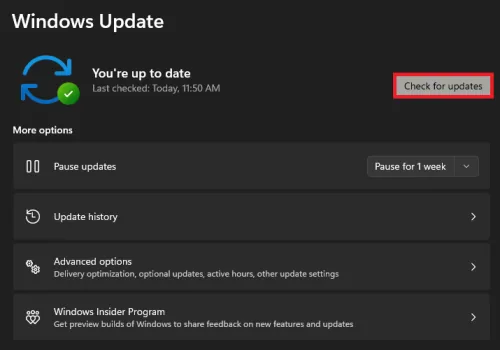
Ensure your Windows system is up-to-date to minimize compatibility issues: Go to 'Settings.'; Navigate to the ‘Windows Update’ section.; Click 'Check for updates.'; Install any available updates.; Restart your computer if prompted.
Test Your NVIDIA Graphics Card
Once your PC has restarted, ensure that the installation was successful: Launch a Graphics-Intensive Application or Game: This could be a modern video game or a graphics rendering software.; Monitor Performance: Check for smooth functionality and responsiveness. By following these steps, you've prepared your system for a smooth NVIDIA graphics driver installation, minimized potential obstructions, and verified that your updated graphics card is performing optimally.
Video walkthrough
If it does not work
- Why do I need to disable my antivirus or firewall when installing NVIDIA drivers?. Temporarily disabling antivirus or firewall is sometimes necessary to prevent them from mistakenly blocking the NVIDIA driver installation process. Remember to re-enable them after installation to keep your system secure.
- How can I find the correct NVIDIA driver for my graphics card?. Visit NVIDIA's official website and navigate to the download section. Use the provided tools to select your specific graphics card model and operating system to download the correct driver.
- What is the benefit of creating a system restore point before installing the NVIDIA driver?. A system restore point enables you to revert your system to a stable state if anything goes wrong during the driver update. It's a safety measure that can save time and frustration.
- Why is it necessary to update Windows before installing NVIDIA drivers?. Keeping your Windows system up-to-date ensures optimal compatibility with the latest NVIDIA drivers. It helps in reducing the risk of installation issues related to outdated system files.
- How do I know if the NVIDIA driver installation was successful?. After installing the new NVIDIA driver, test your graphics card by launching graphics-intensive applications or games. Smooth functionality and responsiveness indicate a successful installation.