How To Fix Network Credentials Error on Windows 10/11
Introduction
In the digital age, seamless connectivity is paramount, and facing a Network Credentials error on your Windows 10/11 system can be a significant hindrance. Fortunately, rectifying this common snag is often just a matter of a few adept clicks within your system settings. Whether it's tweaking the local security policy settings, adjusting the services management, or altering the advanced sharing settings, our tutorial is designed to guide you step-by-step to a swift resolution. Journey with us as we navigate the intricate paths of Windows settings, offering you clear, actionable solutions to get you back online with minimal fuss. Stay tuned for a reservoir of insights and tips that promises a fix and a smoother, more secure Windows experience.
Navigating the Local Security Policy
In troubleshooting the Network Credentials error on your Windows 10/11 system, one potent solution lies in adjusting the Local Security Policy. Follow the streamlined steps below to navigate this section effectively:
Initiate the Process: Begin by clicking on the 'Start Menu'. In the search bar, type "Local Security Policy" to find and access the respective window.
Exploring Security Options: Within the Local Security Policy window, delve into "Local Policies", followed by selecting "Security Options".
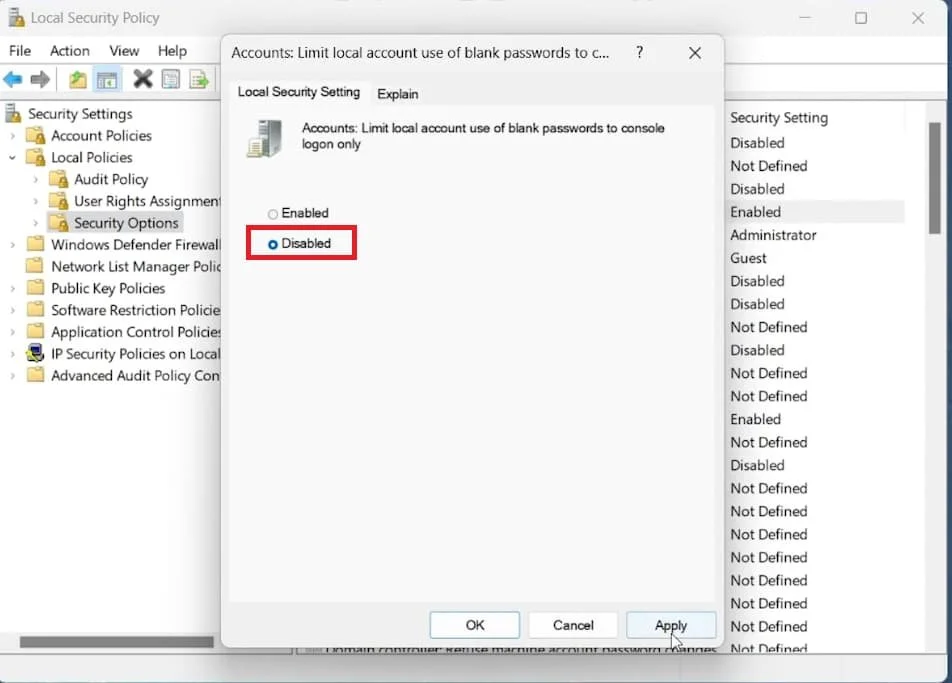
Modifying Account Policies: Locate the policy named "Limit local account use of blank passwords to console logon only". Double-click to unveil its settings. Here, you will need to disable this option to potentially fix the network credentials error.
Finalizing the Changes: After disabling the policy, ensure to click "OK" to save the changes, setting the stage for a smoother user experience on your Windows PC.
By adapting these simple measures, you are one step closer to resolving the credentials error and enhancing your system's security infrastructure.
Local Security Policy Setting (Disabled)
Utilizing Windows Services Manager
If altering the Local Security Policy doesn't rectify the Network Credentials error, don't worry. Your next course of action involves leveraging the Windows Services Manager. Here's a clear, step-by-step guide to navigate this solution seamlessly:
Access the Tool: Click on the 'Start Menu' and enter "Services.msc" in the search bar. Open the application to view a list of available services.
Locating the Credential Manager Service: Once inside, activate the panel by clicking anywhere within it. Quickly find services that start with 'C' by pressing the 'C' key on your keyboard; among these, seek out the 'Credential Manager' service.
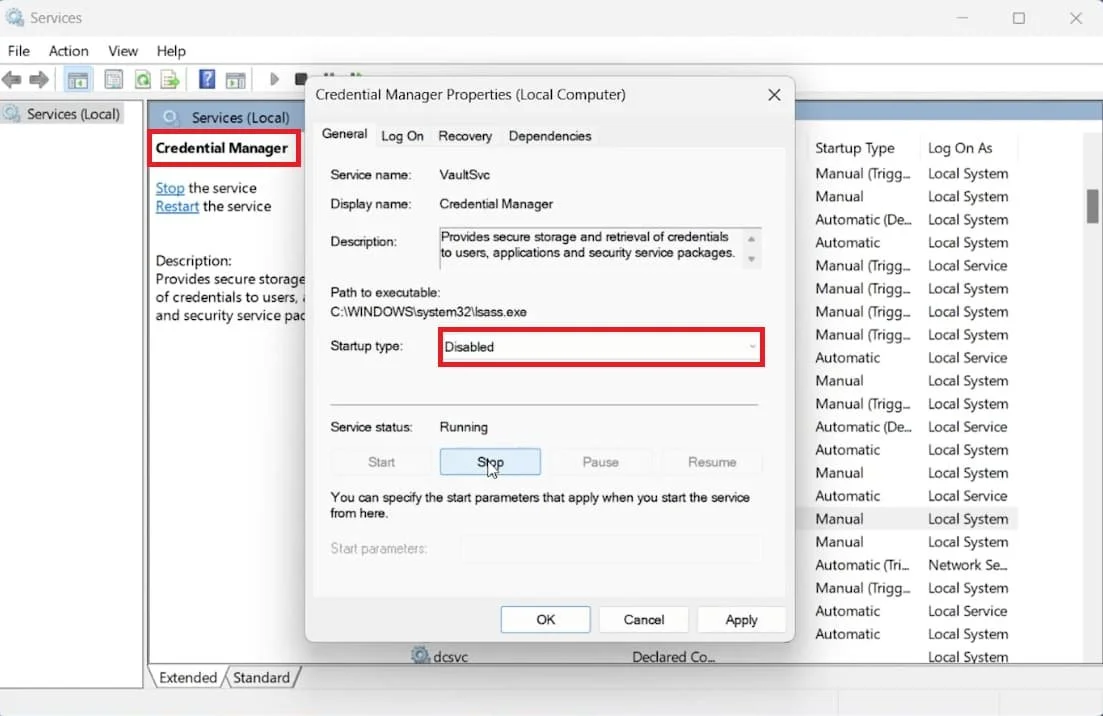
Modifying Service Properties: Double-click on the 'Credential Manager' service to open its properties. Here, change the 'Startup Type' to 'Disabled' and cease its current operation by clicking the 'Stop' button.
Applying Changes: To solidify the adjustments made, click 'Apply', followed by 'OK'.
Restart Your Device: As a final step, reboot your Windows PC to implement the changes fully. This action should eliminate the Network Credentials error for a majority of users, paving the way for a hassle-free computing experience.
Remember, a hands-on approach to managing your service settings can often be the key to resolving common Windows errors effectively.
Windows Services Manager > Credential Manager
Eliminating Web and Windows Credentials
Despite employing previous methods, if the Network Credentials error still looms, you're not out of options yet. Your next step is to remove potential barriers existing within your system's credential records. Here's how you can perform this with ease:
Accessing the Control Panel: Hit the 'Start Menu' and type "Control Panel" in the search bar to open it.
Navigating to Credential Manager: In the upper right corner of the control panel window, utilize the search bar to find and open the 'Credential Manager'.
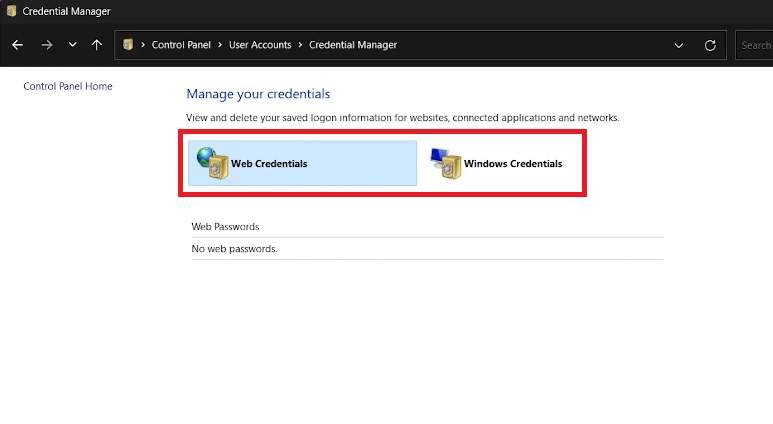
Clearing Credentials: Within the Credential Manager, meticulously remove all listed Web and Windows credentials. This act often proves successful in resolving the Network Credentials error.
Credential Manager > Manage your Credentials
Disabling Password Protected Sharing
If the error persists, a final, effective measure is to disable the password-protected sharing feature in your Windows settings, thus preventing the error from recurring. Here's a simplified guide to achieve this:
Open Network and Sharing Center: In the Control Panel, find your way to 'Network and Internet' followed by 'Network and Sharing Center'.
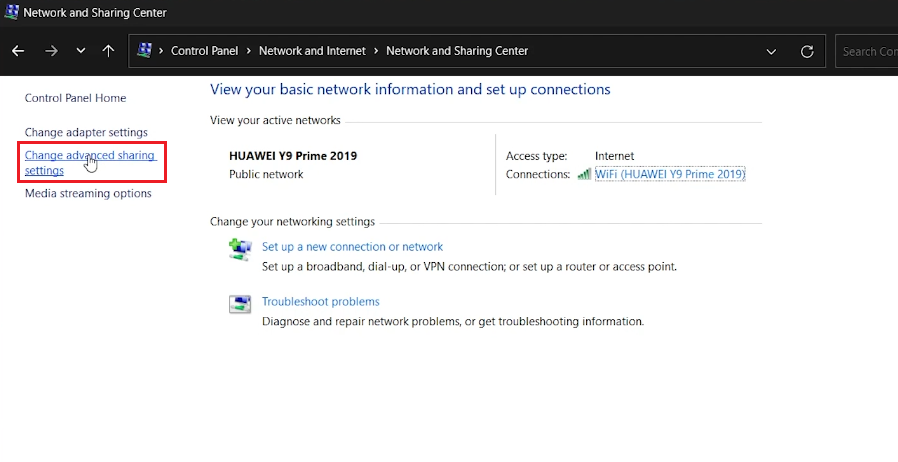
Control Panel > Network and Sharing Center > Change Advanced Sharing Settings
Adjusting Sharing Settings: Select 'Change Advanced Sharing Settings' positioned on the upper left of the window.
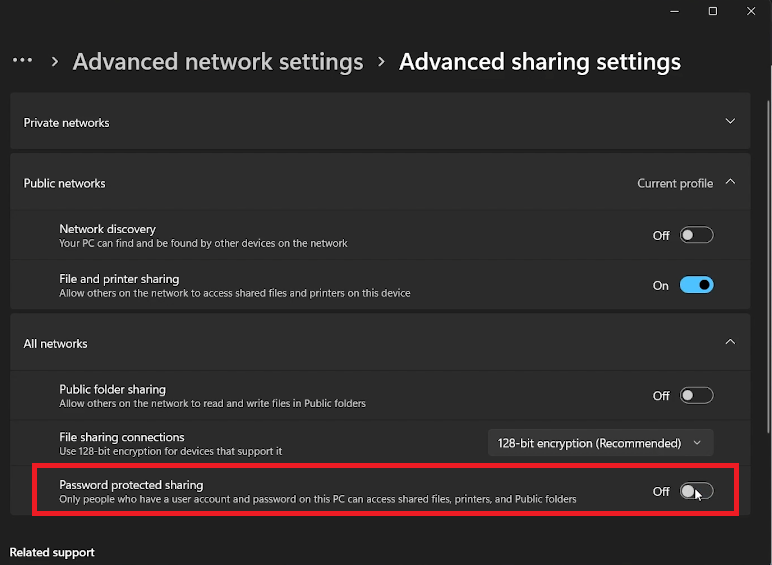
Altering Network Preferences: Navigate to the 'All Networks' tab and decisively disable the 'Password Protected Sharing' option. This crucial step can eradicate the persisting “Network Credentials” error on your Windows PC, ensuring smoother operations moving forward.
Implementing these modifications can significantly enhance your user experience, providing a smoother and error-free computing environment.
Advanced Network Settings > Advanced Sharing Settings
-
The Network Credentials Error occurs when Windows fails to authenticate network access, typically because of incorrect settings or conflicting credentials stored in your system.
-
You can rectify this error by navigating to Local Security Policy in your Windows settings and disabling the 'Limit local account use of blank passwords to console logon only' option.
-
To amend the error through Windows Services Manager, access 'Services.msc' from the start menu, locate the Credential Manager service, and disable its startup type, effectively stopping the service from running.
-
This process involves deleting all stored credentials in the Credential Manager, found within the Control Panel, to prevent the error caused by conflicting or corrupted data.
-
Turning off password-protected sharing through the Control Panel's Advanced Sharing settings removes potential network barriers, aiding in the resolution of the Network Credentials error.


