Windows 11 · Windows
How To Fix Low FPS When Gaming on Windows 11
Original source date
Answer
In your start menu, search for regedit. Right-click the registry editor icon and select Run as administrator. We suggest backing up your current registry if you make a mistake during this tutorial. To do so, navigate to File, Export, select a location to save your backup, and click Save.
Make Changes in your Windows 11 Registry Editor
In your start menu, search for regedit. Right-click the registry editor icon and select Run as administrator. We suggest backing up your current registry if you make a mistake during this tutorial. To do so, navigate to File, Export, select a location to save your backup, and click Save.
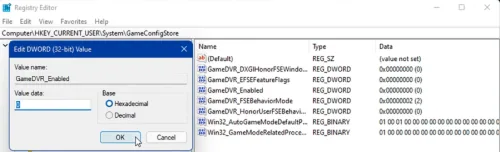
Next, navigate to your registry editor and expand: HKEY_CURRENT_USER\SYSTEM, and…
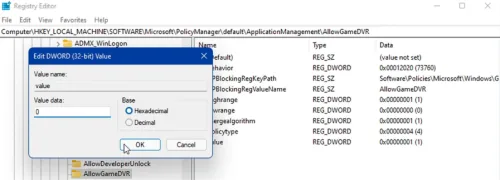
Next, navigate to your registry editor and expand: HKEY_CURRENT_USER\SYSTEM, and select GameConfigStore. On the right side of this window, double-click GameDVR_Enabled and change the Value Data to zero. Leave the base at Hexadecimal and click OK. When this is done, double-click the GameDVR_FSEBehaviorMode and set this value to 2. On the same registry editor window, navigate to HKEY_CURRENT_USER\SOFTWARE\Microsoft\PolicyManager\Default\ApplicationManagement and here, click on the AllowGameDVR folder. On the right hand side, double-click value and make sure to set the Value data to zero. You can now close this window and experience much more FPS and less stuttering while in-game.
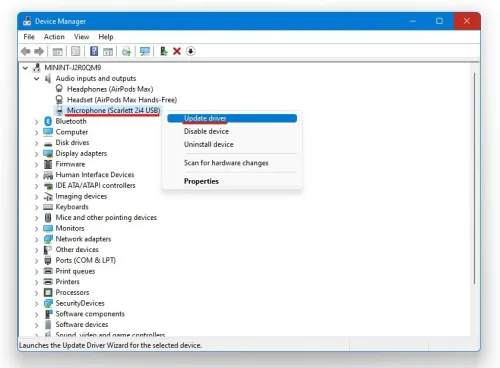
Update Device Drivers
In your Start Menu, search for Device Manager and open it up. On the window, you can expand your audio inputs & outputs, network adapters, USB connections, etc. For each category, ensure that your main device’s driver is current. Simply double-click the device you are using, in this case my headphones, and in the Driver tab, select Update Driver and then Search Automatically for drivers.
Update Graphics Card Driver
NVIDIA graphics cards can utilize the GeForce Experience application. Click here to download the application to your system. When the download is completed, open up the application, and in the Drivers tab, select Download. This will download and install the latest GPU update and should take a few minutes to complete.

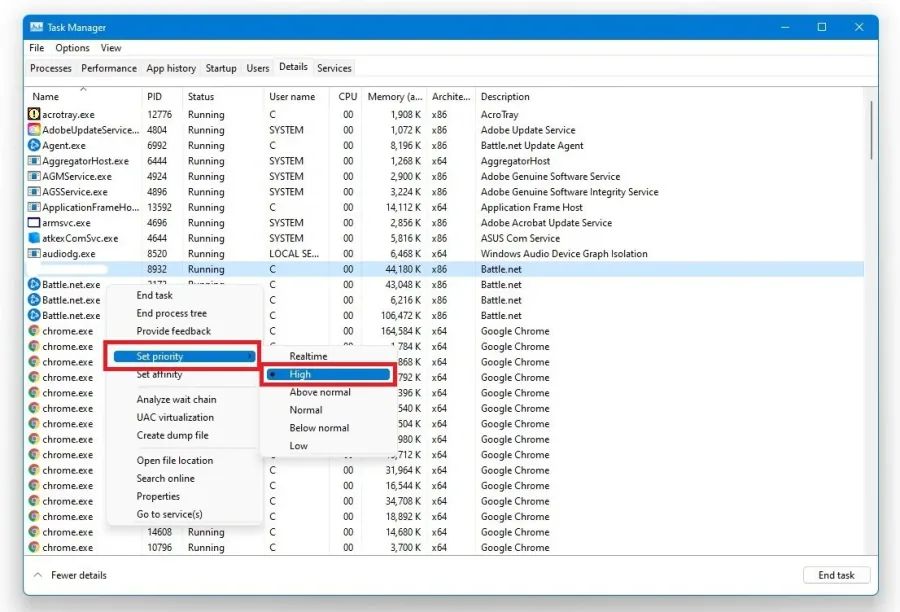
Change the Game’s Process Priority
To further increase the game’s performance on your PC, we will change the application’s priority compared to other programs running in the background. Right-click your taskbar to open up your Task Manager. In the Processes tab, right-click the game process and select “Go to details”. In the Details tab, the application should be highlighted. Right-click the game process and set the priority to high. This will allocate more resources to playing the game and should increase your performance, especially if other programs run in the background. To reduce the CPU utilization from other programs, we suggest you end some programs from running in the background, which you don't need when playing the game. Only to end programs from running, which you know won't break your operating system. You can prevent programs from starting on system boot in the Startup tab.
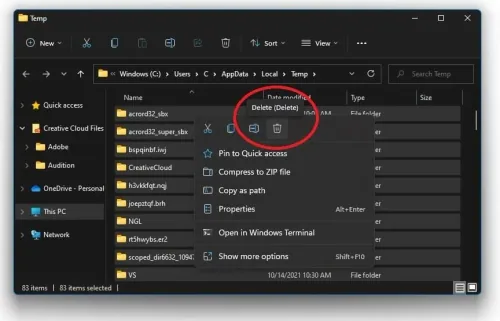
Delete the Windows Temporary Files
Your hard drive might be cluttered with unwanted files. These files will induce lag if not removed properly. You can delete your temporary files manually or use PC cleanup programs, such as CCleaner. These applications are usually the best choice as they will automatically keep your hard-drive clean for you. To manually delete your temporary files, enter %temp% in your taskbar search and hit enter. A new folder will open up. Make sure to delete the content of your temporary files folder. Some files will remain, so simply leave them in the folder as applications on your system are still using them.
Video walkthrough
If it does not work
- If the current interface differs, compare it with the recorded video walkthrough.