Gaming · Platform not recorded
How To Fix Error Code VAN 152 in Valorant - Tutorial
Original source date
Answer
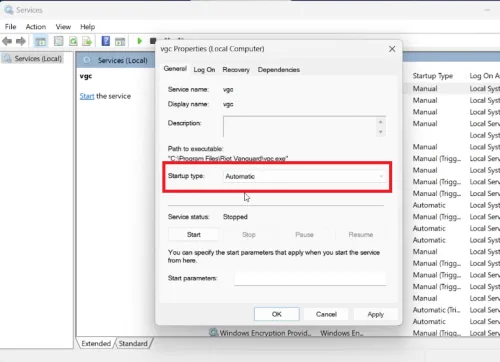
In your quest to overcome the error code VAN 152 while enjoying Valorant on Windows, initiating the Vanguard service is an essential step. Here’s a clear and succinct guide to get you started: Access Windows Services Manager: Click on your Start Menu, type "services.msc", and press enter to unveil the comprehensive list of services running on your system.; Locate the VGC Service: In the new window, click on any service to activate the panel. Begin typing “vgc” to swiftly find the Vanguard service amidst the others.; Modify VGC Properties: Right-click on the “vgc” service to open its properties. Within this window, you'll notice an option for “Startup Type”. Set this to “automatic” to ensure the service initiates each time your system starts.; Enable the Service: Once you have adjusted the settings, click on “Apply”, followed by the “Start” button to activate the service. Confirm your actions by clicking “OK”. By following these streamlined steps, a majority of users should find the error code VAN 152 resolved, paving the way for a smoother gaming experience.
Activating the Vanguard Service (VGC)
In your quest to overcome the error code VAN 152 while enjoying Valorant on Windows, initiating the Vanguard service is an essential step. Here’s a clear and succinct guide to get you started: Access Windows Services Manager: Click on your Start Menu, type "services.msc", and press enter to unveil the comprehensive list of services running on your system.; Locate the VGC Service: In the new window, click on any service to activate the panel. Begin typing “vgc” to swiftly find the Vanguard service amidst the others.; Modify VGC Properties: Right-click on the “vgc” service to open its properties. Within this window, you'll notice an option for “Startup Type”. Set this to “automatic” to ensure the service initiates each time your system starts.; Enable the Service: Once you have adjusted the settings, click on “Apply”, followed by the “Start” button to activate the service. Confirm your actions by clicking “OK”. By following these streamlined steps, a majority of users should find the error code VAN 152 resolved, paving the way for a smoother gaming experience.
Utilizing Windows Command Prompt to Fix Error VAN 152
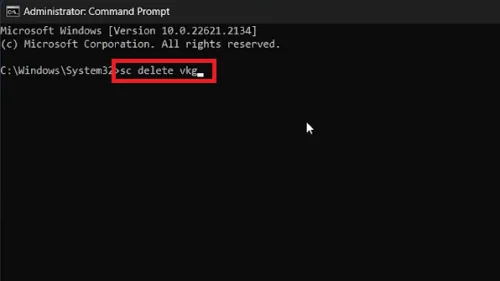
If the error code VAN 152 still persists post the initial fixes, it might be necessary to employ Windows command prompt to delve deeper into the solution. Here's how to execute the commands proficiently: Access Command Prompt as an Administrator: Navigate to your startup menu and type "cmd". When the application appears, right-click and select 'Run as administrator' to grant it necessary permissions.; Executing Commands: In the newly opened command window, it's time to input some specific commands to help resolve the issue. Start by typing “sc delete vgk” followed by the Enter key. This command helps in deleting potential problematic components.; Deleting VGC: Next, input “sc delete vgc” and press Enter. This step aims to remove any lingering issues associated with the VGC service.; Closing the Command Prompt: After successfully inputting the commands, exit the command prompt to apply the changes made during the session. By adopting these steps, users should be closer to resolving the stubborn error code VAN 152, making way for an uninterrupted Valorant gaming experience.
Reinstalling Riot Vanguard: A Solution to Error VAN 152
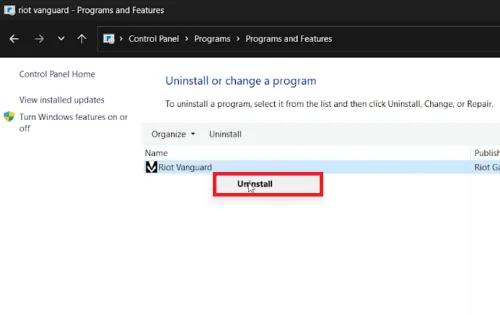
In certain situations, the best way to rectify the VAN 152 error code is by reinstalling the Riot Vanguard program. Follow these streamlined steps to do so efficiently: Access the Control Panel: Click on your Start Menu and initiate a search for the 'Control Panel'.; Navigating to Programs: Once the Control Panel window appears, locate and click on the 'Programs' option, followed by selecting 'Uninstall a program' from the subsequent list.; Uninstall Riot Vanguard: In the 'Programs and Features' window, utilize the search bar located at the upper right corner to find “Riot Vanguard”. Once found, right-click on the application to initiate the uninstallation process.
Running Valorant as an Administrator
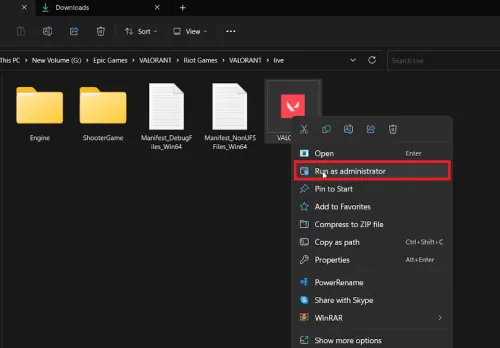
Post uninstallation, the final step involves running the Valorant application with administrative privileges to facilitate the fresh installation of Riot Vanguard. Here’s how: Launching Valorant: Locate and right-click on the Valorant application to select the 'Run as administrator' option.; Reinstall Riot Vanguard: The application will automatically reinstall Riot Vanguard, post which a system restart is mandated to implement the changes successfully.; Final Step: Reboot your computer to cement the changes and get rid of the error code VAN 152, ensuring a smoother gaming experience henceforth.
Video walkthrough
If it does not work
- What is the VAN 152 error in Valorant?. The VAN 152 error is a common glitch that players might encounter in Valorant, usually indicating issues with the Riot Vanguard service. Following our tutorial can help you rectify this problem swiftly.
- How can I access the Riot Vanguard service properties?. You can access the Riot Vanguard service properties by opening your 'Windows Services Manager' from the Start Menu and locating the "vgc" service. Right-click on it to access its properties and make necessary adjustments.
- What is the role of the command prompt in fixing the VAN 152 error?. Utilizing the command prompt is a critical step in the resolution process. Running specific commands ('sc delete vgk' and 'sc delete vgc') as an administrator helps in removing potential obstacles, paving the way for the successful reinstallation of Riot Vanguard.
- Do I need to uninstall Riot Vanguard to fix the VAN 152 error?. Yes, uninstalling Riot Vanguard is a pivotal step in this process. This can be done from the 'Programs and Features' window, accessible through the Control Panel. Reinstalling it while running Valorant as an administrator usually resolves the error.
- Why is it necessary to run Valorant as an administrator post-uninstallation of Riot Vanguard?. Running Valorant as an administrator post-uninstallation facilitates the seamless reinstallation of Riot Vanguard. This step also ensures that any lingering issues are resolved, preventing the recurrence of the VAN 152 error.