Windows 10 · Windows
How To Optimize Windows 10 For Gaming
Original source date
Answer
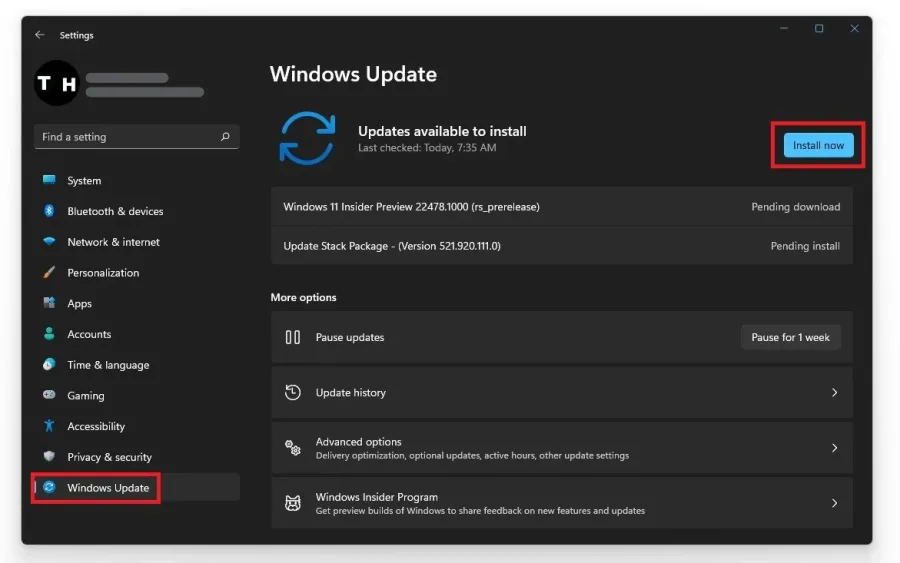
To optimize your system for performance, you should ensure your operating system is up to date. Search for Update in your taskbar search. In your Check for updates system settings window, download the latest update and restart your PC after the download is completed. This will help you with performance issues.
Update the Windows Operating System
To optimize your system for performance, you should ensure your operating system is up to date. Search for Update in your taskbar search. In your Check for updates system settings window, download the latest update and restart your PC after the download is completed. This will help you with performance issues.
Update your Device Drivers
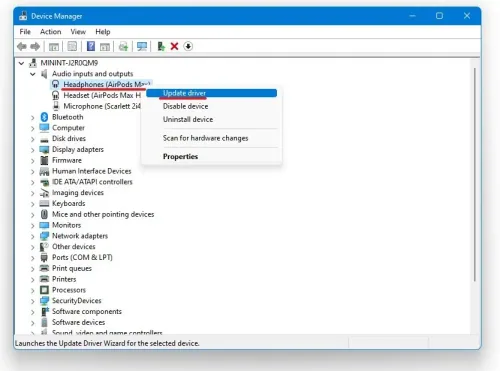
Ensure your drivers are also up to date. To do so, search for Device Manager and open it up. In your device manager, you can expand your audio inputs and outputs, network adapters, USB connections and many more.

For each category, ensure your primary device’s driver is up to date
For each category, ensure your primary device’s driver is up to date. Double-click the device you are using and in the Driver tab, select Update Driver and then Search Automatically for updated driver software.
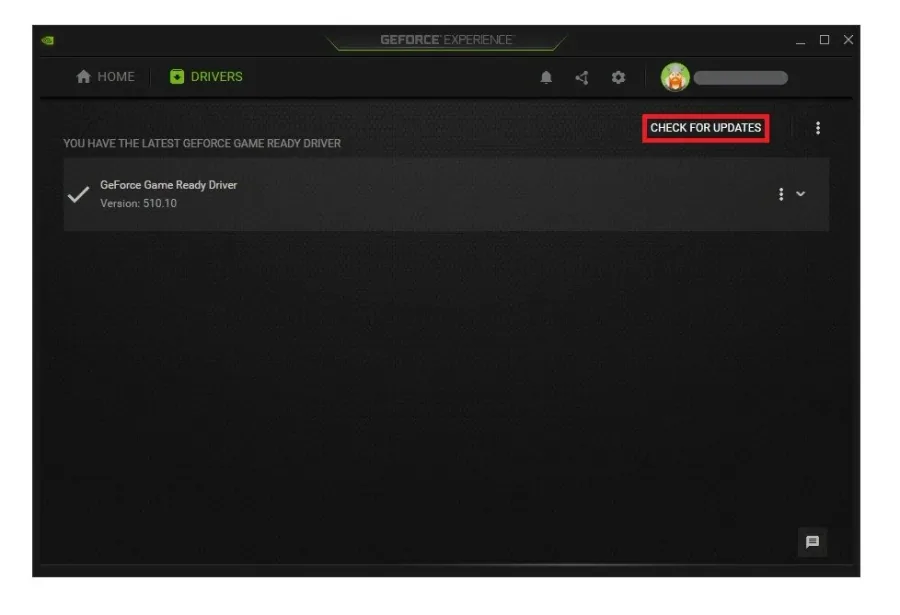
For NVIDIA users
NVIDIA graphics cards can utilize the GeForce Experience application. Click here to download the application to your system. When the download is completed, open up the application, and in the Drivers tab, select Download. This will download and install the latest GPU update and should take a few minutes to complete.
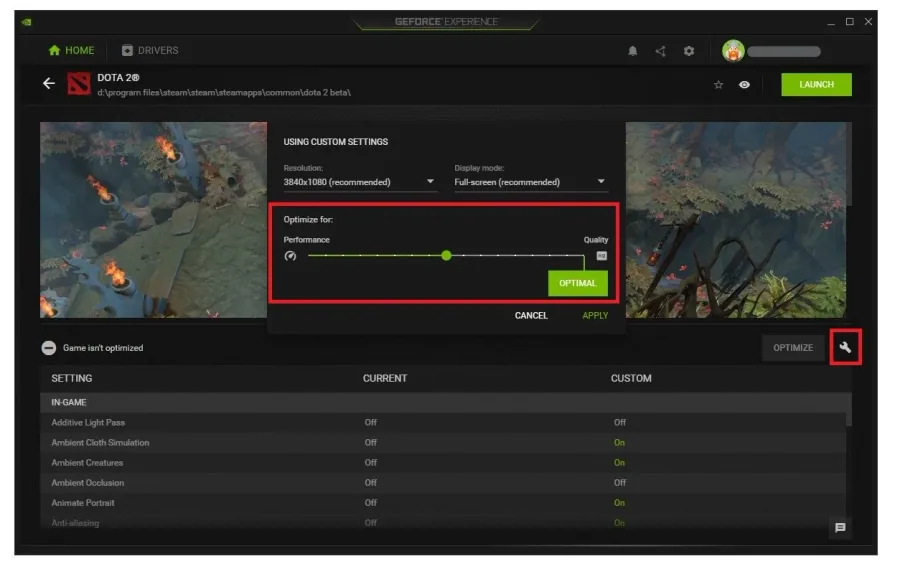
In the Home tab, you can access individual game settings, which can also be changed
In the Home tab, you can access individual game settings, which can also be changed. Select Details for the game you intend to play. Depending on your hardware, you will be presented with current in-game settings and the optimal settings suggestion. When selecting Optimize, GeForce Experience will apply the recommended settings to the game.
Optimize the NVIDIA Control Panel Settings
Making changes to your NVIDIA control panel can be essential. Change a few options in your NVIDIA control panel to improve the game’s performance on your system. To open up your NVIDIA control panel, right-click your desktop and select NVIDIA Control Panel. In your control panel, navigate to Manage 3D Settings > Program Settings.
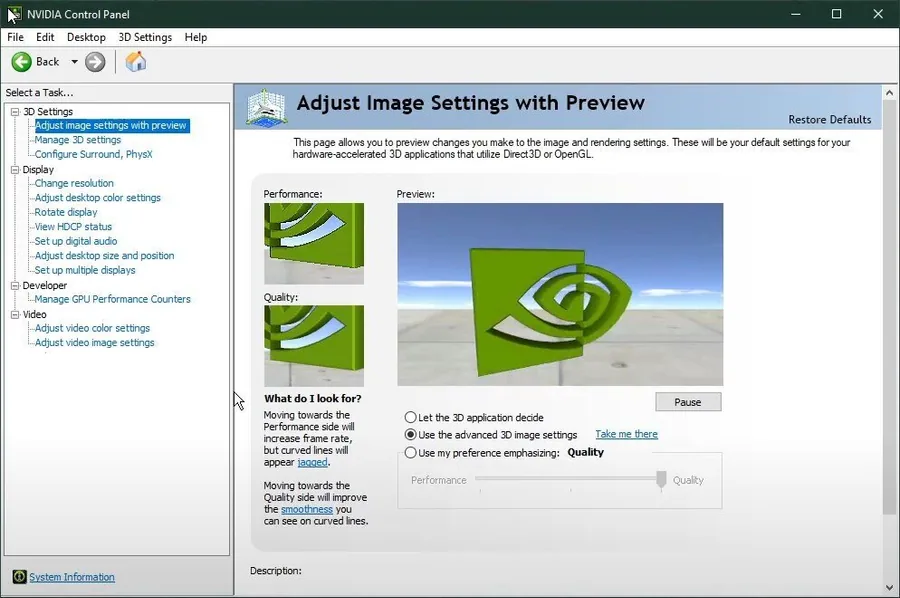
In the Adjust Image Settings with the Preview section, set this option to Use the…
In the Adjust Image Settings with the Preview section, set this option to Use the advanced 3D image settings and apply your changes. In the Manage 3D Settings tab, you can make changes that greatly impact your GPU’s performance. Enable Image Sharpening if you can, set the Sharpen value to 0.5, and Ignore Film Grain to 0.17. You should also check the GPU scaling box, in case it’s available. This will enable you to use custom resolutions, especially lower ones for games that don’t usually support it.
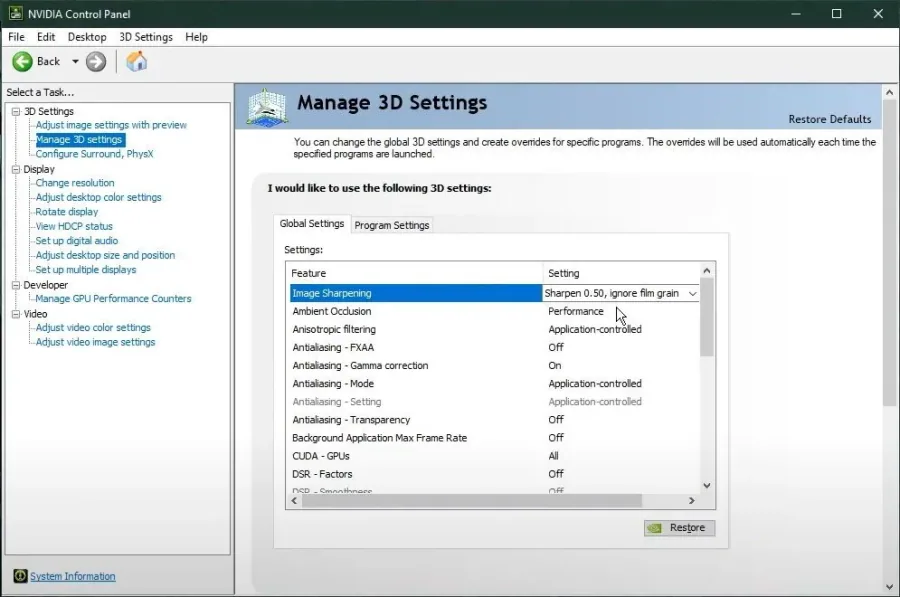
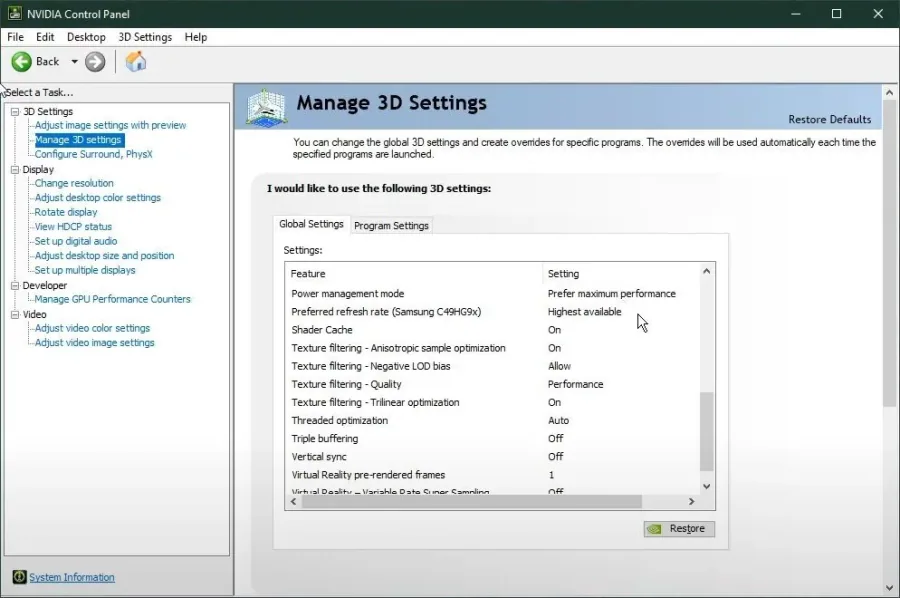
As for the other settings, make sure to change the following Ambient Occlusion to…
As for the other settings, make sure to change the following Ambient Occlusion to Performance; Anisotropic Filtering to Application controlled; Antialiasing FXAA to Off; Enable Antialiasing - Gamma Correction; Antialiasing Mode to Application controlled; Antialiasing Transparency to Off; CUDA GPUs to All; Turn off Dynamic Super Resolution (DSR); Turn on Low Latency Mode; Turn off Max Framerate when using a system that has no issues running games on an average frame rate, as you can cap your FPS in most in-game settings anyway. Disable Multi-Frame Sampled AA; OpenGL rendering GPU to your main GPU; Power Management Mode to Prefer Maximum Performance; Preferred Refresh Rate to Highest Available
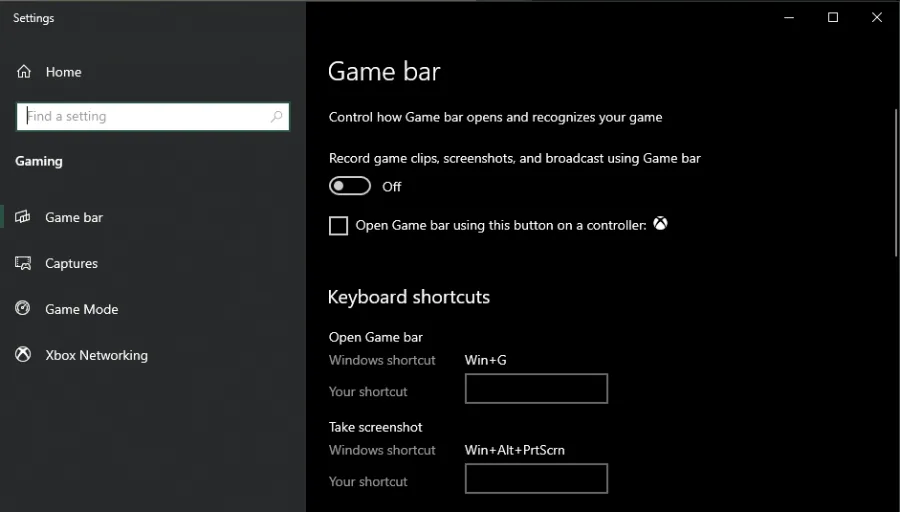
Disable Xbox Game Bar Recording
Some native Windows 10 settings can reduce your overall performance while in-game. Disable the Game Bar recording option, as it continuously records your gameplay and audio. In your taskbar search, enter: Game Bar to open the game bar system settings. Uncheck the recording option. In the Captures tab, disable the background recording option additionally. These settings will only reduce your performance. If you want to record your gameplay, then we suggest using OBS Studio or an external capture card if you lack performance.
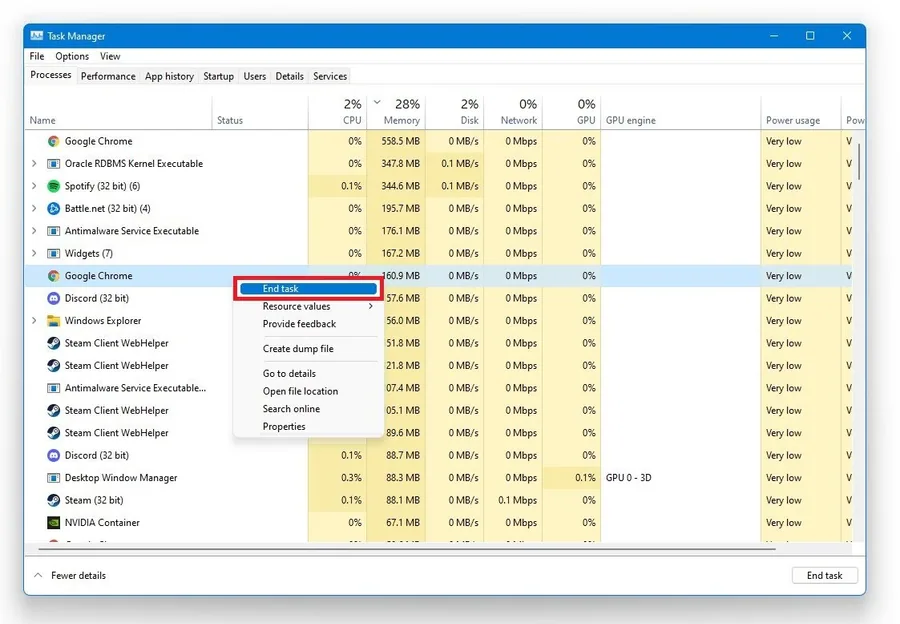
End CPU-Intensive Processes
To reduce the CPU utilization from other programs, we suggest you end some programs from running in the background, which you don't need when playing the game. End programs from running, that you know won't break your operating system. In the Startup tab, you can prevent programs from starting on system boot.
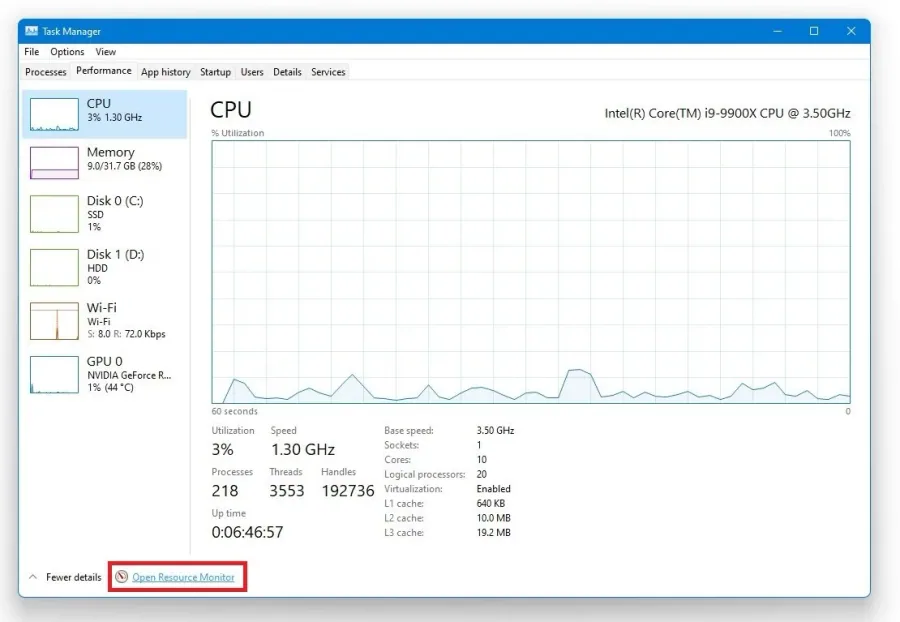
In the Performance tab, select Open Resource Monitor
In the Performance tab, select Open Resource Monitor.
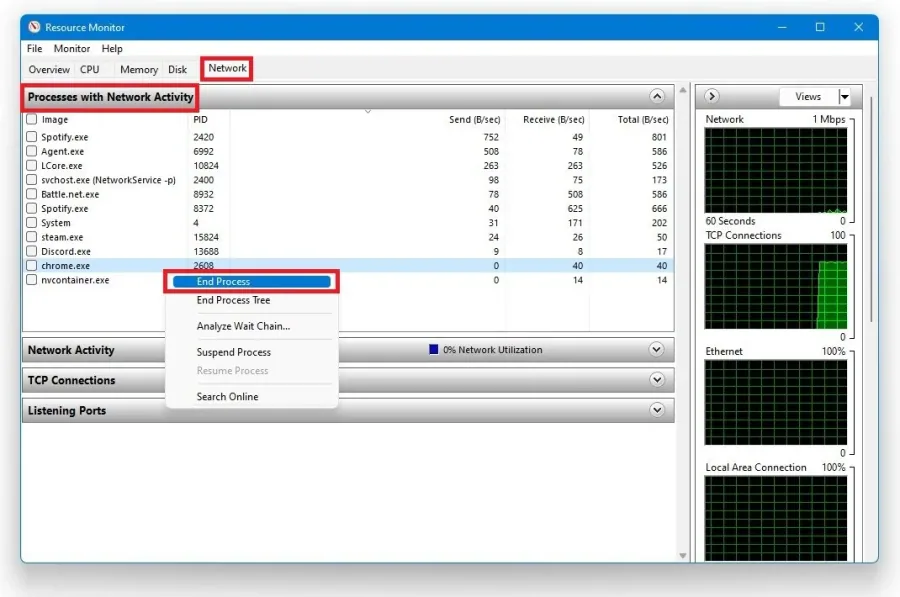
In the Network tab, open the Processes with network activity, and after a few sec…
In the Network tab, open the Processes with network activity, and after a few seconds, you will see every process using your network connection. This might be your browser running in the background, Steam, or a download bottlenecking your connection. These processes will help you find out where network-related issues are coming from, and you can easily end some processes from running if you wish to do so.
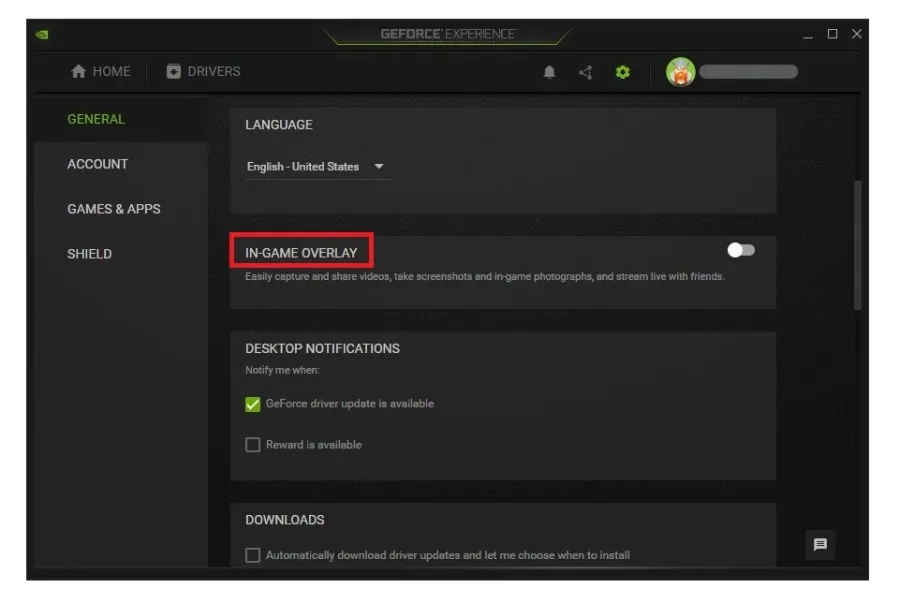
Disable In-Game Overlays & Notifications
Disable overlays from other applications, as these commonly cause issues while in the game and reduce your performance. Usually, those come with programs like Geforce Experience, Discord, or Steam. In your Geforce Experience application, navigate to your settings, and in the General tab, you can disable the overlay. You can also prevent native applications from showing notifications. In your taskbar search, enter Notifications and open up your Notifications & Actions settings. You have the option to disable all notifications from apps and other senders or select the programs you allow to send notifications by scrolling down the list and turning all the others off.
Change your DNS Server Address
If nothing has helped so far fixing the issues with your network connection, we will change your DNS server address. Use the key combination Windows key + R and in this dialogue box type Control and press Enter.
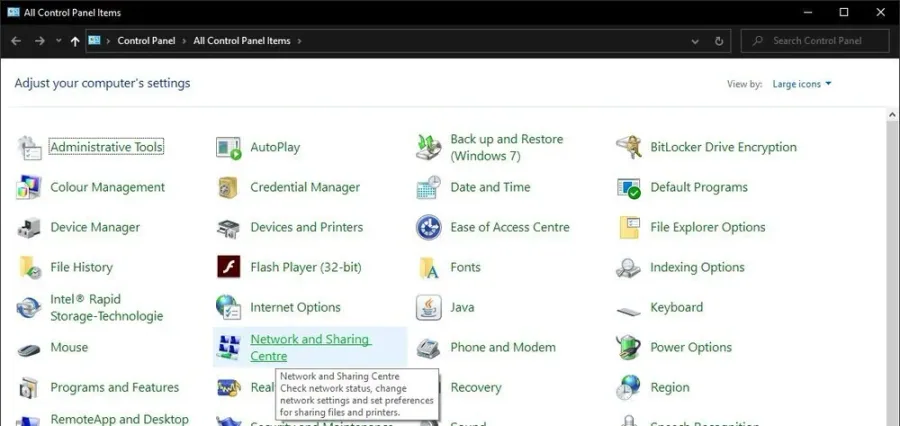
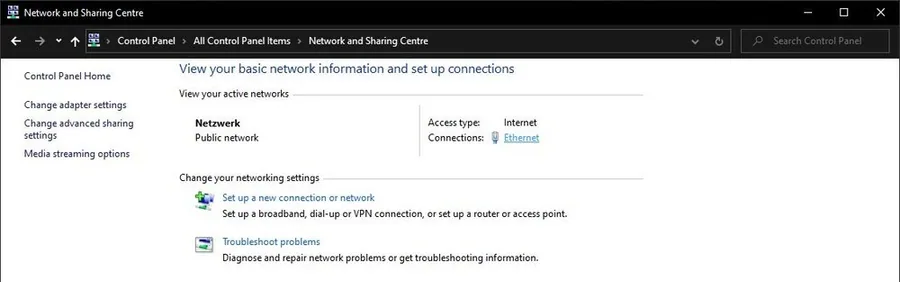
Navigate to Network and Internet, then Network and Sharing Centre and select your…
Navigate to Network and Internet, then Network and Sharing Centre and select your current network connection. This window will open with some general information about your connection.
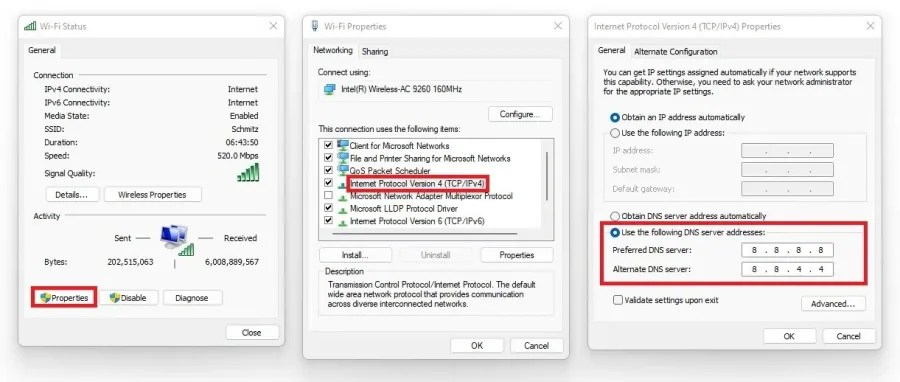
Navigate to Properties and finally double-click on Internet Protocol Version 4
Navigate to Properties and finally double-click on Internet Protocol Version 4. Select the option Use the following DNS server addresses as preferred DNS server: 8.8.8.8 and as alternative DNS server use: 8.8.4.4.
Delete the Windows Temporary Files
Your hard drive might be cluttered with unwanted files. These files will induce lag if not removed properly. You can delete your temporary files manually or use PC cleanup programs, such as CCleaner. These applications are usually the best choice as they automatically keep your hard drive clean. To manually delete your temporary files, enter %temp% in your taskbar search and hit enter. Select and delete all files in the folder. Sometimes, this can take a few minutes if you haven’t done this before. Some files will most likely stay in your temp folder, as these are still in use by your programs. To completely delete these files, empty your recycle bin.

Video walkthrough
If it does not work
- If the current interface differs, compare it with the recorded video walkthrough.