OBS · macOS
How To Stream & Record with OBS Studio on Mac OS – Complete Guide
Original source date
Answer
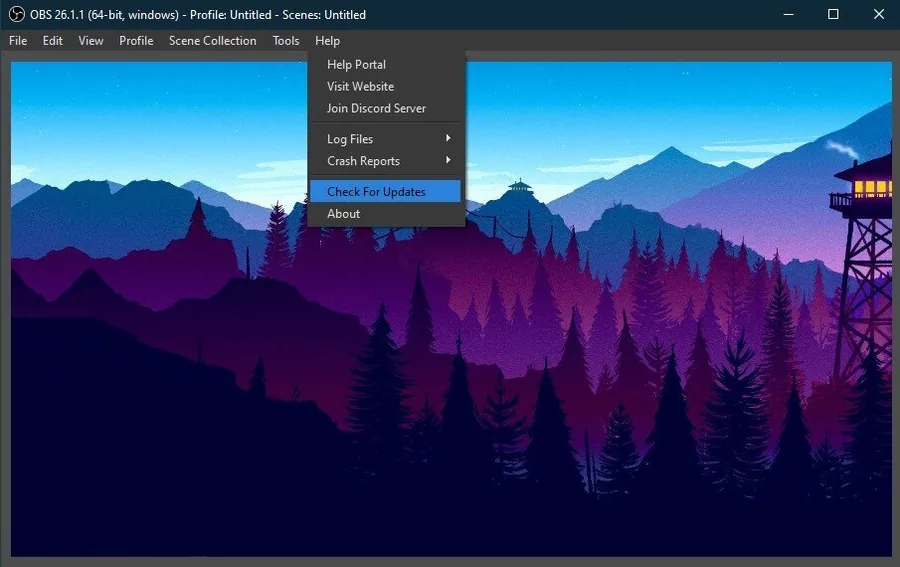
Before making any changes to your OBS Studio settings, ensure the application is up to date. Open up OBS Studio, and under Help, select Check for Updates. Reduce the number of unneeded scenes and sources. Especially video capture devices, which display a video feed in their native resolution and refresh rate can induce a lot of lag while trying to record or stream. If you don’t plan on using specific devices or sources, then I suggest creating a separate scene with a minimal amount of sources.
Update OBS Studio
Before making any changes to your OBS Studio settings, ensure the application is up to date. Open up OBS Studio, and under Help, select Check for Updates.
Reduce the number of unneeded scenes and sources
Reduce the number of unneeded scenes and sources. Especially video capture devices, which display a video feed in their native resolution and refresh rate can induce a lot of lag while trying to record or stream. If you don’t plan on using specific devices or sources, then I suggest creating a separate scene with a minimal amount of sources.
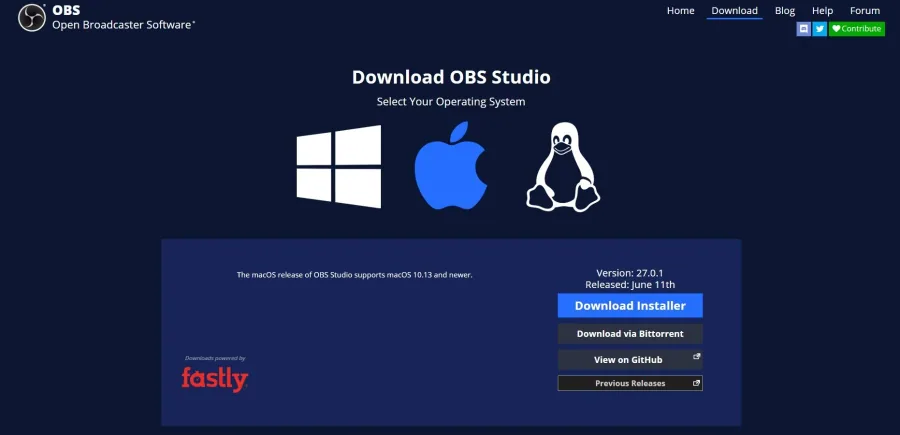
Download OBS Studio
To get started, click here to get to the official OBS (Open Broadcaster Software) website. Select Mac OS and download the installer. Downloading the OBS installer will take a few seconds, which you must install to your system. After downloading and installing the installer, you can open up OBS Studio.
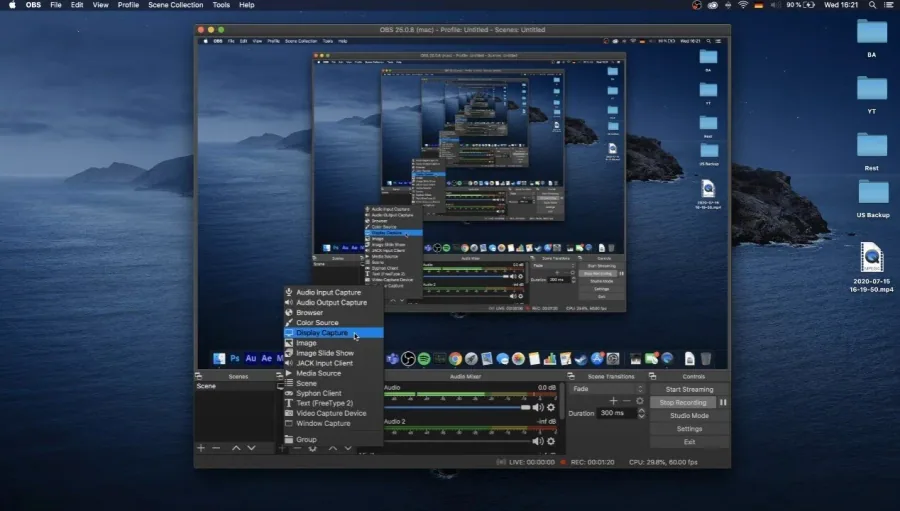
Adding Sources in OBS Studio
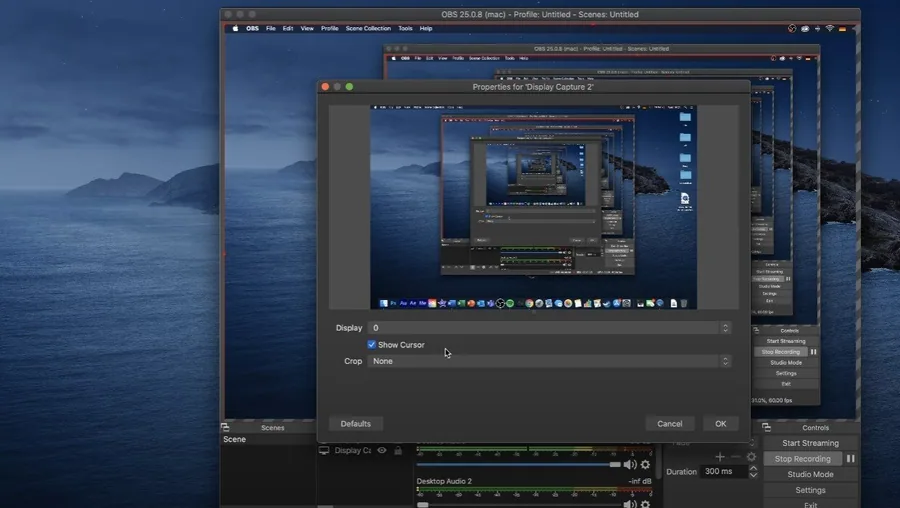
We will add a few sources to your scene, to make you understand how that works. When this is done, we will have to play around with a few settings and then you’re set. Click on the plus symbol in your Sources section. This will open up this drop-down menu, where you can choose from different sources. Select the Display Capture source if you wish to record your screen. Name it whatever you want, select the main display which you want to record, apply a crop if you wish to, and then you’re done.
In most cases, your native Mac OS display is not running the standard 1080p resol…
In most cases, your native Mac OS display is not running the standard 1080p resolution. Later, we will show you how to fit the display capture source to your recording when going through the settings. In case you wish to record a singular application, such as a game or application then add the Window capture from your sources. You can choose a specific window to capture, which will even get captured if other applications are showing up in your window. You can choose an external capture device when adding a video capture device. Such as your webcam or camera to show up in your recording or stream. These sources should cover the most important ones, most of the others are pretty self-explanatory.
Use Soundflower to Record your Mac Audio
After adding your sources, you might have already noticed that sound from your desktop is not being recorded. This issue is standard on macOS, and can be resolved using a small 3rd party application. Click here to get to the Soundflower GitHub page.
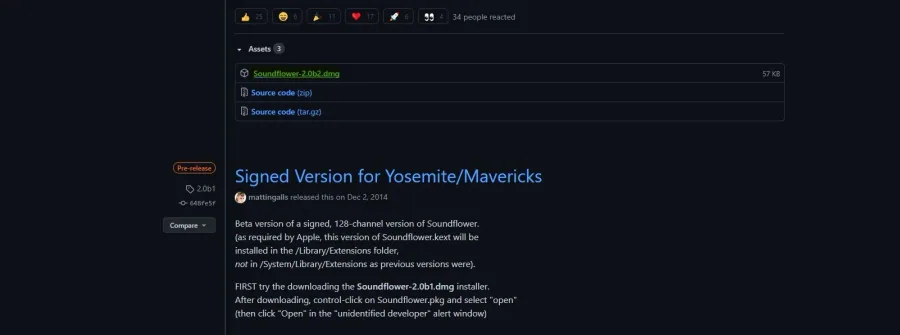
Scroll down, and under Assets, select Soundflower 2.0b2.dmg
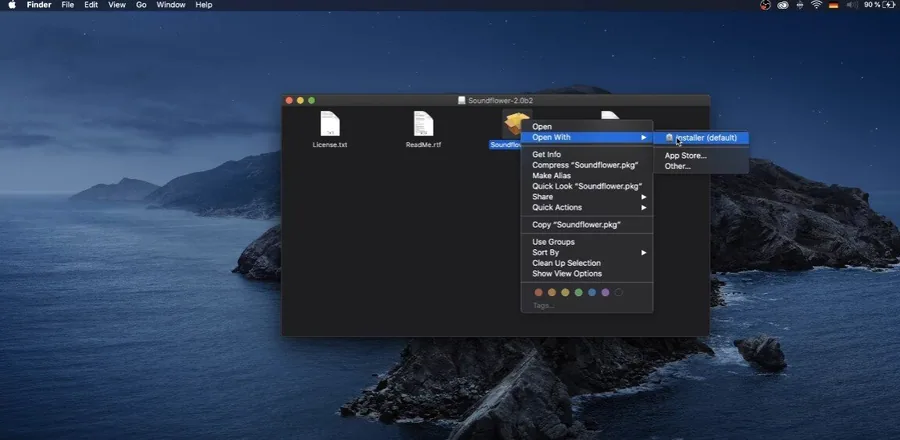
Scroll down, and under Assets, select Soundflower 2.0b2.dmg. This will automatically download and unarchive the content. Lastly, a folder will open up. Right-click Soundflower.pkg and select to open it up with the installer.
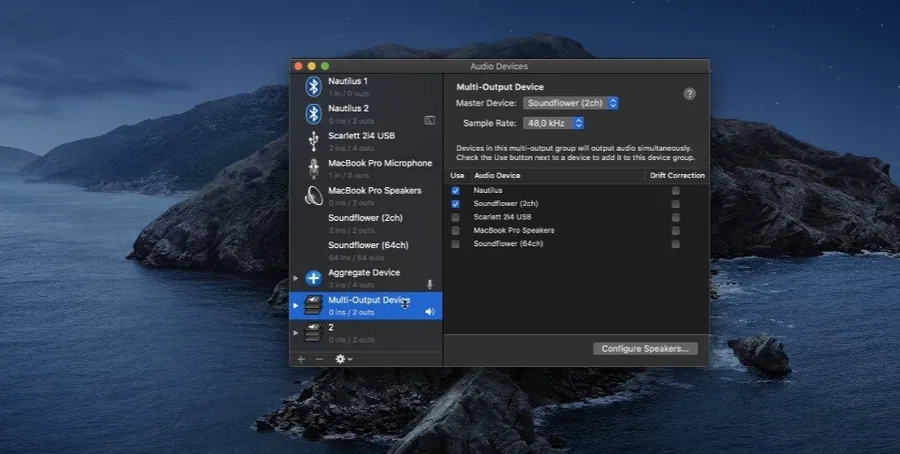
When the installation is completed, open up your spotlight search and the Audio M…
When the installation is completed, open up your spotlight search and the Audio Midi setup. On the window, select the plus sign to add the multi-output device. Set the sample rate to 40 kHz and then select to use your usual output device. This could be your laptop speakers, headphones, or external sound system. Select to use the Soundflower 2 channel.
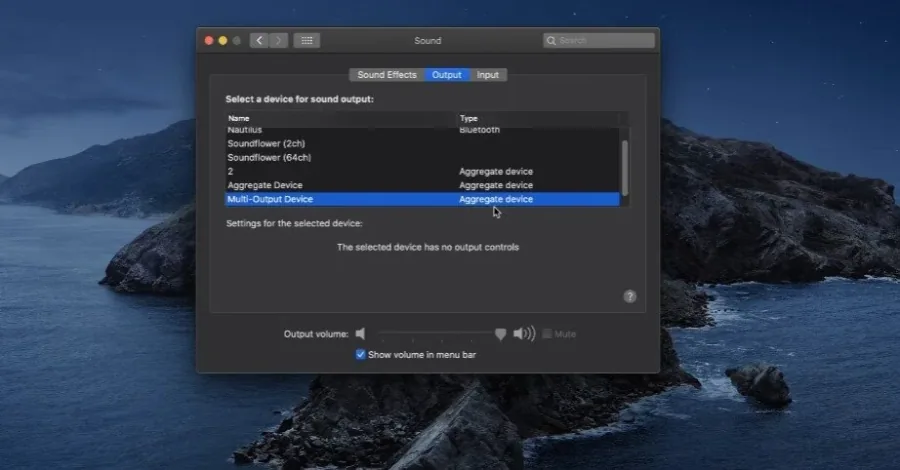
Adjust the macOS Sound Settings
Close the Audio Devices window and open up your system preferences. On the window, select Sound, and in the output section, you can choose the multi-output device. This will enable you to listen to the output sound and record with OBS Studio.
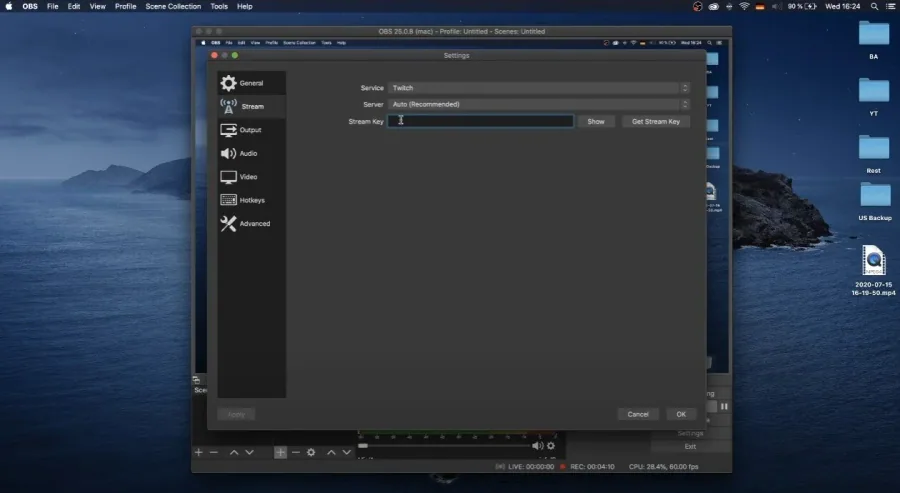
Adjust the OBS Studio Settings
In the Stream section of your OBS Studio settings, select your Streaming Service. Set the Server Region to automatic, and enter your Stream Key in the dialogue box.
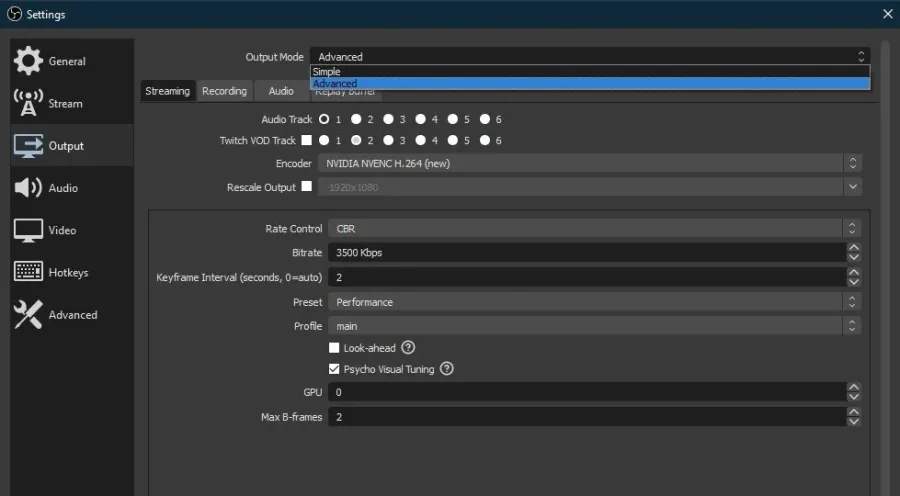
OBS Studio Output Settings
Navigate to your OBS Studio settings which need to be optimized to your network connection and available resources. On this window, navigate to the Output tab and set the output mode to Advanced. If you get the option to use a hardware encoder, for example, when you’re using an AMD Radeon Pro GPU on a Macbook Pro, then you can try using the Apple VT hardware encoder. If not, select x264, which will utilize your CPU rather than your graphics processor. If you’re unsure about which encoder to use, open up your task manager by right-clicking your taskbar and selecting it. You should see the workload on your CPU and GPU in the Performance tab. Don’t forget to account for any programs running on your system while streaming or recording, such as graphics-intensive games or memory-eating programs such as Chrome or Adobe applications.
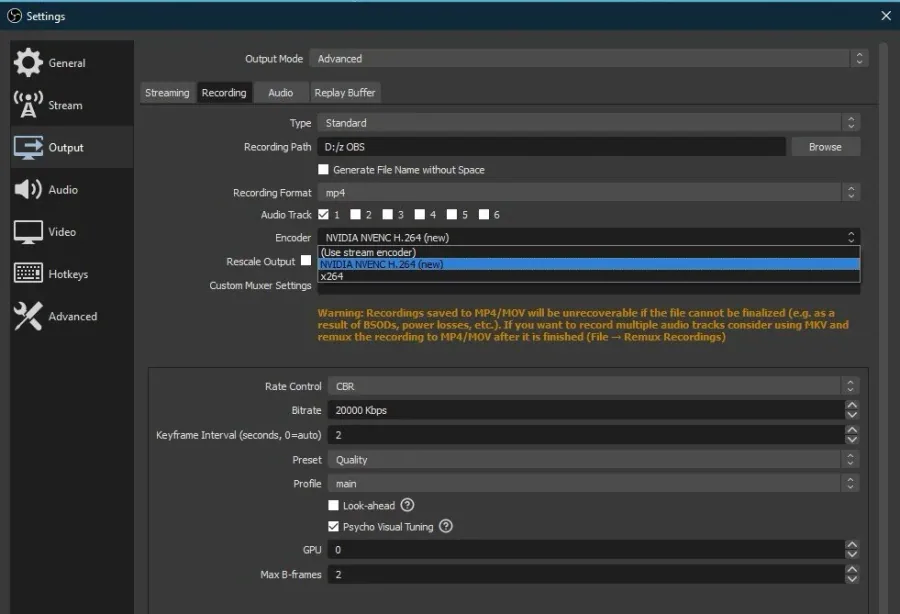
OBS Studio Recording Settings
In the Recording section, we suggest setting the recording path to an SSD if you have enough storage. Otherwise, choose a folder in your HDD storage. We like to use .mp4 as the recording format, which keeps the file size low and allows you to import it into any video editing software. Again, set the encoder to NVIDIA NVENC if you have a powerful enough NVIDIA graphics card, otherwise, set it to x264. Set your rate control to CBR, and your bitrate to around 10’000. I am using 20’000, inflating the file size to 20 Mb per recorded second to get even more detail in my videos. This setting will not depend on your network connection but rather on how much available storage you have left. Below, set the keyframe interval to 2 seconds, preset to quality, profile to main and max B-frames to 2. Don’t forget to apply your changes.
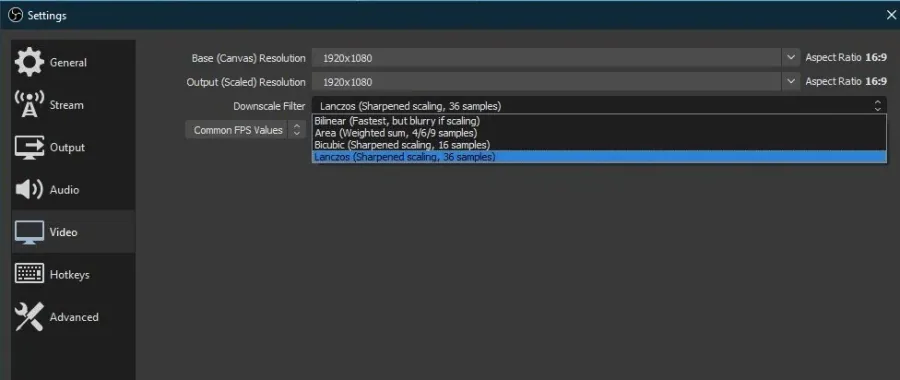
OBS Studio Video Settings
In the video tab, set the Base Resolution to your native monitor resolution. We will have to rescale the base resolution as we use a very unusual native monitor resolution. That’s why it’s set to 1920 x 1080. The output, or scaled resolution, should be in a 16:9 aspect ratio, which is best for streaming or recording. That’s why most people stream in 1080, 936, or 720p. If you experience stuttering or network lag while streaming, we suggest setting the output resolution to 720p before applying the next tweaks. This option will also come down to personal preference and the type of content you wish to stream or record. If you have no clue what to choose, make a test stream to see what works best for you and your viewers. Lastly, set the downscale filter to bicubic or bilinear when streaming and to Lanczos when recording to get a sharped image.
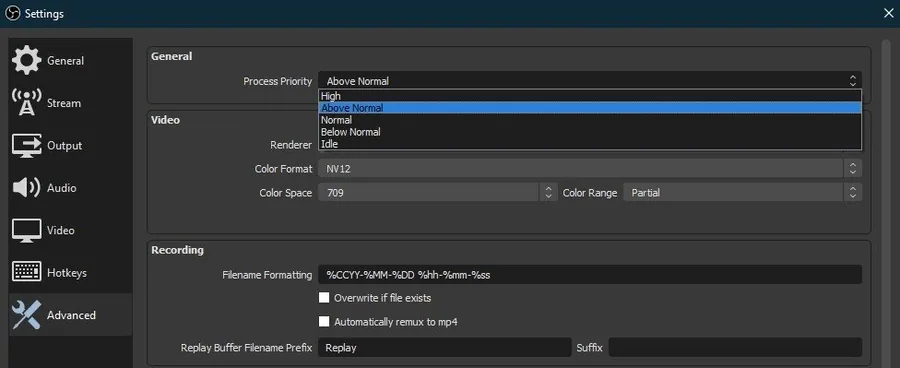
OBS Studio Advanced Settings
In the Advanced tab, set the process priority to above normal, and you should be done with tweaking your OBS Studio settings.
How To Improve your Network Connection
The next step would be to improve your network connection for a more reliable stream and some additional tweaks to improve your system’s performance when streaming or recording. To improve your network connection, use an ethernet cable which will make sure to have a more reliable experience when streaming. You should also restart your router or modem if you haven’t done this in a while to reduce the number of devices using the same network connection to reduce the risk of random downloads bottlenecking your connection. Exit out of programs that you don’t need when recording or streaming. This could be your browser running in the background, Steam or Skype. These programs still need some resources and can even use up your network connection.

OBS Studio Streaming Alerts
If you wish to add any alerts to your stream, such as a subscriber or donation alert, visit this page. Log in with your preferred platform, and follow the guide to add everything you need to your stream on OBS Studio.
Video walkthrough
If it does not work
- If the current interface differs, compare it with the recorded video walkthrough.