
Windows 11 · Windows
Fix the ‘Class Not Registered’ Error in Windows 11
Source-checked About 10 minutes
Answer
“Class not registered” does not identify one universal fault. Note the app, file type, or link that triggers it; repair that app first, correct its default association if relevant, and use DISM followed by SFC only when several Windows components are affected. Do not download DLL or registry files from repair sites.
Record what triggers the message
Close the message and repeat the same action once. Write down the app name, the filename and extension or link type, and the exact error text. If only one app or file type fails, keep every repair limited to it.
Repair the affected app
Open Start > Settings > Apps > Installed apps. Select More (…) beside the affected app, open Advanced options, and choose Repair. If Advanced options is absent, open Control Panel > Programs > Programs and Features, select the program, and choose Repair or Change when offered. Test the original action before considering Reset, which can remove the app's data and settings.
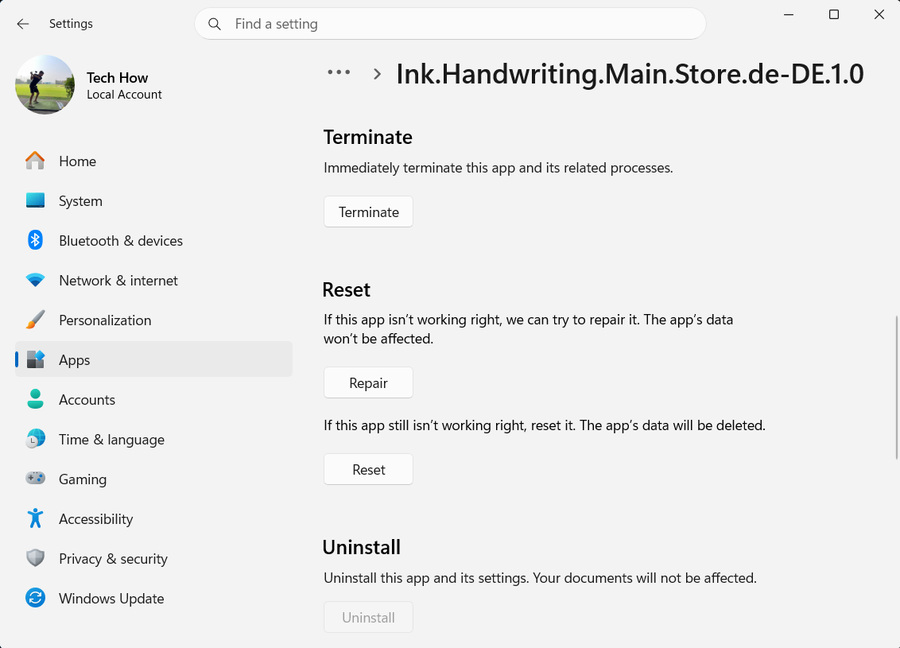
Correct only the affected association
If the error appears when you open a file or link, go to Settings > Apps > Default apps. Search for the exact extension, such as .jpg, or the affected link protocol. Select the result and choose the intended installed app. Do not reset every default app for one broken association.
Reinstall only if repair is unavailable
Back up app-local projects or data and confirm that you can sign in or restore the license. Uninstall only the affected app from Settings > Apps > Installed apps, then reinstall it from Microsoft Store or the original publisher. Restart only if its installer requests it.
Repair Windows only for wider failures
Use this branch only if several unrelated apps or Windows components fail. Install Windows updates and restart if requested. Search for Command Prompt, choose Run as administrator, and approve the prompt. Run `DISM.exe /Online /Cleanup-image /Restorehealth`; wait for “The operation completed successfully,” then run `sfc /scannow` and wait for 100%.
Verify the original action
Repeat the exact app, file, or link action recorded in Step 1. The repair is successful only when that same action completes without the “Class not registered” message; a successful DISM or SFC scan alone is not proof.
Video walkthrough
If it does not work
- If Advanced options is missing, use Control Panel's Repair or Change command when available, or reinstall from the original publisher.
- If SFC reports no integrity violations but one app still fails, stop repairing Windows and return to that app's repair, association, or reinstall path.
- If DISM cannot obtain source files, stop instead of adding registry entries or downloaded DLLs; use Microsoft's documented repair-source guidance or contact Microsoft Support.
- If Explorer, Settings, and several built-in apps all fail, record the Windows build and the exact DISM and SFC results before contacting Microsoft Support.
Sources and verification
Checked against official documentation on . Scope: Windows.
Follow the linked first-party guidance if labels differ after a platform update.