Gaming · Platform not recorded
How To Fix BlueStacks Error 2004 “Something Went Wrong, Installation Failed”
Original source date
Answer
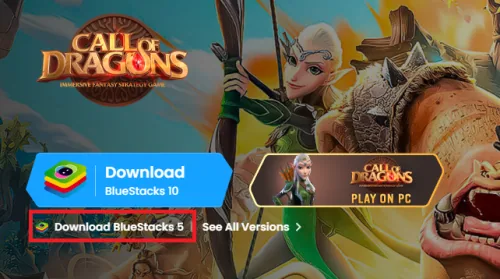
The BlueStacks error 2004 often stems from several potential issues including inadequate user permissions, lack of storage space, missing essential drivers, or even corrupted Windows files. Let's get started on addressing these problems: Validate your BlueStacks version: Firstly, you'll need to ascertain that you're installing the appropriate version of BlueStacks. Click here to navigate directly to the official download page.; Downloading BlueStacks 5 Installer: After you're on the page, proceed to download the latest BlueStacks 5 installer. This updated version offers improved speed and performance, making it a preferred choice among users.; Installation: Once the download concludes, locate the downloaded files using your browser's built-in file locator. Then, double-click on the installer which will initiate the installation of BlueStacks on your device. By ensuring that you are installing the correct version of BlueStacks, you're one step closer to solving the Error 2004 issue.
Reinstall BlueStacks
The BlueStacks error 2004 often stems from several potential issues including inadequate user permissions, lack of storage space, missing essential drivers, or even corrupted Windows files. Let's get started on addressing these problems: Validate your BlueStacks version: Firstly, you'll need to ascertain that you're installing the appropriate version of BlueStacks. Click here to navigate directly to the official download page.; Downloading BlueStacks 5 Installer: After you're on the page, proceed to download the latest BlueStacks 5 installer. This updated version offers improved speed and performance, making it a preferred choice among users.; Installation: Once the download concludes, locate the downloaded files using your browser's built-in file locator. Then, double-click on the installer which will initiate the installation of BlueStacks on your device. By ensuring that you are installing the correct version of BlueStacks, you're one step closer to solving the Error 2004 issue.
Clearing Disk Space for Smooth BlueStacks Operation
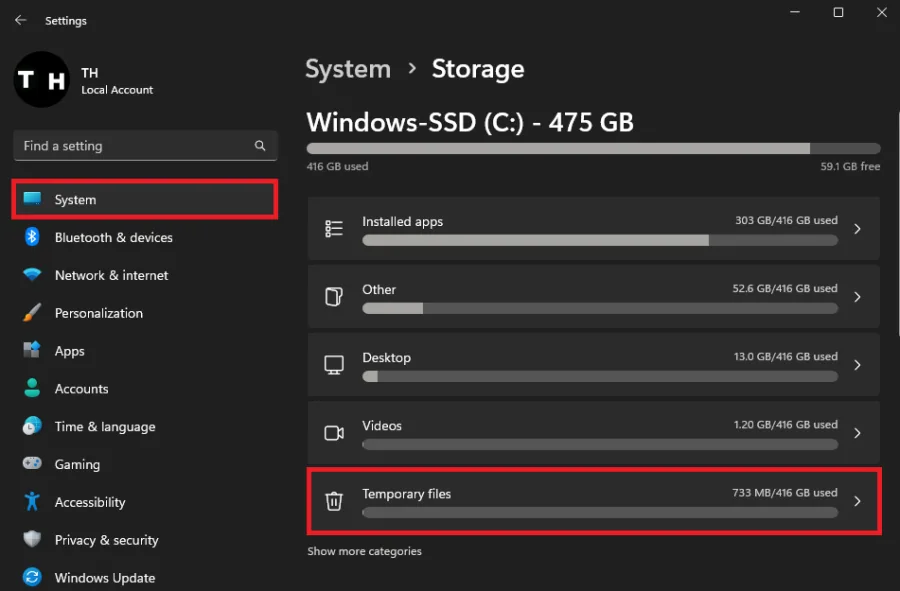
A lack of sufficient disk space can often trigger the BlueStacks Error 2004. To mitigate this, it's advisable to review your storage availability: Check Storage: Navigate to your Windows settings and select "System." Then, proceed to "Storage" to assess your current disk space.; Cleanup: You may notice that your available storage is insufficient. To rectify this, consider removing unneeded programs or deleting temporary files. Navigate to "Temporary Files" and proceed to eliminate Windows Update Cleanup files, Temporary Files, and content within your recycle bin.; Minimum Requirement: Ensure that you have at least 5GB of free space - the recommended amount for optimal BlueStacks operation.
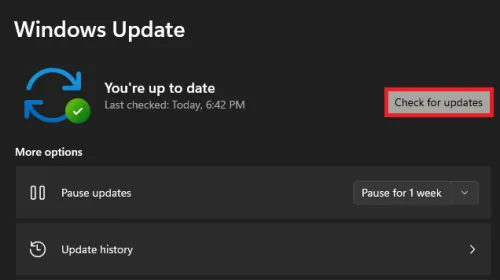
Windows Update: As a subsequent step, navigate to your Windows Update settings
Windows Update: As a subsequent step, navigate to your Windows Update settings. Click on "Check for Updates," and proceed to download and install any available updates. This step is crucial, as some BlueStacks features might require the latest Windows components to function properly. With a tidied up storage and the latest Windows updates installed, your system should now be primed to launch BlueStacks without a hitch.
Optimizing BlueStacks Compatibility Settings
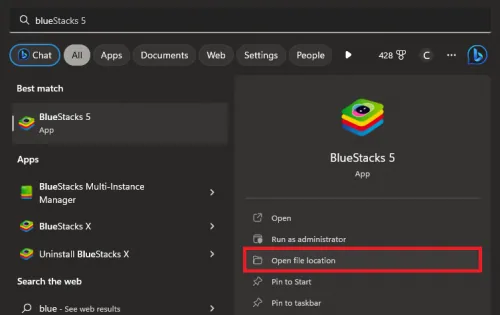
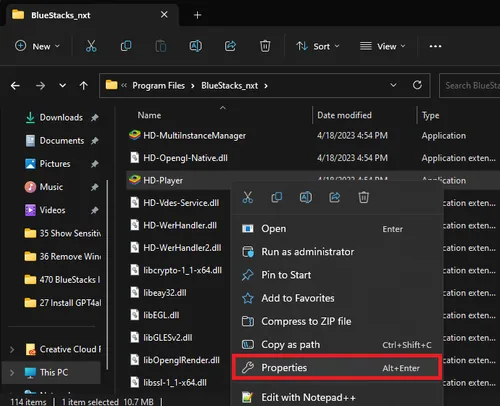
Should the problem persist, you might need to adjust the compatibility settings of BlueStacks. Here's how to do so: Locate BlueStacks: Use your start menu search bar to find 'BlueStacks'. Once you find it, right-click and choose "Open File Location".
Access File Explorer: Your file explorer will then display the contents of the Bl…
Access File Explorer: Your file explorer will then display the contents of the BlueStacks folder. Here, you need to right-click on the BlueStacks shortcut and select “Open File Location” again.; Adjust Application Properties: Now, locate the HD-Player.exe application, right-click on it to open its properties.
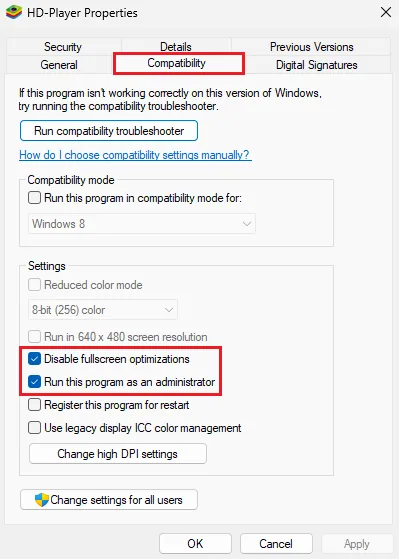
Compatibility Changes: Within the "Compatibility" tab, ensure you enable both the…
Compatibility Changes: Within the "Compatibility" tab, ensure you enable both the "Disable Fullscreen Optimizations" and the "Run this program as an administrator" options. Don't forget to click "Apply" to save your changes. These tweaks optimize the BlueStacks settings, increasing the chances of successful operation without encountering the Error 2004.
Execute the System File Checker Utility
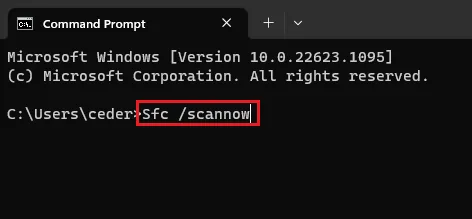
If the BlueStacks error continues, executing the System File Checker (SFC) tool could be a solution. Here's how to go about it: Access Command Prompt: Utilize your start menu search bar to locate 'CMD' and open your Command Prompt window.; Run SFC Command: Type in Sfc /scannow and press enter. This command prompts the tool to initiate a thorough scan of your system files.; Fix Corrupted Files: The SFC utility will now identify and repair any corrupted system files it finds, substituting them with a cached copy stored in a compressed folder in Windows. After the scan and repair, you should be able to launch BlueStacks without encountering the 'installation failed' error, enhancing your PC's smooth performance.
Video walkthrough
If it does not work
- What causes the BlueStacks error 2004 during installation?. The BlueStacks error 2004 can occur due to various reasons, including insufficient permissions on your account, lack of disk space, missing drivers, or corrupted Windows files.
- How can I make sure that I'm installing the correct version of BlueStacks?. You can ensure this by visiting the official BlueStacks download page and downloading the latest BlueStacks 5 installer.
- What can I do if I suspect that insufficient disk space is causing the BlueStacks error?. If disk space is an issue, try to free up some storage by uninstalling unnecessary programs or deleting temporary files from your PC. Ensure that you have at least 5GB of disk space before trying to install BlueStacks again.
- How can adjusting the BlueStacks compatibility options help solve the error?. Adjusting compatibility options like 'Disable Fullscreen Optimizations' and running the program as an administrator could help avoid potential conflicts that might cause the error.
- What is the System File Checker tool and how can it help?. The System File Checker (SFC) tool scans and repairs corrupted system files in Windows. Running this tool can help resolve the BlueStacks error by fixing any corrupted system files.